1. Introduction
Thank you for choosing the Ideal Standard Ceraplan III Washbasin Mixer Tap, model B0700AA. This single-lever washbasin mixer tap is designed for optimal performance and durability in your bathroom. It features a chrome finish, a rigid cast spout, and an integrated pop-up waste set. This manual provides essential information for the safe installation, operation, and maintenance of your new tap.
2. Safety Information
- Always turn off the main water supply before beginning any installation or maintenance work.
- Ensure all connections are secure to prevent leaks.
- If you are unsure about any part of the installation process, consult a qualified plumber.
- Do not use abrasive cleaners or harsh chemicals on the chrome finish, as this may damage the surface.
- Keep small parts out of reach of children.
3. Package Contents
Please check that all components are present before starting installation:
- Ideal Standard Ceraplan III Washbasin Mixer Tap (Model B0700AA)
- Flexible connection hoses (G3/8)
- Pop-up waste set (G1 1/4)
- Mounting hardware (EASY FIX system with centering seal)

Figure 1: Ideal Standard Ceraplan III Washbasin Mixer Tap (Model B0700AA) installed on a white ceramic basin.
4. Setup and Installation
This section outlines the general steps for installing your washbasin mixer tap. Professional installation is recommended.
4.1 Pre-Installation Checks
- Ensure the washbasin has a single tap hole with a diameter of approximately 35 mm.
- Verify that the maximum thickness of the mounting surface (deck) does not exceed 30 mm.
- Confirm that hot and cold water supply lines are available and accessible.
4.2 Installation Steps
- Prepare the Tap: Attach the flexible connection hoses (G3/8) to the tap body. Ensure they are hand-tightened, then gently tighten with a wrench.
- Mount the Tap: Insert the tap body through the tap hole in the washbasin. From underneath the basin, secure the tap using the EASY FIX bottom fixing system and centering seal. Ensure the tap is aligned correctly before fully tightening.
- Connect Water Supply: Connect the flexible hoses to the hot and cold water supply valves. The hoses are typically color-coded (red for hot, blue for cold) or marked. Ensure a watertight seal.
- Install Pop-Up Waste: Assemble and install the G1 1/4 pop-up waste set into the basin's drain hole according to its specific instructions. Connect the pop-up rod to the lever on the tap body.
- Test for Leaks: Slowly turn on the main water supply. Check all connections for leaks. Operate the tap to ensure proper water flow and temperature mixing.
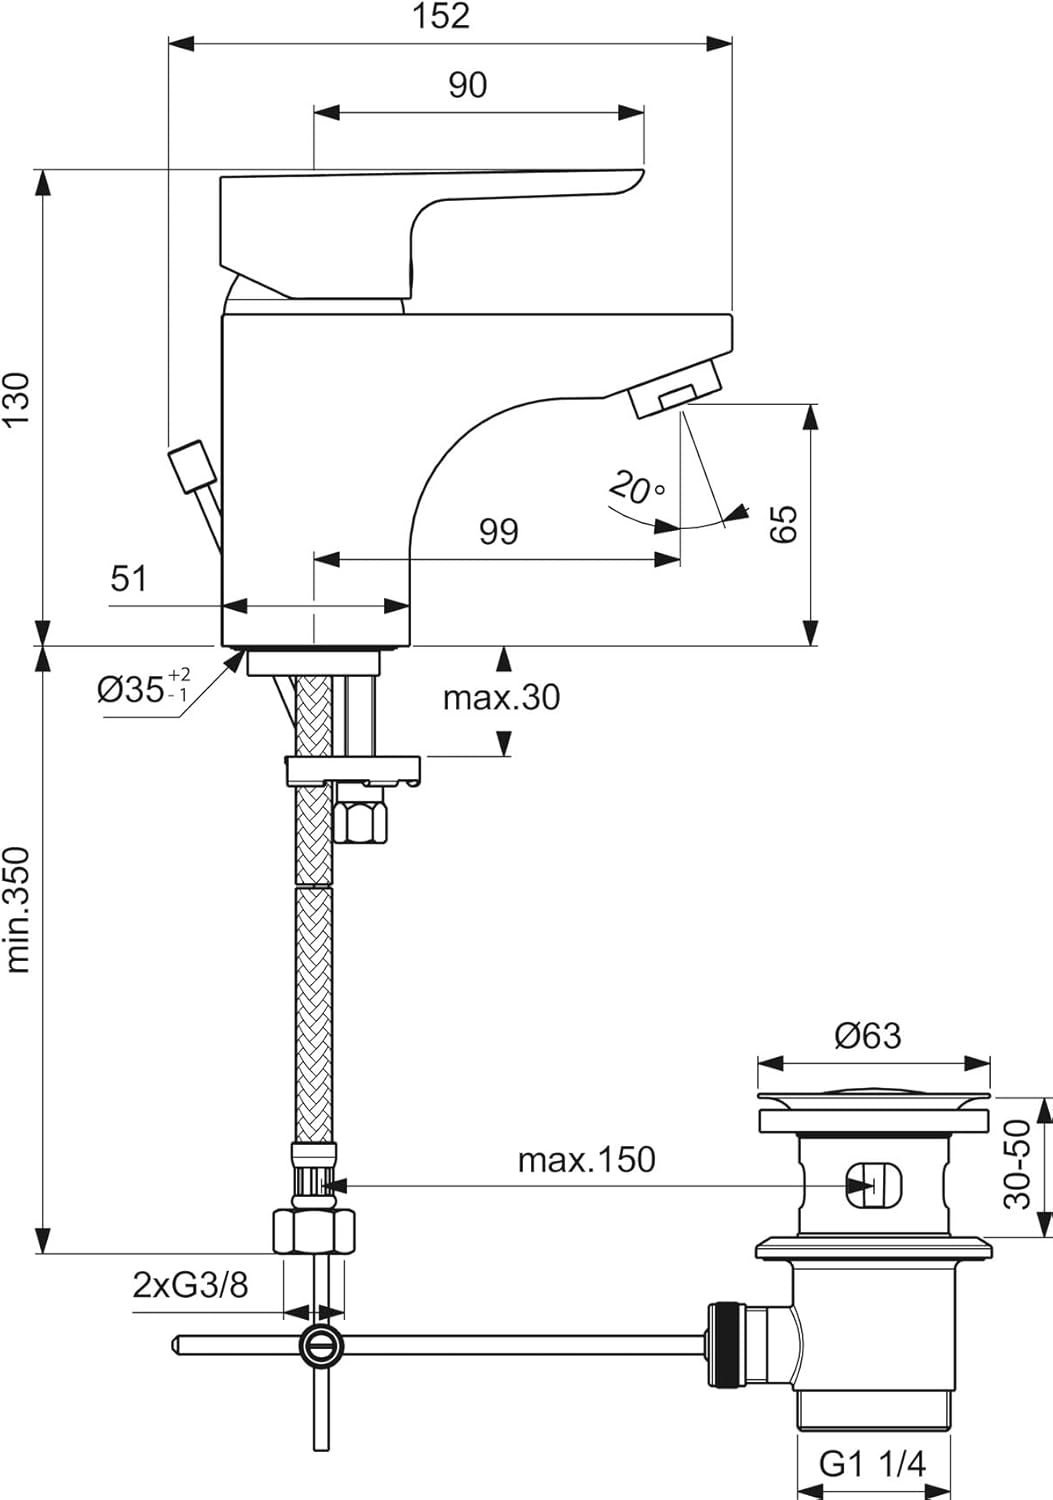
Figure 2: Technical drawing showing dimensions and connection points for installation.
5. Operating Instructions
The Ceraplan III washbasin mixer tap features a single lever for intuitive control of water flow and temperature.
- Water Flow Control: Lift the lever upwards to increase water flow. Push it downwards to reduce or stop the flow.
- Temperature Control: Move the lever to the left for hot water and to the right for cold water. The tap includes an integrated hot water temperature limiter for safety and energy efficiency.
- ECO Function: The tap is equipped with an ECO function (water-saving system) that provides a reduced flow rate for everyday use, helping to conserve water.
- Spout Swivel: The spout has a 90-degree swivel range, allowing for flexible use within the basin area.
- Pop-Up Waste Operation: Push or pull the small rod located at the back of the tap to open or close the basin's waste plug.

Figure 3: Close-up of the tap's single lever for flow and temperature control.
6. Maintenance
Regular maintenance will ensure the longevity and optimal performance of your tap.
- Cleaning the Finish: Clean the chrome surface regularly with a soft cloth and mild soap or a non-abrasive cleaner specifically designed for chrome. Rinse thoroughly with clean water and dry immediately to prevent water spots. Do not use abrasive pads, scouring agents, or cleaners containing alcohol, ammonia, or acids.
- Aerator Maintenance: Periodically unscrew the aerator at the end of the spout and clean any accumulated debris or limescale. This helps maintain consistent water flow.
- Cartridge: The tap features a 40 mm CLICK cartridge with durable ceramic discs and an integrated food-safe grease reservoir, designed for long-term, maintenance-free operation. If you experience persistent dripping or difficulty controlling temperature, the cartridge may need inspection or replacement by a qualified professional.
7. Troubleshooting
Before contacting customer service, please refer to the following common issues and solutions:
| Problem | Possible Cause | Solution |
|---|---|---|
| Low water flow | Clogged aerator; partially closed stopcock; debris in supply lines. | Clean the aerator. Ensure stopcocks are fully open. Flush supply lines if necessary (turn off main water first). |
| Water dripping from spout | Worn cartridge seals; debris in cartridge. | The cartridge may need to be inspected or replaced by a professional. |
| Difficulty adjusting temperature | Cartridge issue; hot/cold supply issues. | Check hot and cold water supply. If problem persists, cartridge may need inspection. |
| Leak at base of tap | Loose mounting nut; damaged seal. | Ensure mounting nut is tightened. Check and replace seals if damaged. |
8. Specifications
| Feature | Specification |
|---|---|
| Model Number | B0700AA |
| Brand | Ideal Standard |
| Series | Ceraplan III |
| Recommended Use | Basin |
| Mounting Type | Deck Mount (Single Hole) |
| Finish Type | Chrome |
| Material | Brass |
| Number of Handles | 1 (Single Lever) |
| Spout Design | Traditional Curve, Rigid Cast |
| Spout Reach | 99 mm |
| Spout Height | 66 mm |
| Cartridge Type | 40 mm CLICK-Kartusche with ceramic discs |
| Swivel Range | 90 Degrees |
| Maximum Flow Rate | 9 Liters Per Minute (with ECO function) |
| Special Features | Water-saving system (Wassersparsystem), Integrated hot water temperature limitation, Integrated grease reservoir |
| Included Components | Tap, Flexible Connection Hoses, Pop-up Waste Set |
| Product Dimensions (D x W x H) | 5.98" x 2.01" x 5.12" (152mm x 51mm x 130mm approx.) |
| Item Weight | 1.77 Kilograms (3.89 pounds) |
9. Warranty Information
For detailed warranty information regarding your Ideal Standard Ceraplan III Washbasin Mixer Tap, please refer to the documentation provided with your purchase or visit the official Ideal Standard website. Warranty terms and conditions may vary by region.
10. Support and Contact
If you require further assistance, have questions not covered in this manual, or need to report a product issue, please contact Ideal Standard customer service. Contact details can typically be found on the official Ideal Standard website or on your purchase receipt.
Website: www.idealstandard.com


