
WSDCAM 4331021195
WSDCAM Door Alarm Wireless Anti-Theft Remote Control Door and Window Security Alarms User Manual
Model: 4331021195
1. Introduction
The WSDCAM Door Alarm is a wireless anti-theft security device designed to protect your home or property. This system features a loud 105 dB alarm sound to deter intruders and alert occupants. It is suitable for various entry points such as doors and windows. The system is controlled by a remote, offering Arm, Disarm, Panic, and Doorbell modes. Its low-consumption design ensures long battery life, typically working for at least a year.

Figure 1: WSDCAM Door Alarm System components.
2. Package Contents
Please verify that all items are present in your package:
- 1 x Door Alarm Unit
- 1 x Magnet Sensor
- 1 x Remote Control
- 3 x Adhesive Tapes
- 1 x User Manual (this document)
3. Product Overview and Components
Familiarize yourself with the main components of your WSDCAM Door Alarm system:
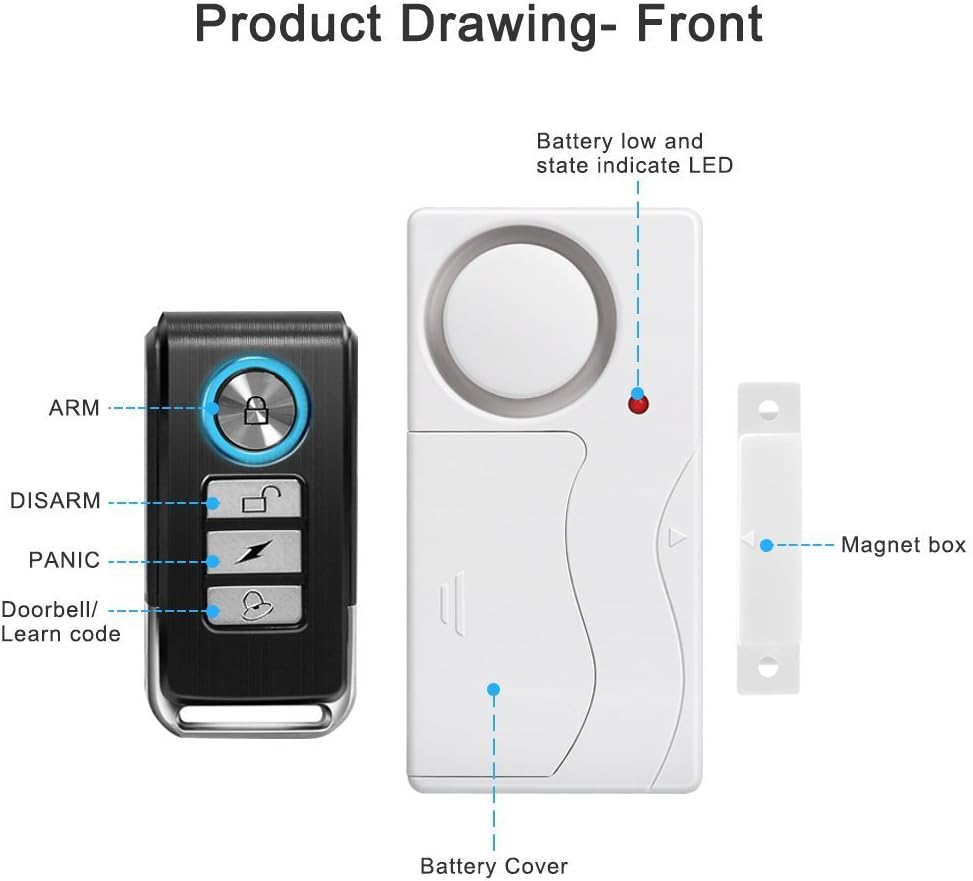
Figure 2: Front view and labeled components of the WSDCAM Door Alarm.
- Alarm Unit: The main device that emits the alarm sound. It features a siren, a battery low/state indicator LED, and a battery cover.
- Magnet Sensor: A smaller component that works in conjunction with the alarm unit. When separated from the alarm unit, it triggers the alarm.
- Remote Control: Used to control the alarm unit wirelessly. It has buttons for Arm, Disarm, Panic, and Doorbell/Learn code functions.
4. Specifications
| Feature | Specification |
|---|---|
| Alarm Unit Battery | 2 x AAA Alkaline batteries (not included) |
| Remote Control Battery | 1 x 12V/27A Alkaline battery (included) |
| Noise Level | 105 dB |
| Control Method | Remote Control |
| Product Dimensions (Alarm) | 3.35 x 1.57 x 0.59 inches (8.5 x 4.0 x 1.5 cm) |
| Product Dimensions (Remote) | 2.48 x 1.18 inches (6.3 x 3.0 cm) |
| Product Dimensions (Magnet Box) | 1.77 x 0.47 inches (4.5 x 1.2 cm) |
| Wireless Control Range | Up to 49 ft (15 meters) |
| Mounting Type | Adhesive (Peel and Stick) |
| Model Number | 4331021195 |
| UPC | 706693542178 |
5. Setup
5.1 Battery Installation
- Alarm Unit: Open the battery cover on the back of the alarm unit. Insert two (2) AAA alkaline batteries, ensuring correct polarity. Close the battery cover securely.
- Remote Control: The remote control comes with a 12V/27A alkaline battery pre-installed. If replacement is needed, refer to the remote's specific instructions for battery compartment access.
5.2 Installation
The WSDCAM Door Alarm is designed for simple peel-and-stick installation on doors or windows.
- Choose Location: Identify a clean, dry, and flat surface on your door or window frame where the alarm unit and magnet sensor can be mounted.
- Positioning: The alarm unit and the magnet sensor must be aligned with each other. For optimal performance, ensure the distance between the alarm unit and the magnet sensor is less than 10mm when the door/window is closed. An alignment arrow on the alarm unit indicates the correct side for the magnet sensor.
- Apply Adhesive: Peel off the protective backing from one side of the adhesive tape and apply it firmly to the back of the alarm unit. Repeat for the magnet sensor.
- Mounting: Peel off the remaining backing from the adhesive tapes. Press the alarm unit firmly onto the chosen surface. Then, align and press the magnet sensor onto the adjacent surface (door/window frame) ensuring the <10mm gap when closed.

Figure 3: Proper alignment and distance for installation.

Figure 4: Installation examples for various door and window types.
6. Operating Instructions
6.1 Remote Control Functions
The remote control allows you to manage the alarm's functions from a distance of up to 49 feet (15 meters).
- Arm Button (Locked Padlock Icon): Press to arm the alarm. The alarm unit will emit a confirmation sound, and the LED will flash. In this mode, opening the protected door/window will trigger the 105 dB alarm.
- Disarm Button (Unlocked Padlock Icon): Press to disarm the alarm. The alarm unit will emit a confirmation sound, and the LED will turn off. The alarm will not trigger if the door/window is opened.
- Panic Button (Lightning Bolt Icon): Press this button to immediately trigger the 105 dB alarm, regardless of the arm/disarm status. This is useful for emergency situations.
- Doorbell/Learn Code Button (Bell Icon): In disarmed mode, pressing this button will set the alarm unit to doorbell mode. When the protected door/window is opened, the alarm unit will emit a chime sound instead of a siren. This button is also used for pairing new remotes or alarms (see section 6.2).

Figure 5: Remote control range and functionality.

Figure 6: The 105 dB alarm in action.
6.2 Pairing Additional Remotes or Alarms
The WSDCAM Door Alarm system allows for flexible expansion. One alarm unit can be paired with up to 8 remote controls, and one remote control can be paired with up to 50 alarm units.

Figure 7: DIY Pairing capabilities.
To pair a remote control to an alarm unit (or multiple units):
- If you have other alarm units already paired with the remote, temporarily remove one battery from each of those alarms. This prevents them from being deprogrammed during the process.
- For the new alarm unit you wish to pair, insert only one AAA battery.
- Press and hold the Doorbell/Learn Code button (Bell Icon) on the remote control.
- While still holding the Doorbell/Learn Code button, insert the second AAA battery into the alarm unit. The alarm will beep once. Continue holding the Doorbell/Learn Code button until the alarm beeps one more time (this may take a few seconds).
- Release the Doorbell/Learn Code button and then immediately press the Disarm button (Unlocked Padlock Icon) on the remote. The alarm will beep again.
- Test the pairing by pressing the Arm button (Locked Padlock Icon) on the remote. The alarm unit should arm. Then, separate the alarm unit from its magnet sensor; the alarm should sound. Press Disarm to silence it.
- Reinsert all batteries into any other alarm units that were temporarily disconnected.
- Test all alarm units by pressing the Arm button on the remote. All paired alarms should arm.
For a visual demonstration of the alarm's functionality, please watch the official product video:
Video 1: How WSDCAM Door Alarm Works. This video demonstrates the alarm's activation and sound when a door or window is opened.
7. Maintenance
7.1 Battery Replacement
Replace batteries when the alarm unit's LED indicator shows a low battery state (e.g., dimming or specific flash pattern, refer to Figure 2). For the alarm unit, use 2 new AAA alkaline batteries. For the remote control, use a new 12V/27A alkaline battery.
7.2 Cleaning
Wipe the alarm unit and magnet sensor with a soft, dry cloth. Do not use abrasive cleaners or solvents, as these can damage the device.
8. Troubleshooting
- Alarm not sounding when door/window opens:
- Ensure the alarm is in Arm mode (check remote control status).
- Check battery levels in the alarm unit and remote control. Replace if low.
- Verify that the alarm unit and magnet sensor are correctly aligned and the gap is less than 10mm when the door/window is closed.
- If the alarm unit was recently paired, re-check the pairing steps in Section 6.2.
- Remote control not working:
- Check the remote control battery. Replace if necessary.
- Ensure you are within the effective wireless range (up to 49 ft).
- Re-pair the remote control with the alarm unit following the steps in Section 6.2.
- Alarm sounds unexpectedly (false alarms):
- Check the alignment and stability of the alarm unit and magnet sensor. Ensure they are not shifting or vibrating, causing momentary separation.
- Verify that the gap between the alarm unit and magnet sensor does not exceed 10mm due to door/window movement or settling.
9. Warranty and Support
For warranty information or technical support, please refer to the product packaging or contact WSDCAM customer service directly. Contact details can typically be found on the manufacturer's official website or through your point of purchase.
Related documents4331021195


Ask a question about this manual
Ask about setup, troubleshooting, compatibility, parts, safety, or missing instructions. Manuals+ will review the question and use this page’s manual context to help answer it.