
Gentex 50-GENK2AM
Contents
Gentex 50-GENK2AM Auto-Dimming Rear View Mirror User Manual
Model: 50-GENK2AM | Brand: Gentex
Introduction
The Gentex 50-GENK2AM Auto-Dimming Rear View Mirror is designed to enhance nighttime driving safety by automatically reducing glare from the headlights of vehicles approaching from behind. Utilizing advanced sensor technology, the mirror detects offending light and adjusts its tint to eliminate dangerous glare, thereby reducing eyestrain and driver fatigue. This manual provides comprehensive instructions for the installation, operation, and maintenance of your new auto-dimming mirror.
Safety Information
- Always disconnect the vehicle's battery before beginning any electrical installation to prevent electrical shock or damage to the vehicle's electrical system.
- Ensure all wiring connections are secure and properly insulated to prevent short circuits.
- Mount the mirror securely to the windshield according to the instructions to prevent it from dislodging during vehicle operation.
- Do not obstruct the light sensors on the mirror, as this will impair its auto-dimming functionality.
- If you are unsure about any part of the installation process, consult a qualified automotive technician.
Package Contents
Verify that all components are present before beginning installation:
- Gentex 50-GENK2AM Auto-Dimming Rear View Mirror
- Wiring Harness
- Installation Instructions (detailed in this manual)
- Necessary Hardware (as supplied by manufacturer)
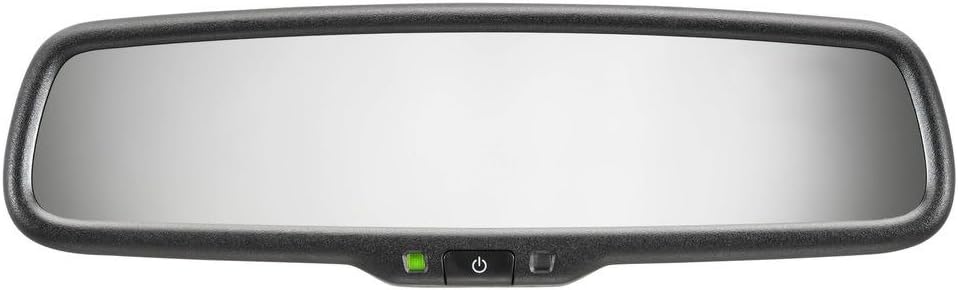
Figure 1: Front view of the Gentex 50-GENK2AM Auto-Dimming Rear View Mirror. The mirror features a sleek black frame, a reflective surface, and a control panel at the bottom center. This panel includes a small green indicator light on the left, a power button with a circular icon, and another button to its right, likely for adjusting the auto-dimming feature or other settings. This image illustrates the primary components visible to the driver.
Setup and Installation
The Gentex 50-GENK2AM mirror is designed for windshield mounting and requires electrical wiring. Professional installation is recommended, but experienced do-it-yourselfers can follow these general guidelines. Refer to your vehicle's specific wiring diagrams if necessary.
Tools Required:
- Wire strippers/crimpers
- Multimeter (for identifying power sources)
- Screwdrivers (Phillips and flathead)
- Electrical tape or heat shrink tubing
- Fuse tap (optional, for clean power connection)
Installation Steps:
- Disconnect Battery: Before starting, disconnect the negative terminal of your vehicle's battery.
- Remove Existing Mirror: Carefully remove your vehicle's existing rear view mirror. The method varies by vehicle; typically, it involves prying or unscrewing from the windshield mount.
- Mount New Mirror: Attach the Gentex 50-GENK2AM mirror to the windshield mount. Ensure it is securely fastened and does not wobble.
- Route Wiring: Route the included wiring harness from the mirror location along the headliner and down the A-pillar to an accessible power source, such as the fuse box. Use trim removal tools to tuck wires neatly and avoid obstructing airbags.
- Identify Power Source: Using a multimeter, identify a switched 12V power source (one that is only active when the ignition is on) and a reliable ground point. Many users opt for a fuse tap in the vehicle's fuse box for a clean installation.
- Connect Wiring: Connect the mirror's power wire (typically red) to the identified 12V switched power source and the ground wire (typically black) to a chassis ground point. Ensure all connections are crimped securely and insulated.
- Reconnect Battery: Once all wiring is complete and secure, reconnect the vehicle's battery.
- Test Functionality: Turn on the vehicle's ignition and verify that the mirror powers on and the auto-dimming feature functions correctly (see Operating section).
Operating Instructions
The Gentex 50-GENK2AM Auto-Dimming Rear View Mirror operates automatically once powered. It features light sensors that detect ambient light and glare from behind the vehicle.
- Automatic Dimming: The mirror is equipped with intelligent circuitry that continuously monitors light levels. When bright light (e.g., headlights from following vehicles) is detected, the mirror will automatically dim to reduce glare. The brighter the glare, the more the mirror will dim.
- Indicator Light: A small green indicator light (as shown in Figure 1) on the mirror's bezel typically indicates that the auto-dimming function is active.
- Power Button: The mirror usually includes a power button (often marked with a universal power symbol) that allows you to manually turn the auto-dimming feature on or off. Pressing this button will toggle the function. When the feature is off, the mirror will remain in its undimmed state.
- Forward-Facing Sensor: A sensor on the front of the mirror detects ambient light. During daylight hours or in well-lit conditions, the mirror will not dim.
- Rear-Facing Sensor: A sensor on the back of the mirror detects light from behind the vehicle. This sensor triggers the dimming action.
Ensure both sensors are clear of obstructions (e.g., stickers, dirt) for optimal performance.
Maintenance
To ensure the longevity and optimal performance of your Gentex auto-dimming mirror, follow these simple maintenance guidelines:
- Cleaning: Clean the mirror surface and sensors with a soft, lint-free cloth and a non-abrasive glass cleaner. Do not spray cleaner directly onto the mirror; instead, apply it to the cloth first. Avoid using harsh chemicals or abrasive materials that could scratch the surface or damage the sensors.
- Sensor Obstruction: Periodically check that the light sensors on both the front and back of the mirror are free from dust, dirt, or any obstructions (e.g., air fresheners, toll passes, stickers) that could interfere with its automatic dimming function.
- Wiring Inspection: Occasionally inspect the visible wiring for any signs of wear, fraying, or loose connections. Address any issues promptly to prevent electrical problems.
Troubleshooting
If you experience issues with your Gentex 50-GENK2AM Auto-Dimming Rear View Mirror, refer to the following common problems and solutions:
| Problem | Possible Cause | Solution |
|---|---|---|
| Mirror does not dim. |
|
|
| Mirror dims too much or not enough. |
|
|
| Mirror has no power (indicator light off). |
|
|
If the problem persists after attempting these solutions, please contact Gentex customer support.
Specifications
| Model Number | 50-GENK2AM |
| Brand | Gentex |
| Type | Auto-Dimming Rear View Mirror |
| Mounting Type | Windshield Mount |
| Color | Black |
| Dimensions (L x W x H) | 12 x 6.5 x 4.75 inches (approximate) |
| Item Weight | 1.39 pounds (approximate) |
| Special Features | Automatic Glare Elimination, Reduced Eyestrain, Integrated Light Sensors |
| Automotive Fit Type | Universal Fit |
Warranty and Support
Gentex products are manufactured to high quality standards. For specific warranty information regarding your 50-GENK2AM Auto-Dimming Rear View Mirror, please refer to the warranty card included with your product or visit the official Gentex website. Keep your proof of purchase for warranty claims.
Customer Support:
If you require technical assistance, have questions about installation, or need to report a defect, please contact Gentex customer support through their official channels. Contact information can typically be found on their website or on the product packaging.
When contacting support, please have your product model number (50-GENK2AM) and purchase details ready.
Ask a question about this manual
Ask about setup, troubleshooting, compatibility, parts, safety, or missing instructions. Manuals+ will review the question and use this page’s manual context to help answer it.