

1. Introduction
Thank you for choosing the Renkforce E0111H Thermo-Hygrometer. This device is designed to provide accurate measurements of indoor temperature and humidity, helping you monitor your environment for optimal comfort and health. Its compact and portable design, along with a foldable stand, makes it suitable for various settings, including travel.
Key features include:
- Temperature and Humidity Display
- Min/Max Value Memory
- Comfort Level Indicator
- Alarm with Snooze Function
- Foldable Stand/Protective Cover
2. Safety Information
Please read and understand the following safety instructions before using the device:
- Keep the device away from water and high humidity to prevent damage.
- Avoid exposing the device to extreme temperatures (hot or cold) or direct sunlight.
- Do not attempt to disassemble or modify the device. This will void the warranty.
- Dispose of used batteries according to local regulations. Do not mix old and new batteries, or different types of batteries.
- Keep batteries out of reach of children.
- Clean the device with a soft, dry cloth. Do not use abrasive cleaners or solvents.
3. Package Contents
Please check the package contents upon unpacking:
- 1 x Renkforce E0111H Thermo-Hygrometer
- This User Manual
Note: Batteries are not included and must be purchased separately.
4. Device Overview
4.1 Front View

Figure 1: Front view of the Renkforce E0111H Thermo-Hygrometer. The display shows temperature, humidity, time, and comfort level indicators.
The front of the device features a clear LCD display that shows the current temperature, relative humidity, time, and comfort level icons. The foldable cover acts as a stand when open and protects the screen when closed.
4.2 Rear View and Controls
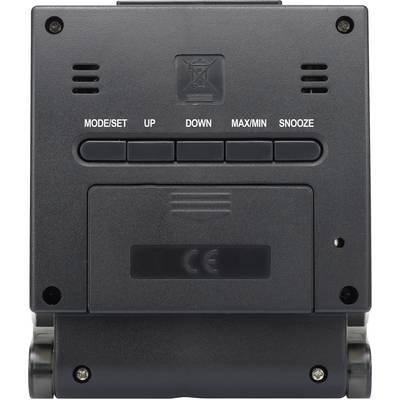
Figure 2: Rear view of the Renkforce E0111H Thermo-Hygrometer, highlighting the battery compartment and control buttons.
The rear of the device houses the battery compartment and the control buttons:
- MODE/SET: Used to switch between display modes (e.g., time, alarm) and to enter/confirm settings.
- UP: Used to increase values during settings or to toggle functions.
- DOWN: Used to decrease values during settings or to toggle functions.
- MAX/MIN: Used to view the maximum and minimum recorded temperature and humidity values.
- SNOOZE: Used to activate the snooze function when the alarm sounds.
5. Setup
5.1 Battery Installation
- Open the battery compartment cover located on the back of the device.
- Insert the required batteries (e.g., 2 x AAA, type not specified in product data, please check device for markings) according to the polarity (+/-) indicated inside the compartment.
- Close the battery compartment cover securely.
- The device will power on automatically and display current temperature, humidity, and default time.
Important: Ensure correct battery polarity. Remove batteries if the device will not be used for an extended period.
6. Operating Instructions
6.1 Setting Time and Date
- In normal time display mode, press and hold the MODE/SET button for a few seconds until the time display starts flashing.
- Use the UP or DOWN buttons to adjust the hour.
- Press MODE/SET again to confirm the hour and move to setting the minutes.
- Use the UP or DOWN buttons to adjust the minutes.
- Continue pressing MODE/SET to cycle through and set the year, month, and day using the UP or DOWN buttons.
- Press MODE/SET one last time to exit the setting mode.
6.2 Setting the Alarm
- From the normal time display, press the MODE/SET button once to switch to alarm display mode (usually indicated by an alarm icon).
- Press and hold the MODE/SET button until the alarm time starts flashing.
- Use the UP or DOWN buttons to set the desired alarm hour.
- Press MODE/SET to confirm the hour and move to setting the alarm minutes.
- Use the UP or DOWN buttons to set the desired alarm minutes.
- Press MODE/SET to confirm and exit alarm setting mode.
- To activate/deactivate the alarm, press the UP button while in alarm display mode. An alarm icon will appear/disappear on the display.
6.3 Using the Snooze Function
When the alarm sounds, press the SNOOZE button to temporarily silence the alarm. The alarm will sound again after a few minutes (typical snooze duration is 5-10 minutes, may vary). To turn off the alarm completely, press any other button.
6.4 Viewing Min/Max Values
Press the MAX/MIN button once to display the maximum recorded temperature and humidity since the last reset. Press it again to display the minimum recorded values. Press it a third time to return to current readings.
To reset the Min/Max values, press and hold the MAX/MIN button while the maximum or minimum values are displayed.
6.5 Temperature Unit Selection (°C/°F)
While in normal display mode, press the UP button to toggle between Celsius (°C) and Fahrenheit (°F) temperature units.
6.6 Comfort Level Indicator
The device displays icons to indicate the comfort level based on current temperature and humidity:
- :) (Smiling Face): Indicates a comfortable environment.
- :| (Neutral Face): Indicates a normal or slightly less comfortable environment.
- :( (Frowning Face): Indicates an uncomfortable environment (too dry, too humid, too hot, or too cold).
7. Maintenance
- Cleaning: Wipe the device with a soft, dry cloth. Do not use liquid cleaners or chemical agents.
- Battery Replacement: When the display becomes dim or the device stops functioning, replace the batteries with new ones. Follow the battery installation steps in Section 5.1.
- Storage: If not in use for a long period, remove the batteries and store the device in a cool, dry place away from direct sunlight.
8. Troubleshooting
| Problem | Possible Cause | Solution |
|---|---|---|
| No display or dim display | Batteries are dead or incorrectly installed. | Replace batteries with new ones, ensuring correct polarity. |
| Incorrect temperature/humidity readings | Device is placed near a heat source, vent, or in direct sunlight. Sensor is obstructed. | Relocate the device to a stable environment away from direct influences. Ensure sensors are clear. Allow time for readings to stabilize. |
| Buttons not responding | Low battery power. Device malfunction. | Replace batteries. If problem persists, contact customer support. |
9. Specifications
| Model: | E0111H |
| Brand: | Renkforce |
| Dimensions (L x W x H): | 17 x 9 x 1 cm (approximate) |
| Weight: | 120 Grams (approximate, without batteries) |
| Color: | Black |
| Mounting Type: | Table Mount (with foldable stand) |
| Power Source: | Batteries (type not specified, typically AAA) |
| Temperature Range: | Not specified (typical indoor range) |
| Humidity Range: | Not specified (typical indoor range) |
10. Warranty and Support
Renkforce products are manufactured to high-quality standards. For warranty information, please refer to the terms and conditions provided at the point of purchase or visit the official Renkforce website. If you encounter any issues or require technical assistance, please contact your retailer or Renkforce customer support.
Please retain your proof of purchase for warranty claims.