Introduction
This manual provides detailed instructions for the safe installation, operation, and maintenance of your Canarm CF15148351S Cf48 Ceiling Fan. Please read this manual thoroughly before beginning installation and retain it for future reference. This ceiling fan is designed to provide efficient air circulation and illumination for indoor spaces.
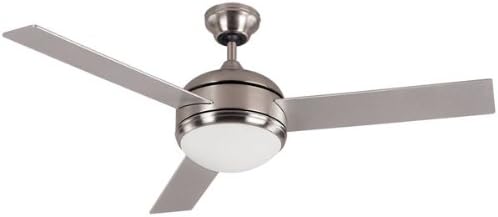
Figure 1: Canarm CF15148351S Cf48 Ceiling Fan, featuring a brushed pewter finish, three rectangular blades, and a central integrated light with a frosted white diffuser.
Safety Information
WARNING: To reduce the risk of fire, electric shock, or personal injury, always follow these safety guidelines:
- Disconnect power at the main circuit breaker or fuse box before installation or servicing.
- All wiring must be in accordance with national and local electrical codes. Consult a qualified electrician if you are unsure.
- The fan must be mounted to a structurally sound outlet box or support system capable of supporting a minimum of 35 lbs (15.9 kg).
- Ensure the installation site allows for a minimum clearance of 7 feet (2.1 meters) from the floor to the fan blades.
- Do not operate the fan with damaged wiring or components.
- Avoid placing objects in the path of the rotating blades.
- This product is intended for indoor use only.
Package Contents
Verify that all components are present before beginning installation. If any parts are missing or damaged, contact Canarm customer service.
- Motor Housing Assembly
- Fan Blades (5)
- Blade Brackets
- Downrod and Canopy Assembly
- Mounting Bracket
- Light Kit Assembly
- Remote Control and Receiver
- Hardware Pack (screws, washers, wire nuts)
- Instruction Manual
Setup and Installation
Follow these steps carefully for proper installation. Professional installation is recommended if you are not familiar with electrical wiring.
- Turn Off Power: Before starting, ensure the power supply to the outlet box is turned off at the circuit breaker.
- Install Mounting Bracket: Secure the mounting bracket to the ceiling outlet box using the screws provided. Ensure the bracket is firmly attached and can support the fan's weight.
- Assemble Downrod: Insert the downrod through the canopy and connect it to the motor housing. Secure with the provided pin and screw.
- Hang Fan Assembly: Carefully lift the fan assembly and hang it on the mounting bracket.
- Wire Connections: Connect the fan's electrical wires to the household wiring according to the wiring diagram in the separate wiring guide (if applicable) or the instructions provided with the remote receiver. Typically, this involves connecting live, neutral, and ground wires. Insert the remote receiver into the canopy.
- Secure Canopy: Slide the canopy up to the ceiling and secure it to the mounting bracket with the screws.
- Attach Blades: Attach each fan blade to its blade bracket, then secure the blade brackets to the motor housing. Ensure all screws are tightened.
- Install Light Kit: Connect the light kit wiring to the fan's light kit wires. Secure the light kit assembly to the bottom of the motor housing. Install the light bulb(s) (if not pre-installed) and the diffuser.
- Restore Power: Once all connections are secure and the fan is fully assembled, restore power at the circuit breaker.
Operating Instructions
Your Canarm CF15148351S ceiling fan is operated by a remote control.
Remote Control Functions:
- Fan ON/OFF: Press to turn the fan on or off.
- Fan Speed Control: Buttons typically marked with fan icons or numbers (1, 2, 3) to adjust fan speed (Low, Medium, High).
- Light ON/OFF: Press to turn the light on or off.
- Light Dimmer: Hold the light button to dim or brighten the light (if dimmable bulbs are used).
- Reverse Function: A button (often marked with an arrow circle) to change the direction of blade rotation.
- Summer Mode (Counter-clockwise): Airflow creates a cooling effect.
- Winter Mode (Clockwise): Airflow pushes warm air down from the ceiling.
Ensure the remote control has fresh batteries installed (typically AAA, not included).
Maintenance
Regular maintenance will ensure the longevity and optimal performance of your ceiling fan.
- Cleaning: To clean the fan, wipe with a soft, damp cloth. Do not use abrasive cleaners or solvents, as these may damage the finish. Ensure power is off before cleaning.
- Blade Balance: Over time, blades may become unbalanced, causing wobbling. Check that all blade screws are tight. A balancing kit (often sold separately) can be used to correct severe wobbling.
- Light Bulb Replacement: Turn off power before replacing light bulbs. Use bulbs of the correct wattage and type as specified in the fan's light kit instructions.
- Annual Check: Annually, check all screws and connections for tightness.
Troubleshooting
If you experience issues with your ceiling fan, refer to the following common problems and solutions:
| Problem | Possible Cause | Solution |
|---|---|---|
| Fan does not start | No power to the fan; Loose wire connections; Remote control battery dead. | Check circuit breaker; Verify all wire connections are secure; Replace remote control batteries. |
| Fan wobbles | Loose blade screws; Unbalanced blades; Loose mounting bracket. | Tighten all blade screws; Use a blade balancing kit; Ensure mounting bracket is secure. |
| Light does not work | Loose wire connection; Faulty bulb; Remote control issue. | Check light kit wiring; Replace bulb; Check remote battery and pairing. |
| Noisy operation | Loose screws; Motor hum; Blades hitting an obstruction. | Tighten all screws; Allow for break-in period (new fans); Ensure no obstructions. |
Specifications
| Feature | Detail |
|---|---|
| Brand | Canarm |
| Model Number | CF15148351S |
| Electric Fan Design | Ceiling Fan |
| Power Source | Corded Electric |
| Style | Modern |
| Finish Type | Brushed Pewter |
| Number of Blades | 5 |
| Item Weight | 0.01 Ounces (Note: This weight seems unusually low and may refer to packaging weight or be an error in source data. Actual product weight will be significantly higher.) |
| Control Method | Remote |
| Blade Material | Plastic |
| UPC | 062345183268 |
| Package Dimensions | 23.5 x 11.5 x 11 inches |
Warranty and Support
Canarm products are manufactured to the highest quality standards. For specific warranty details, please refer to the warranty card included with your product or visit the official Canarm website. For technical support, replacement parts, or general inquiries, please contact Canarm customer service.
Canarm Customer Service:
- Website: www.canarm.com (Please check the official website for the most current contact information.)
- Phone: Refer to the Canarm website or product packaging for regional contact numbers.