
1. Introduction
This manual provides essential information for the proper handling, installation, and maintenance of your Omega National Wood Veneer Tambour Sheet, Model NPV3 O. Please read these instructions carefully before proceeding with any work to ensure optimal results and product longevity.
The Omega National Wood Veneer Tambour Sheet is designed for various woodworking and cabinetry applications, offering a flexible and aesthetically pleasing surface solution.
2. Product Overview
The Omega National Wood Veneer Tambour Sheet features a wood veneer face with a light-colored MDF core, balanced with a veneer on the back for enhanced stability. This construction ensures durability and ease of use for various projects.
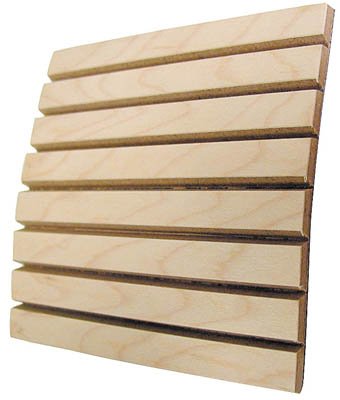
Figure 1: Omega National Wood Veneer Tambour Sheet. This image displays the flat slat design of the red oak veneer tambour sheet, highlighting its flexible construction and natural wood grain.
Key Features:
- Dimensions: Approximately 47.5 inches (120.65 cm) in length and 36 inches (91.44 cm) in height.
- Material: Wood veneer face (Red Oak) with a light-colored Medium Density Fiberboard (MDF) core.
- Construction: Features a balancing veneer on the back for stability and a poly/cotton backing for flexibility.
- Finish: Unfinished, allowing for custom staining or finishing to match your project requirements.
3. Installation Guidelines
Proper installation is crucial for the performance and appearance of the tambour sheet. These guidelines provide general steps; specific project requirements may vary.
3.1 Preparation:
- Acclimatization: Allow the tambour sheet to acclimatize to the installation environment for at least 48 hours prior to cutting or installation. This helps prevent warping or shrinking after installation.
- Surface Preparation: Ensure the receiving surface is clean, dry, smooth, and free from dust or debris.
- Measurement and Cutting: Carefully measure the required dimensions. The tambour sheet can be cut using standard woodworking tools. Use a fine-tooth blade to minimize chipping of the veneer. Support the sheet adequately during cutting.
3.2 Adhesion:
- Adhesive Selection: Use a high-quality, flexible adhesive suitable for wood and MDF applications. Contact adhesive or construction adhesive is generally recommended.
- Application: Apply adhesive evenly to both the back of the tambour sheet (poly/cotton backing) and the receiving surface, following the adhesive manufacturer's instructions.
- Placement: Carefully position the tambour sheet onto the prepared surface. Apply even pressure across the entire surface to ensure good adhesion and remove any air bubbles. Roll or press firmly.
3.3 Finishing (Optional):
- As the tambour sheet is unfinished, it can be stained, painted, or clear-coated to achieve the desired aesthetic. Test any finish on a scrap piece first.
- Ensure the finish is applied evenly and allowed to cure completely according to the product manufacturer's instructions.
4. Usage Guidelines
The flexible nature of the tambour sheet makes it suitable for various applications, including roll-top desks, cabinet doors, wall coverings, and decorative accents. When using the tambour sheet, consider the following:
- Flexibility: The sheet is designed to bend along the slat lines. Avoid bending against the grain or forcing sharp angles that could damage the veneer or backing.
- Environmental Conditions: Avoid prolonged exposure to extreme humidity, direct sunlight, or rapid temperature changes, which can cause warping, cracking, or delamination.
- Weight Bearing: This product is primarily decorative and not designed for heavy weight-bearing applications without additional structural support.
5. Maintenance and Care
Proper care will help maintain the appearance and integrity of your tambour sheet.
- Cleaning: For routine cleaning, wipe the surface with a soft, damp cloth. Avoid abrasive cleaners or harsh chemicals that can damage the wood veneer or finish.
- Dusting: Regularly dust the surface with a dry, soft cloth to prevent buildup.
- Protection: If the tambour sheet is used in an area prone to spills or moisture, consider applying a protective finish (e.g., polyurethane or lacquer) after installation.
- Repair: Minor scratches or dents on unfinished surfaces can often be sanded lightly and refinished. For significant damage, professional repair may be required.
6. Troubleshooting
This section addresses common issues that may arise during or after installation.
| Problem | Possible Cause | Solution |
|---|---|---|
| Veneer Chipping During Cutting | Incorrect blade type or dull blade; insufficient support during cutting. | Use a fine-tooth blade. Ensure the sheet is well-supported on both sides of the cut line. Apply painter's tape along the cut line to minimize chipping. |
| Warping or Cupping | Improper acclimatization; exposure to excessive moisture or dryness; uneven adhesive application. | Ensure proper acclimatization before installation. Maintain stable environmental conditions. Apply adhesive evenly and ensure full contact. |
| Poor Adhesion | Insufficient adhesive; improper surface preparation; inadequate pressure during application. | Use recommended adhesive quantity. Clean and prepare surfaces thoroughly. Apply firm, even pressure across the entire sheet after placement. |
| Uneven Stain/Finish Absorption | Surface not properly prepared; inconsistent application of finish. | Ensure the surface is clean and lightly sanded (if necessary) before applying finish. Apply finish evenly and test on a scrap piece first. |
7. Specifications
| Attribute | Detail |
|---|---|
| Brand | Omega National |
| Model Name | NPV3 O |
| Part Number | V3O |
| Material | Oak Wood Veneer, MDF Core, Poly/Cotton Backing |
| Finish Type | Unfinished |
| Slat Length | 47-1/2" (1219.2mm) |
| Height | 35-5/8" (904.875mm) |
| Item Weight | 20 pounds (approx. 9.07 kg) |
| UPC | 740104909396 |
8. Warranty and Support
For specific warranty information or technical support regarding your Omega National Wood Veneer Tambour Sheet, please contact Omega National Products directly. Details regarding their warranty policy and customer service contact information can typically be found on their official website or through your original point of purchase.
It is recommended to retain your purchase receipt as proof of purchase for any warranty claims.