1. Safety Instructions
Please read all safety instructions carefully before operating the WilTec Boost 430 Battery Charger. Failure to follow these instructions may result in electric shock, fire, or serious injury.
- Electrical Safety: Ensure the charger is connected to a grounded outlet. Do not operate the charger with damaged cords or plugs. Avoid contact with water or wet surfaces.
- Battery Acid: Batteries contain sulfuric acid, which is corrosive. Wear eye protection and gloves when handling batteries. If acid contacts skin or eyes, flush immediately with water and seek medical attention.
- Ventilation: Ensure adequate ventilation during charging to prevent the buildup of explosive gases. Do not charge in a confined area.
- Connection Sequence: Always connect the positive (+) clamp to the positive battery terminal first, then the negative (-) clamp to the negative battery terminal or vehicle chassis away from the battery. Disconnect in reverse order.
- Operating Environment: Operate the charger within the specified temperature range of -10°C to 40°C. Avoid direct sunlight or extreme heat.
- Children and Pets: Keep the charger and batteries out of reach of children and pets.
- Intended Use: This charger is designed for charging 12V and 24V lead-acid batteries and for jump-starting vehicles. Do not use for other purposes.

2. Product Overview
The WilTec Boost 430 is a robust and versatile battery charger and jump starter designed for professional and home use. It features practical transport wheels for easy mobility and a large display for clear monitoring. It supports both 12V and 24V battery systems and offers normal charging and powerful jump-start capabilities.
2.1. Main Components

- Charger Unit: The main body housing the electronics and controls.
- Control Panel: Located on top, with display, switches, and input/output connections.
- Charging Cables: Heavy-duty cables with insulated clamps for connecting to the battery.
- Transport Wheels: For easy movement of the unit.
2.2. Control Panel Diagram
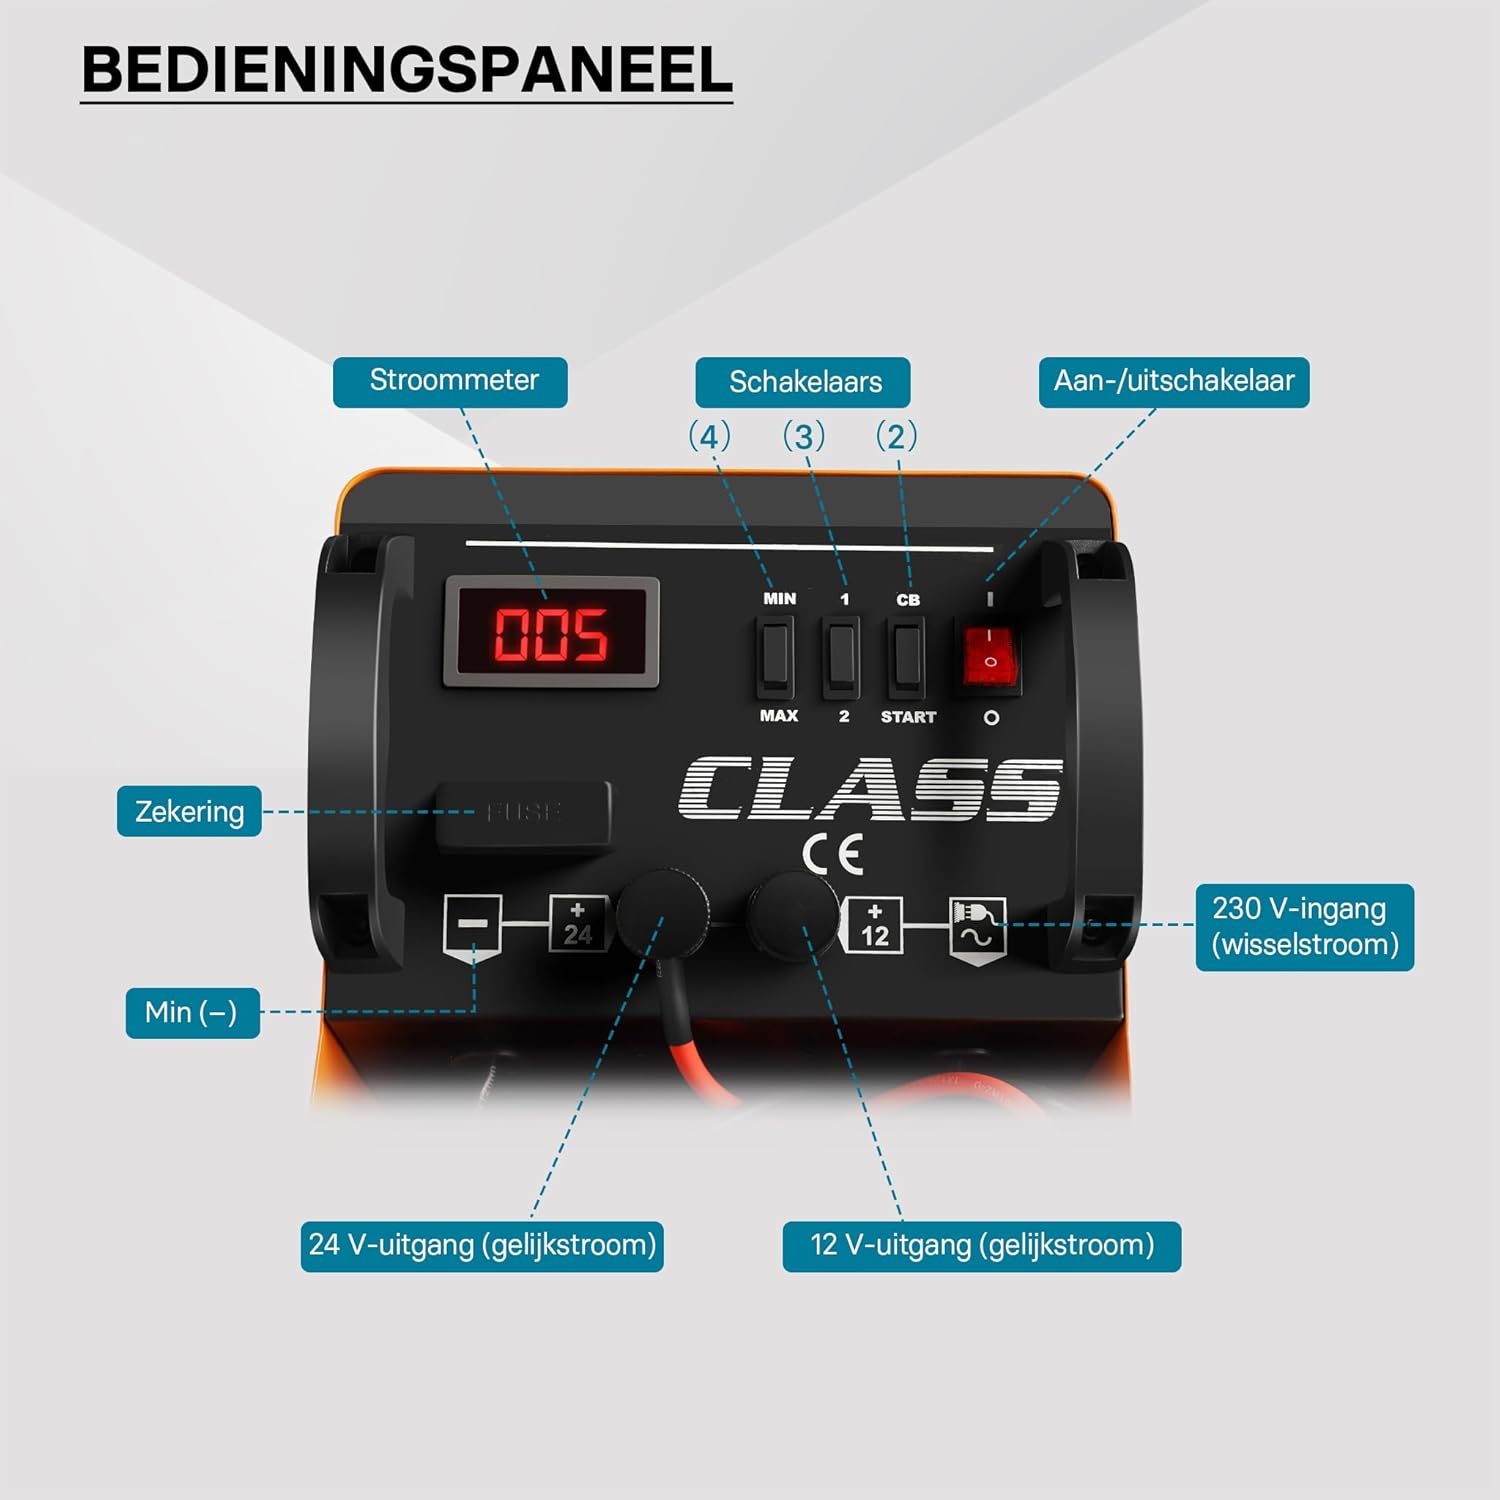
- Ammeter / Current Meter: Displays the charging current.
- Switches (1, 2, 3, 4): Control charging modes (MIN/MAX) and start function.
- On/Off Switch: Powers the unit on or off.
- Fuse: Overcurrent protection.
- Min (-): Negative output terminal.
- 24 V Output (DC): Positive output terminal for 24V charging.
- 12 V Output (DC): Positive output terminal for 12V charging.
- 230 V Input (AC): Power input for the charger.
3. Technical Specifications
| Feature | Specification |
|---|---|
| Brand | WilTec |
| Manufacturer | WilTec |
| Model Number | 30560 |
| Power Source | 230-250 V AC |
| Batteries Included | No |
| Product Dimensions (L x W x H) | 34.01 x 65 x 31.19 cm |
| Item Weight | 19 kg (41.89 pounds) |
| Output Voltage | 12 V / 24 V DC |
| Normal Charging Current (Effective) | 12 / 24 V – 75 A |
| Fast Charging Current (Effective) | 12 / 24 V – 400 A |
| Rated Battery Capacity | 50–750 Ah (min.–max.) |
| Color | Yellow/Black |
| Compliance | CE |
| Date First Available | January 15, 2020 |

4. Setup
Before using the charger, ensure you have read and understood all safety instructions. Prepare your workspace and the battery for charging.
- Unpack the Charger: Carefully remove the charger from its packaging. Inspect for any damage during transit.
- Position the Charger: Place the charger on a stable, level surface in a well-ventilated area, away from flammable materials. Utilize the transport wheels to easily move the unit into position.
- Prepare the Battery: Ensure the battery terminals are clean and free of corrosion. If necessary, clean them with a wire brush. For flooded lead-acid batteries, check the electrolyte levels and top up with distilled water if needed (wear appropriate PPE).
- Connect to Power: Ensure the charger's ON/OFF switch is in the OFF position. Plug the charger's power cord into a suitable 230-250V AC grounded electrical outlet.
5. Operating Instructions
5.1. Charging a Battery
Follow these steps to safely charge a 12V or 24V battery:
- Identify Battery Voltage: Determine if the battery is 12V or 24V.
- Connect Clamps:
- Connect the red positive (+) clamp to the positive (+) terminal of the battery.
- Connect the black negative (-) clamp to the negative (-) terminal of the battery or to a non-painted metal part of the vehicle chassis away from the battery. Ensure connections are secure.

Figure 5: Proper connection of insulated clamps to a battery, highlighting 12V and 24V options. - Select Charging Voltage: On the control panel, connect the positive cable to the appropriate 12V or 24V output terminal based on your battery's voltage.
- Select Charging Mode: Choose between MIN (normal charge) or MAX (fast charge) using the switches on the control panel. For most applications, MIN is recommended for a slower, more thorough charge.
- Turn On Charger: Flip the ON/OFF switch to the ON position. The ammeter will show the charging current.
- Monitor Charging: Allow the battery to charge. The charging current will gradually decrease as the battery charges.
- Disconnect: Once charging is complete, turn the charger OFF. Disconnect the negative (-) clamp first, then the positive (+) clamp.

5.2. Jump Start Function
The Boost 430 can also provide a quick jump start for vehicles with a discharged battery.
- Connect Clamps: Connect the charger to the vehicle battery as described in step 2 of "Charging a Battery" (positive to positive, negative to chassis).
- Select START Mode: Ensure the charger is OFF. Select the "START" switch on the control panel.
- Attempt Engine Start: Turn the charger ON. Wait a few minutes (as per general jump-start best practices) before attempting to start the vehicle's engine. Do not crank the engine for more than 5 seconds. If the engine does not start, wait 1-2 minutes before trying again.
- Disconnect: Once the engine starts, immediately turn the charger OFF. Disconnect the negative (-) clamp first, then the positive (+) clamp.
6. Maintenance
Regular maintenance ensures the longevity and optimal performance of your WilTec Boost 430 charger.
- Cleaning: Disconnect the charger from power before cleaning. Wipe the exterior with a dry or slightly damp cloth. Do not use harsh chemicals or abrasive cleaners.
- Cable and Clamp Inspection: Regularly inspect the charging cables and clamps for any signs of damage, fraying, or corrosion. Replace if necessary.
- Storage: Store the charger in a cool, dry place, away from direct sunlight and moisture. Ensure cables are neatly coiled to prevent damage.
- Fuse Replacement: If the fuse blows, replace it with a fuse of the same type and rating as indicated on the unit or in the specifications. Always disconnect power before replacing the fuse.
7. Troubleshooting
This section addresses common issues you might encounter with your WilTec Boost 430 charger.
| Problem | Possible Cause | Solution |
|---|---|---|
| Charger does not turn on. | No power from outlet; ON/OFF switch is off; Blown fuse. | Check power outlet; Ensure ON/OFF switch is ON; Check and replace fuse if necessary. |
| Battery not charging. | Incorrect clamp connection; Incorrect voltage selection; Battery is severely discharged or faulty. | Ensure clamps are connected correctly (positive to positive, negative to negative/chassis); Verify 12V/24V selection matches battery; Have battery tested by a professional. |
| Ammeter shows no current or very low current. | Battery is fully charged; Poor connection; Internal fault. | This is normal if battery is full; Check clamp connections; If issue persists, contact support. |
| Charger gets hot during operation. | Normal operation under heavy load; Insufficient ventilation. | Some heat is normal. Ensure adequate ventilation around the charger. If overheating is excessive, disconnect and contact support. |
8. Warranty and Support
WilTec products are manufactured with high quality standards. For any questions regarding the operation, maintenance, or troubleshooting of your WilTec Boost 430 Battery Charger, please contact WilTec customer support.
Please refer to your purchase documentation for specific warranty terms and conditions. Keep your proof of purchase for any warranty claims.
For further assistance, you may visit the official WilTec website or contact their customer service department directly. Contact information can typically be found on the product packaging or the manufacturer's website.
Manufacturer: WilTec Wildanger Technik GmbH


