
ExquizOn RD-801
ExquizOn RD-801 Projector User Manual
Model: RD-801 | Brand: ExquizOn
1. Introduction
The ExquizOn RD-801 is a versatile HD LED multimedia projector designed for home cinema, gaming, and presentations. It offers a vibrant viewing experience with its 800x480 native resolution, supporting up to 1080P, 2000 lumens brightness, and a 1000:1 contrast ratio. With multiple input options, it connects seamlessly to various devices, providing an immersive entertainment solution.
Key features include:
- Native Resolution: 800x480 (supports 720P, 1080P)
- Brightness: 2000 Lumens
- Contrast Ratio: 1000:1
- Long Lamp Life: 50,000 hours (LED)
- Multiple Inputs: HDMI, USB, AV, VGA, TV
- Built-in Speakers
2. Package Contents
Please check the package carefully to ensure all items are present and in good condition:
- ExquizOn RD-801 LCD Projector
- Power Cord
- AV Cable
- VGA Cable
- Remote Control
- User's Manual

Image: Contents of the ExquizOn RD-801 projector package, showing the projector, remote control, AV cable, power cable, VGA cable, and the user's manual.
3. Product Overview
3.1 Front and Side View

Image: Side view of the projector, highlighting the cool winds input ventilation, IR receiver, level-stand adjustment, and the focus lens.
The front features the projection lens. The side includes ventilation for cooling, an IR receiver for the remote control, a level-stand adjustment for tilting the projector, and the focus lens for image clarity.
3.2 Rear Panel and Input Terminals
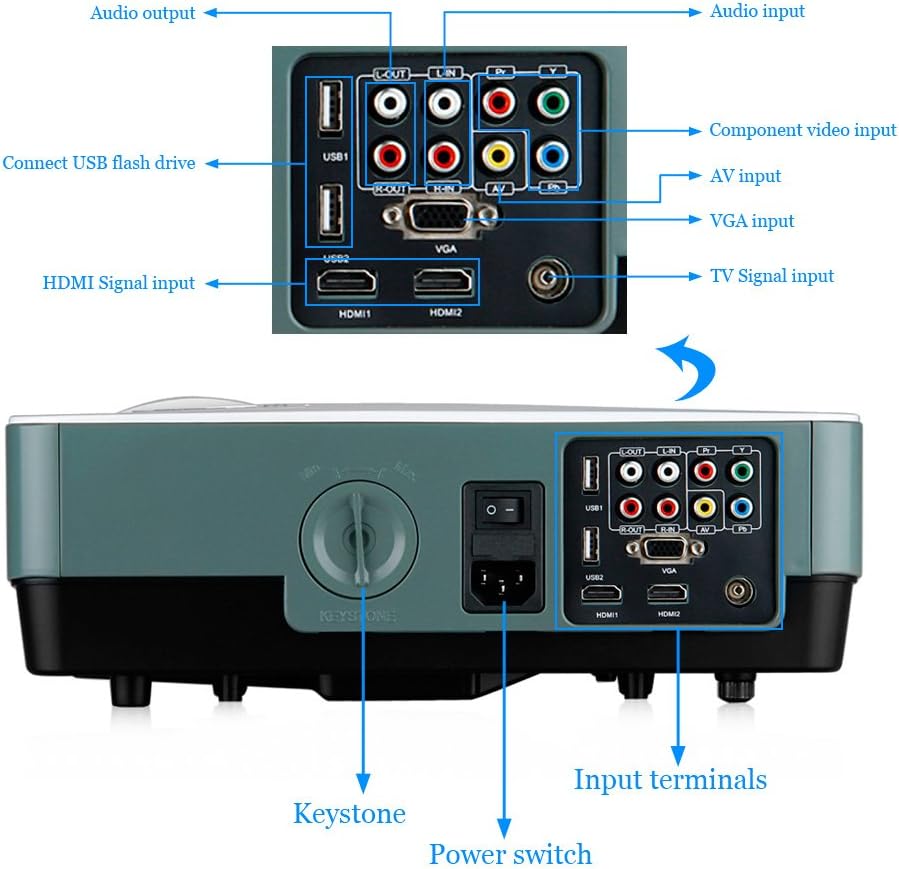
Image: Rear panel of the projector, detailing the input terminals for HDMI, USB, AV, VGA, TV, and audio input/output ports. Also visible are the keystone correction knob and power switch.
The rear panel provides all necessary connection ports:
- HDMI1/HDMI2: For connecting high-definition devices like Blu-ray players, game consoles, or laptops.
- USB1/USB2: For connecting USB flash drives to play multimedia files.
- AV: For connecting devices using composite video and stereo audio cables.
- VGA: For connecting computers or laptops.
- YPbPr (Component Video Input): For connecting devices with component video output.
- ATV (TV Signal Input): For connecting an antenna for analog TV channels.
- Audio Output: For connecting external speakers or headphones.
Also located on the rear are the Keystone correction knob to adjust image distortion and the main Power Switch.
3.3 Top Panel Controls
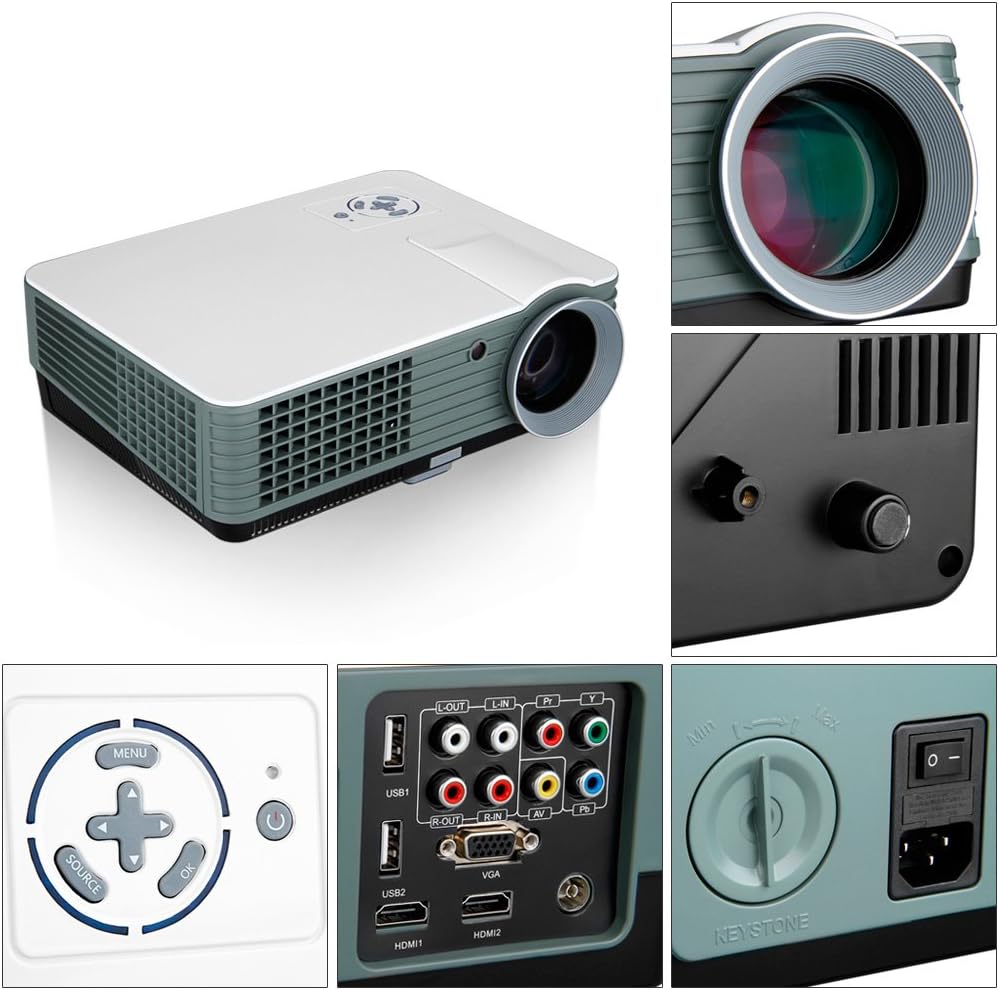
Image: Detailed view of the projector's top control panel, including buttons for Menu, Source, navigation (up, down, left, right), OK, and Power.
The top panel features intuitive buttons for navigation and control:
- Power Button: To turn the projector on or off.
- Menu Button: To access the projector's settings menu.
- Source Button: To select the input source (HDMI, USB, AV, VGA, TV).
- Navigation Buttons (Up/Down/Left/Right): To navigate through menus and adjust settings.
- OK Button: To confirm selections.
3.4 Bottom View

Image: The bottom of the projector, indicating the locations of the projector mount holes for ceiling or tripod mounting, the level-stand adjustment, and the product information label.
The bottom of the projector includes:
- Projector Mount Holes: For mounting the projector to a ceiling mount or tripod.
- Level-Stand Adjustment: An adjustable foot to fine-tune the projection angle.
- Product Label: Contains model number, serial number, and electrical ratings.
4. Setup
4.1 Placement
Place the projector on a stable, flat surface or mount it securely. Ensure there is adequate ventilation around the projector to prevent overheating. The optimal projection distance for a clear image is between 1.5 to 4 meters (approximately 50 to 140 inches diagonal screen size).
4.2 Power Connection
- Connect the power cord to the projector's power input port.
- Plug the other end of the power cord into a wall outlet.
- Ensure the main power switch on the rear of the projector is in the 'ON' position.
4.3 Connecting Devices
The RD-801 offers multiple connectivity options:
- HDMI: Use an HDMI cable to connect your laptop, game console, or Blu-ray player to either HDMI1 or HDMI2 port.
- VGA: Connect your computer's VGA output to the projector's VGA port using a VGA cable.
- AV: Use the provided AV cable to connect devices like DVD players. Match the yellow, white, and red plugs to the corresponding ports.
- USB: Insert a USB flash drive into either USB1 or USB2 port to play media files directly.
- TV (ATV): Connect a coaxial antenna cable to the ATV port to receive analog television signals.
5. Operating the Projector
5.1 Power On/Off
- Press the Power button on the projector's top panel or the remote control to turn on the projector.
- To turn off, press the Power button again. The projector will enter standby mode.
5.2 Source Selection
After connecting your device, press the Source button on the projector or remote control. Use the navigation buttons to select the desired input source (e.g., HDMI1, VGA, USB, AV, TV) and press OK.
5.3 Image Adjustment
- Focus: Rotate the focus lens ring on the front of the projector until the image appears sharp and clear.
- Keystone Correction: If the image appears trapezoidal (wider at the top or bottom), adjust the Keystone knob on the rear panel until the image is rectangular. The RD-801 supports 15-degree physical keystone correction.
- Picture Settings: Press the Menu button to access picture settings such as brightness, contrast, color, and aspect ratio (16:9 or 4:3).
5.4 Media Playback (USB)
When a USB flash drive is inserted and selected as the source, the projector will display a media browser. Navigate through folders and files using the remote control or top panel buttons. Select the desired photo, music, or video file and press OK to play.
6. Maintenance
6.1 Cleaning the Lens
Use a soft, lint-free cloth specifically designed for optical lenses to gently wipe the projector lens. Do not use abrasive cleaners or excessive force, as this can scratch the lens.
6.2 Cleaning the Projector Body
Wipe the exterior of the projector with a soft, dry cloth. For stubborn dirt, a slightly damp cloth can be used, but ensure no liquid enters the ventilation openings.
6.3 Ventilation
Regularly check and clean the ventilation openings to ensure proper airflow. Blocked vents can lead to overheating and reduce the lifespan of the projector. The projector features a hyperfine air cooling technology to minimize noise while maintaining optimal temperature.

Image: The projector showcasing its built-in stereo speakers and the advanced air cooling system designed for quiet operation.
6.4 Lamp Life
The LED lamp in your RD-801 projector has an extra-long life of approximately 50,000 hours, meaning it will likely not require replacement during the projector's lifetime under normal usage conditions.
7. Troubleshooting
If you encounter issues with your projector, please refer to the following common problems and solutions:
| Problem | Possible Cause | Solution |
|---|---|---|
| No image on screen |
|
|
| Image is blurry |
|
|
| No sound |
|
|
| Fan noise is loud |
|
|
| Cannot receive TV channels (ATV) |
|
|
8. Specifications
| Feature | Specification |
|---|---|
| Projector System | 5 inch LCD TFT display |
| Lens | 3 pieces of glass lenses, manual focus |
| Native Resolution | 800x480 (supports 720P/1080P) |
| Brightness | 2000 Lumens |
| Contrast Ratio | 1000:1 |
| Image Flip | 360 degree flip |
| Aspect Ratio | 16:9 & 4:3 |
| Lamp Type | LED 100W, 50,000 hours life |
| Picture Size | 50-140 inch |
| Keystone Correction | 15 degree physical correction |
| Noise Level | <25 dB |
| Interface Inputs | HDMI1/HDMI2/USB1/USB2/AV/VGA/YPbPr/ATV |
| Product Dimensions | 33 x 25.7 x 10.5 cm |
| Product Weight | 3 KG |
9. Warranty and Support
For warranty information and technical support, please refer to the contact details provided with your purchase documentation or visit the official ExquizOn website. Keep your purchase receipt as proof of purchase for any warranty claims.
Ask a question about this manual
Ask about setup, troubleshooting, compatibility, parts, safety, or missing instructions. Manuals+ will review the question and use this page’s manual context to help answer it.