1. Introduction
The TASCAM DR-70D is a compact, high-quality 4-channel audio recorder designed for videographers and filmmakers. It integrates seamlessly with DSLR cameras, providing professional audio recording capabilities with multiple input options and flexible control.

Image 1.1: The TASCAM DR-70D 4-Channel Audio Recorder, designed for DSLR cameras.
This manual provides detailed instructions for setting up, operating, and maintaining your DR-70D recorder to ensure optimal performance and longevity.
2. Key Features
- Four XLR/TRS Combo Inputs: Equipped with high-quality HDDA mic preamps, offering 64dB of gain and phantom power (24V/48V) for professional microphones.
- Two Internal Omnidirectional Microphones: Built-in stereo microphones for capturing ambient sound or quick recordings without external mics.
- Multiple Recording Modes: Supports MONO/DUAL MONO, STEREO/DUAL STEREO, and 2MIX/DUAL 2MIX for versatile recording scenarios.
- Dual Recording Function: Records a safety track at a lower level to prevent clipping and distortion.
- Compact and Robust Design: Designed to mount between a tripod and camera, or on top via a hot shoe mount (with optional adapter). Features durable construction.
- Built-in Mixer: Allows individual recording of each input for post-production, while sending a stereo mix to headphones and the camera.
- Slate Tone Generator: Provides reference slate tones for easy audio/video synchronization.
- Camera Input/Output: Dedicated jacks for monitoring camera audio and sending a stereo mix to the camera for simplified editing.
- SD Card Recording: Records to SD, SDHC, or SDXC cards up to 128GB.
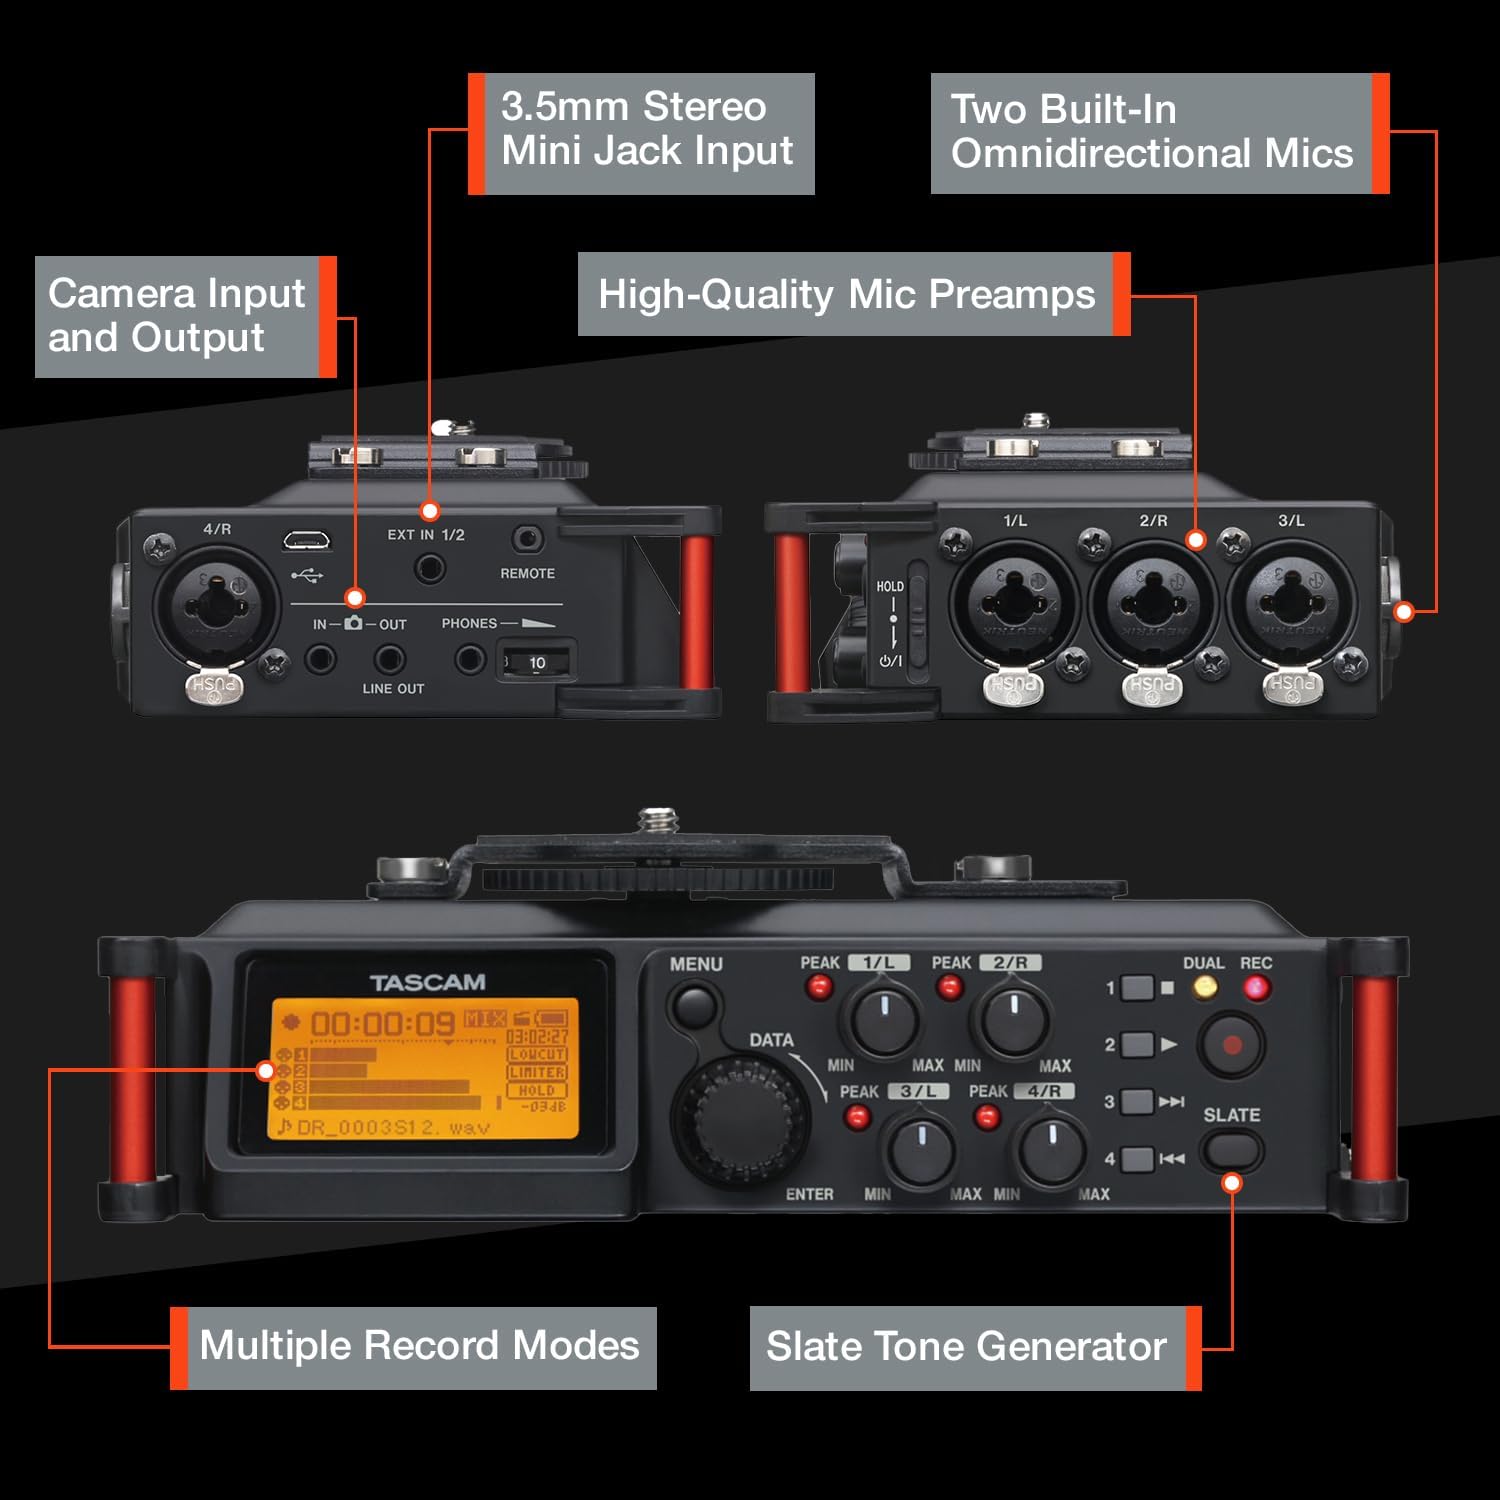
Image 2.1: Overview of the TASCAM DR-70D's inputs, outputs, and controls.
3. Setup
3.1. Battery Installation
- Ensure the unit is powered off.
- Locate the battery compartment on the underside of the unit.
- Open the compartment cover.
- Insert four (4) AA batteries, observing the correct polarity (+/-) as indicated inside the compartment.
- Close the battery compartment cover securely.
Note: The DR-70D can also be powered via a USB power adapter (sold separately) or a dedicated AC adapter (sold separately).
3.2. SD Card Installation
- Ensure the unit is powered off.
- Locate the SD card slot on the side of the unit.
- Insert an SD, SDHC, or SDXC card (up to 128GB) into the slot until it clicks into place.
- To remove, push the card gently until it ejects, then pull it out.
Note: It is recommended to format the SD card using the DR-70D's menu system before first use and periodically thereafter.
3.3. Mounting the DR-70D
The DR-70D offers versatile mounting options for integration with camera rigs:
- Between Camera and Tripod: The unit features tripod threads on the bottom and a camera mounting plate on top, allowing it to be placed directly between your camera and tripod.
- On Camera Hot Shoe: An optional AK-DR70C adapter (sold separately) can be used to mount the DR-70D onto a camera's hot shoe.
- On Follow-Focus Cages: The tripod threads also allow mounting on various camera cages.

Image 3.1: The DR-70D's compact and tough design allows for various mounting configurations.
4. Operating Instructions
4.1. Power On/Off
- To power on, press and hold the power button until the display illuminates.
- To power off, press and hold the power button until the unit shuts down.
4.2. Connecting Microphones and Line Sources
The DR-70D features four combo XLR/TRS inputs (1-4) and a 3.5mm stereo mini-jack input (EXT IN 1/2).
- XLR/TRS Inputs (1-4): Connect professional microphones or line-level devices using XLR or 1/4-inch TRS cables. Activate phantom power (24V or 48V) via the menu for condenser microphones.
- 3.5mm Stereo Mini-Jack Input (EXT IN 1/2): Connect consumer-level microphones or line-level devices. This input supports plug-in power.

Image 4.1: The 3.5mm stereo mini jack input for connecting external microphones or line sources.
4.3. Setting Recording Levels
- Use the individual gain knobs for each input (1-4) to adjust the input level.
- Monitor the level meters on the display to ensure signals are strong but do not peak into the red, which indicates clipping.
- The built-in limiter can be activated via the menu to prevent sudden loud sounds from distorting the recording.
- High-Pass Filter (HPF) can be applied to reduce unwanted low-frequency noise.
4.4. Recording Modes
The DR-70D offers several recording modes to suit different production needs:
- MONO/DUAL MONO: Ideal for recording a single performer or sound source, with an option to record a safety track.
- STEREO/DUAL STEREO: Best for recording with the built-in microphones or an external stereo microphone setup, with an option for a safety track.
- 2MIX/DUAL 2MIX: Creates stereo files from two or more mixed inputs. Dual Recording creates a backup track at up to 12dB lower levels to prevent distortion.

Image 4.2: Illustration of MONO/DUAL MONO recording mode.

Image 4.3: Illustration of STEREO/DUAL STEREO recording mode.

Image 4.4: Illustration of 2MIX/DUAL 2MIX recording mode.
4.5. Monitoring Audio
- Connect headphones to the 3.5mm PHONES jack for real-time audio monitoring.
- The DR-70D's built-in mixer allows you to monitor the individual inputs or the stereo mix.
- Use the CAMERA IN jack to monitor audio from your camera, allowing you to evaluate the camera's audio signal alongside the DR-70D's output.
4.6. Using the Slate Tone Generator
The slate tone generator helps synchronize audio and video files in post-production.
- Press the SLATE button to generate a reference tone.
- Slate tones can be added automatically at the start and/or end of a recording, or manually at any time.

Image 4.5: The SLATE button for generating reference tones.
4.7. Camera Integration
- Camera Input: Connect your camera's audio output to the DR-70D's IN-O jack to monitor camera audio.
- Camera Output: Send a stereo mix from the DR-70D to your camera's audio input via the LINE OUT jack. This simplifies synchronization in editing software.

Image 4.6: The camera input jack for monitoring camera audio.

Image 4.7: The camera output jack for sending audio to your camera.
5. Maintenance
- Cleaning: Use a soft, dry cloth to clean the exterior of the unit. Avoid abrasive cleaners or solvents.
- Storage: Store the DR-70D in a cool, dry place away from direct sunlight and extreme temperatures. Remove batteries if storing for extended periods.
- Firmware Updates: Check the Tascam website periodically for firmware updates to ensure optimal performance and access to new features.
6. Troubleshooting
| Problem | Possible Cause | Solution |
|---|---|---|
| Unit does not power on. | Dead or incorrectly inserted batteries; no external power. | Replace batteries, check polarity, or connect to a power adapter. |
| No audio recorded. | Incorrect input selection; low gain; faulty microphone/cable; SD card issue. | Verify input settings, increase gain, test microphone/cable, ensure SD card is inserted and formatted. |
| Distorted audio. | Input levels too high; limiter not active. | Reduce input gain, activate the limiter, check microphone placement. |
| No sound from headphones. | Headphone volume too low; incorrect monitoring settings; faulty headphones. | Increase headphone volume, check monitoring mix settings, test with different headphones. |
| SD card error. | Card not formatted; incompatible card; card full. | Format the SD card in the DR-70D, use a compatible card (SD/SDHC/SDXC), delete old files. |
7. Specifications
| Feature | Detail |
|---|---|
| Product Dimensions | 6.25 x 4.5 x 2.25 inches |
| Item Weight | 1.16 pounds |
| Item Model Number | DR-70D |
| Batteries | 4 AA batteries (included) |
| Hardware Interface | USB |
| Microphone Form Factor | Built-In |
| Audio Format | WAV |
| Headphones Jack | 3.5 millimeters |
| Memory Storage Capacity | Supports SD, SDHC, SDXC up to 128 GB (card not included) |
| Manufacturer | Tascam |
8. Warranty and Support
For warranty information and technical support, please refer to the official Tascam website or contact your local Tascam distributor. Keep your proof of purchase for warranty claims.
Official Tascam Website: www.tascam.com


