1. Introduction
This manual provides instructions for the safe and effective use of the Diablo 3-inch Bi-Metal Hole Saw (Model DHS3000). This hole saw is engineered for durability and performance, featuring a variable tooth design for faster cuts and reduced vibration. It is designed for use with the Diablo Snap-Lock Plus Mandrel System, enabling quick changes and efficient material removal.
Key features include:
- Deep Cut Capacity: Offers a 2-3/8" cutting depth for deeper holes in a single pass.
- Quick-Change Convenience: Compatible with the Snap-Lock Plus mandrel system for rapid hole saw changes.
- Universal Mandrel Compatibility: The mandrel fits all Diablo hole saw sizes from 5/8" to 6" in diameter.
- Tool-Free Plug Ejection: Facilitates quick material removal.
- Variable Tooth Design: Delivers faster cuts with less vibration.
2. Safety Information
Always prioritize safety when operating power tools. Failure to follow these instructions may result in serious injury.
- Wear Personal Protective Equipment (PPE): Always wear safety glasses, hearing protection, and gloves. A dust mask is recommended when cutting materials that produce fine particles.
- Secure Workpiece: Ensure the material being cut is firmly clamped or secured to prevent movement during operation.
- Use Correct Speed: Operate your drill at the appropriate speed for the material and hole saw size. Refer to your drill's manual for speed recommendations.
- Maintain Control: Hold the drill firmly with both hands. Be prepared for torque reaction, especially when the hole saw binds or breaks through the material.
- Inspect Tool: Before each use, inspect the hole saw and mandrel for damage, wear, or dullness. Do not use damaged tools.
- Clear Work Area: Keep your work area clean and well-lit. Remove any obstructions or debris.
- Disconnect Power: Always disconnect the drill from the power source before changing accessories or performing maintenance.
- Avoid Overheating: Allow the hole saw to cool periodically during prolonged use, especially when cutting metal, to prevent overheating and prolong tool life.
- Proposition 65 Warning: This product may expose you to chemicals known to the State of California to cause cancer and birth defects or other reproductive harm. For more information, visit www.P65Warnings.ca.gov.
3. Components
The Diablo Bi-Metal Hole Saw (DHS3000) is a precision cutting accessory. It is designed to be used with a compatible Snap-Lock Plus Mandrel System (sold separately).

Figure 1: Diablo 3-inch Bi-Metal Hole Saw (DHS3000). This image shows the main hole saw unit, highlighting its red body and sharp teeth.

Figure 2: Diablo Bi-Metal Hole Saw in its retail packaging. The packaging highlights key features like variable tooth technology, cutting depth, and mandrel compatibility.
4. Setup
Proper setup is essential for safe and efficient operation. The Diablo Bi-Metal Hole Saw requires a Diablo Snap-Lock Plus Mandrel System (sold separately) for attachment to a drill.
- Select the Correct Mandrel: Ensure you have a Diablo Snap-Lock Plus Mandrel. This system is designed for universal compatibility with Diablo hole saws from 5/8" to 6" in diameter.
- Attach Hole Saw to Mandrel:
- Align the hole saw with the Snap-Lock Plus Mandrel.
- Push the hole saw onto the mandrel until it clicks securely into place. The Snap-Lock Plus system allows for quick, tool-free attachment.

Figure 3: Illustration of the Snap-Lock Plus Mandrel System. Red arrows indicate the quick attachment mechanism for the hole saw onto the mandrel.
- Insert Mandrel into Drill:
- Open the chuck of your power drill.
- Insert the hexagonal shank of the Snap-Lock Plus Mandrel into the drill chuck.
- Tighten the drill chuck securely to prevent slippage during operation.
- Verify Secure Attachment: Gently pull on the hole saw to ensure it is firmly attached to both the mandrel and the drill.
5. Operating Instructions
Follow these steps for effective and safe operation of your Diablo Bi-Metal Hole Saw.
- Prepare Workpiece: Securely clamp the material you intend to cut. Mark the center point for your hole.
- Position the Pilot Bit: Place the pilot bit of the mandrel directly on the marked center point.
- Start Drilling:
- Start the drill at a low speed, applying light pressure.
- Once the hole saw teeth begin to engage the material, gradually increase the speed to the recommended setting for your material.
- Maintain steady, firm pressure. Avoid excessive force, which can cause the saw to bind or overheat.

Figure 4: Comparison illustrating the increased cutting depth of the Diablo hole saw (2-3/8") versus a standard hole saw (1-5/8"). This allows for deeper cuts in a single pass.
- Clear Chips: The variable tooth design helps in efficient chip removal. For deeper cuts or sticky materials, periodically withdraw the saw slightly to clear debris.
- Complete the Cut: Continue drilling until the hole is fully cut through the material. Be prepared for a slight change in resistance as the saw breaks through.
- Eject Plug: After completing the cut, disconnect the drill from power. The Snap-Lock Plus Mandrel System features tool-free plug ejection. Simply push the hole saw forward on the mandrel to release the cut material.
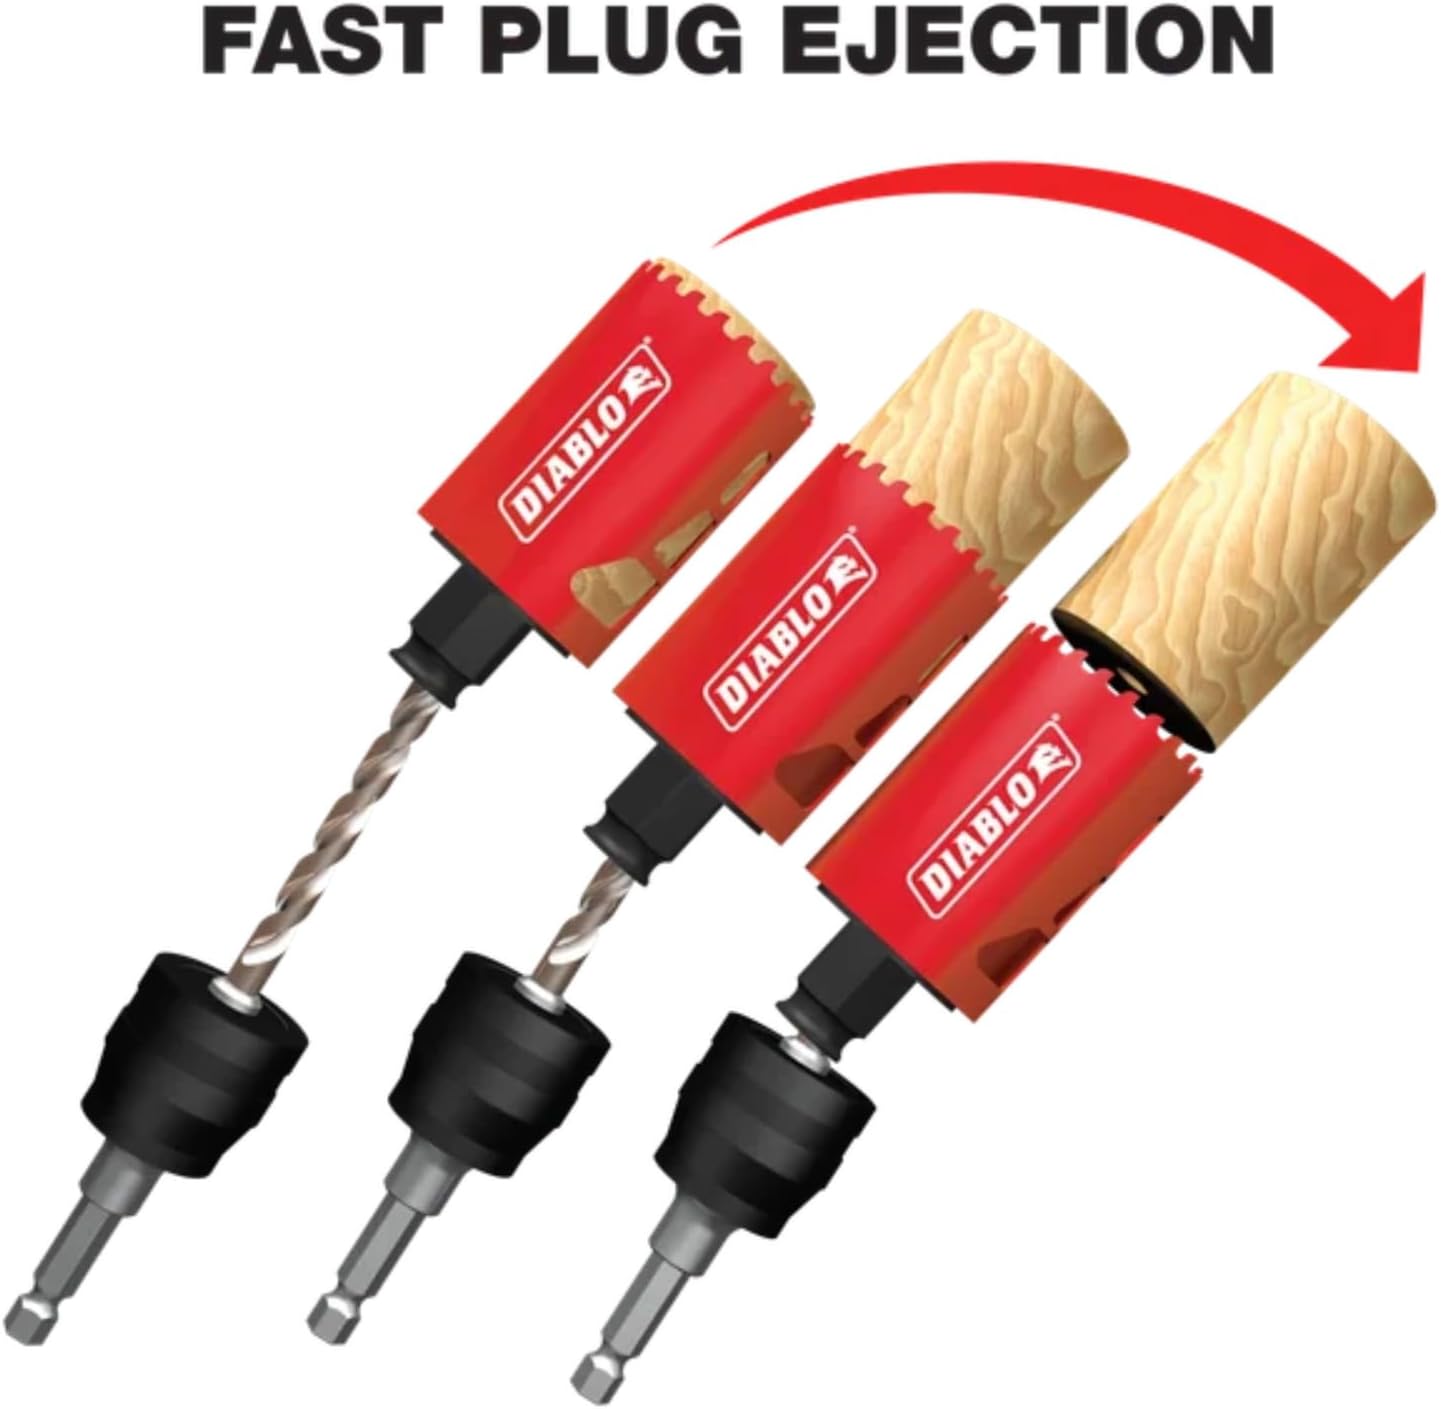
Figure 5: Sequence demonstrating the fast plug ejection feature of the Diablo hole saw. The cut material is easily pushed out of the saw without additional tools.
Recommended Materials:
This bi-metal hole saw is suitable for cutting various materials, including:
- Hardwoods
- Softwoods
- Steel
- Plastics
- Siding
- Clean Wood
6. Maintenance
Regular maintenance ensures the longevity and optimal performance of your hole saw.
- Cleaning: After each use, remove any debris, sawdust, or metal shavings from the hole saw and mandrel. A stiff brush can be used. Avoid using harsh chemicals that may damage the tool.
- Inspection: Periodically inspect the teeth for wear, damage, or dullness. A dull hole saw will cut slowly and generate excessive heat. Replace the hole saw if teeth are significantly worn or damaged.
- Storage: Store the hole saw and mandrel in a dry place to prevent rust. Keep them in their original packaging or a tool case to protect the teeth from damage.
- Lubrication (for metal cutting): When cutting metal, using a cutting lubricant can significantly extend the life of the hole saw and improve cutting performance.
7. Troubleshooting
| Problem | Possible Cause | Solution |
|---|---|---|
| Slow cutting or excessive effort required | Dull teeth, incorrect drill speed, insufficient pressure, or cutting hard material without lubricant. | Replace hole saw if dull. Adjust drill speed. Apply consistent pressure. Use cutting lubricant for metal. |
| Hole saw binds or jams | Excessive pressure, material movement, or chips not clearing. | Reduce pressure. Secure workpiece more firmly. Periodically withdraw saw to clear chips. |
| Excessive heat or smoke | Incorrect drill speed, dull saw, or lack of lubricant (for metal). | Reduce drill speed. Replace saw if dull. Use cutting lubricant. Allow saw to cool. |
| Inaccurate hole placement | Pilot bit not centered, workpiece not secured. | Ensure pilot bit is precisely on the mark. Secure workpiece tightly. |
| Hole saw not attaching to mandrel | Improper alignment, debris in mechanism, or non-compatible mandrel. | Ensure proper alignment and push firmly until it clicks. Clean mandrel mechanism. Verify mandrel is a Diablo Snap-Lock Plus. |
8. Specifications
| Feature | Detail |
|---|---|
| Model Number | DHS3000 |
| Diameter | 3 inches (76mm) |
| Cutting Depth | 2-3/8 inches (60mm) |
| Material | Bi-Metal (Stainless Steel) |
| Mandrel System Compatibility | Diablo Snap-Lock Plus (Mandrel sold separately) |
| Item Weight | 6.4 ounces |
| Product Dimensions | 3"L x 3.8"W |
| Manufacturer | Freud (Diablo) |
| UPC | 008925128038 |
9. Support and Warranty
For technical assistance, product inquiries, or warranty information, please contact Diablo customer support. Details can typically be found on the official Diablo Tools website or product packaging.
Note: Specific warranty terms and conditions may vary. Please refer to the documentation included with your purchase or visit the manufacturer's website for the most current information.


