1. Product Overview
The UDIRC U818A is a 2.4GHz 4-channel RC Quadcopter equipped with a 6-axis gyro for stable flight and easy operation. This model includes a camera for video recording and still photography, offering an engaging remote-controlled flying experience.
Key Features:
- 6-Axis Gyro: Integrated design ensures precise positioning and stable flight.
- 4-Channel Control: Provides stable flying and easy maneuverability.
- Integrated Camera: Capable of video recording and still photography.
- High Capacity Battery: Enables extended flight times.
- Modular Design: Facilitates easy installation and repair of components.
- Control Distance: Up to 30 meters.

Image 1.1: The UDIRC U818A RC Quadcopter and its 2.4GHz remote control, along with the battery charger.
2. Safety Information
While no specific safety information was provided by the manufacturer in the product details, it is crucial to follow general safety guidelines when operating remote-controlled aircraft:
- Always operate the quadcopter in open areas, away from people, animals, and obstacles.
- Do not fly near airports, power lines, or other restricted airspace.
- Ensure the battery is fully charged and securely installed before each flight.
- Inspect the quadcopter for any damage before and after each use.
- Keep fingers and loose clothing away from rotating propellers.
- Adult supervision is recommended for users under 14 years of age.
- Do not modify the quadcopter or its components.
3. Setup
3.1. Package Contents
Verify that all items are present in the package:
- 1 x UDIRC U818A RC Quadcopter with Camera
- 1 x Transmitter (Remote Control)
- 1 x 3.7V 500mAh Li-Po Battery (for quadcopter)
- 1 x USB Charging Cable
- Spare Propellers
- Screwdriver
- User Manual
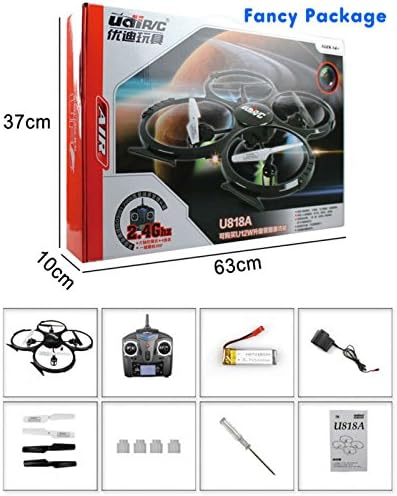
Image 3.1: Visual representation of the UDIRC U818A quadcopter package contents, including the drone, remote, battery, charger, and spare parts.
3.2. Charging the Quadcopter Battery
- Connect the quadcopter's Li-Po battery to the provided USB charging cable.
- Plug the USB charging cable into a USB power source (e.g., computer USB port, USB wall adapter).
- The charging indicator light on the USB cable will illuminate during charging and turn off when fully charged.
- Charging time is approximately 120 minutes. Do not overcharge.
3.3. Installing Transmitter Batteries
- Open the battery compartment on the back of the transmitter.
- Insert 4 x AA batteries (not included), ensuring correct polarity (+/-).
- Close the battery compartment securely.
3.4. Propeller Installation (if required)
If propellers are not pre-installed or need replacement:
- Identify the 'A' and 'B' marked propellers.
- Match the 'A' propellers to the motor shafts marked 'A' and 'B' propellers to motor shafts marked 'B'.
- Gently push the propellers onto the motor shafts until they are secure. Ensure they can rotate freely.
3.5. Binding the Quadcopter and Transmitter
- Place the quadcopter on a flat, level surface.
- Connect the quadcopter's battery. The LED lights on the quadcopter will flash.
- Turn on the transmitter.
- Push the left throttle stick (up/down) all the way up, then all the way down.
- The quadcopter's LED lights will stop flashing and remain solid, indicating successful binding.
4. Operating Instructions
4.1. Basic Flight Controls
Familiarize yourself with the transmitter controls:
- Left Stick (Throttle/Yaw):
- Up/Down: Controls altitude (throttle).
- Left/Right: Controls rotation (yaw).
- Right Stick (Pitch/Roll):
- Up/Down: Controls forward/backward movement (pitch).
- Left/Right: Controls leftward/rightward movement (roll).
4.2. Take-off and Landing
- After binding, slowly push the left throttle stick upwards to take off.
- To land, slowly pull the left throttle stick downwards until the quadcopter gently touches the ground.
4.3. Trim Adjustment
If the quadcopter drifts in any direction during hover, use the trim buttons on the transmitter to correct it. Press the trim button opposite to the drift direction until stable flight is achieved.
4.4. 360° Flips
Ensure sufficient altitude (at least 3 meters) before attempting flips. Press the 360° flip button (refer to your transmitter diagram) and then quickly push the right stick in the desired flip direction (forward, backward, left, or right).
4.5. Camera Operation
The U818A is equipped with a camera for aerial photography and videography. Ensure a microSD card (not included, but 2GB cards are often bundled) is inserted into the camera slot before use.
- Taking Photos: Press the photo button on the transmitter (refer to your transmitter diagram). A single beep usually indicates a photo has been taken.
- Recording Video: Press the video button on the transmitter. A continuous beep or flashing light typically indicates recording is in progress. Press again to stop recording.

Image 4.1: The underside of the UDIRC U818A quadcopter, highlighting the integrated camera and battery compartment.

Image 4.2: The UDIRC U818A quadcopter with its red and blue LED lights illuminated, indicating power and flight status.
5. Maintenance
5.1. Cleaning
Wipe the quadcopter with a soft, dry cloth after each use to remove dust and debris. Avoid using water or harsh chemicals.
5.2. Propeller Replacement
If a propeller is damaged, replace it immediately using the spare propellers provided. Refer to section 3.4 for installation instructions. Damaged propellers can affect flight stability and performance.
5.3. Battery Care
- Store batteries in a cool, dry place when not in use.
- Do not expose batteries to extreme temperatures or direct sunlight.
- If the quadcopter will not be used for an extended period, remove the battery from the quadcopter and the AA batteries from the transmitter.
6. Troubleshooting
| Problem | Possible Cause | Solution |
|---|---|---|
| Quadcopter does not respond to transmitter. | Not bound, low battery, out of range. | Re-bind the quadcopter (Section 3.5). Charge quadcopter battery. Replace transmitter batteries. Ensure within 30m range. |
| Quadcopter drifts during flight. | Trim not adjusted, uneven surface during binding. | Adjust trim controls (Section 4.3). Ensure quadcopter is on a flat surface when binding. |
| Short flight time. | Battery not fully charged, old battery. | Ensure battery is fully charged (Section 3.2). Consider replacing old batteries. |
| Camera not recording/taking photos. | No microSD card, card full, card error. | Insert a formatted microSD card. Check card capacity. Try a different card. |
| Quadcopter unstable or crashes easily. | Damaged propellers, strong wind, inexperienced pilot. | Replace damaged propellers (Section 5.2). Fly in calm conditions. Practice basic controls. |
7. Specifications
| Feature | Detail |
|---|---|
| Brand | UDIRC |
| Model Name | FBA_U818A |
| Item Model Number | UDIU818A |
| Special Feature | FPV-capable, Integrated Camera |
| Age Range (Recommended) | Adult (Manufacturer recommended: 14 years and up) |
| Color | As Shown |
| Included Components | Battery, Camera |
| Quadcopter Battery | 3.7V 500mAh Lithium Polymer (included) |
| Charging Time | Approximately 120 minutes |
| Flying Time | 6-9 minutes |
| Remote Control Technology | 2.4GHz Radio |
| Control Type | Remote Control |
| Maximum Range | 30 Meters |
| Material | Plastic |
| Wireless Communication | Wi-Fi (for FPV, if applicable) |
| Transmitter Batteries | 4 x AA batteries (not included) |
| Product Dimensions | 12.99"L x 13.39"W x 2.17"H (33 x 34 x 5.5 cm) |
| Item Weight | 2.4 pounds |
| UPC | 739792841415 |
| Date First Available | May 30, 2013 |

Image 7.1: Diagram illustrating the dimensions of the UDIRC U818A quadcopter.
8. Warranty and Support
8.1. Warranty Information
Specific warranty details were not provided in the product information. Please refer to the product packaging or contact UDIRC directly for warranty terms and conditions.
8.2. Customer Support
For further assistance, technical support, or inquiries regarding your UDIRC U818A Quadcopter, please contact UDIRC customer service through their official website or the retailer where the product was purchased.


