
Introduction
The RadioShack Inline Antenna Signal Amplifier is designed to enhance over-the-air (OTA) television signals. This device strengthens weak signals, helping to improve picture clarity and channel stability, especially in areas with long cable runs, signal splitters, or weak broadcast signals. It provides up to 15 dB of signal gain and is suitable for both indoor and outdoor antenna setups.
Safety Information
- Do not expose the amplifier to moisture or extreme temperatures.
- Ensure all connections are secure to prevent signal loss or electrical hazards.
- Disconnect power before making or changing connections.
- Keep out of reach of children.
- Use only with compatible antenna systems and power adapters.
Package Contents
Please verify that all items are present:
- RadioShack Inline Antenna Signal Amplifier
- Antenna (if included in specific kit)
- Coaxial Cable (if included in specific kit)
- Power Adapter (if required for amplified antenna setup)
Setup and Installation
Follow these steps to properly install your inline antenna signal amplifier. Ensure your television and any other connected devices are powered off before beginning installation.
1. Connecting with an External Passive Antenna
This configuration is for passive (non-amplified) outdoor or indoor antennas. The amplifier is placed inline between the antenna and your television.
- Connect the coaxial cable from your external passive antenna to one end of the RadioShack Inline Antenna Signal Amplifier.
- Connect another coaxial cable from the other end of the amplifier to the antenna input on your television (HDTV).
- Ensure all connections are finger-tight.

Image: Setup for an external passive antenna. The antenna connects via an RF cable to the inline amplifier, which then connects to the indoor television setup. This can be done entirely indoors or with an outdoor antenna cable running indoors.
2. Connecting with an External Amplified Antenna
If you are using an external amplified antenna that requires a power injector, the RadioShack amplifier should be placed after the power injector.
- Connect the coaxial cable from your external amplified antenna to the input of its power injector.
- Connect the power adapter for the amplified antenna to the power injector and plug it into a wall outlet.
- Connect a coaxial cable from the output of the power injector to one end of the RadioShack Inline Antenna Signal Amplifier.
- Connect another coaxial cable from the other end of the RadioShack amplifier to the antenna input on your television (HDTV).
- Ensure all connections are finger-tight.

Image: Setup for an external amplified antenna. The outdoor antenna connects to an indoor power injector, which is powered by an adapter. The output of the power injector then connects to the RadioShack inline amplifier, which finally connects to the television.
3. Connecting to Multiple Devices (with a Splitter)
If you need to distribute the amplified signal to multiple televisions or other devices (like an FM tuner), you can use a 75 ohm splitter after the inline amplifier.
- Follow either Step 1 or Step 2 to connect your antenna to the RadioShack Inline Antenna Signal Amplifier.
- Connect a coaxial cable from the output of the RadioShack amplifier to the input of a 75 ohm splitter.
- Connect coaxial cables from the outputs of the splitter to the antenna inputs of your HDTV, other TVs, or FM tuners.
- Ensure all connections are finger-tight.
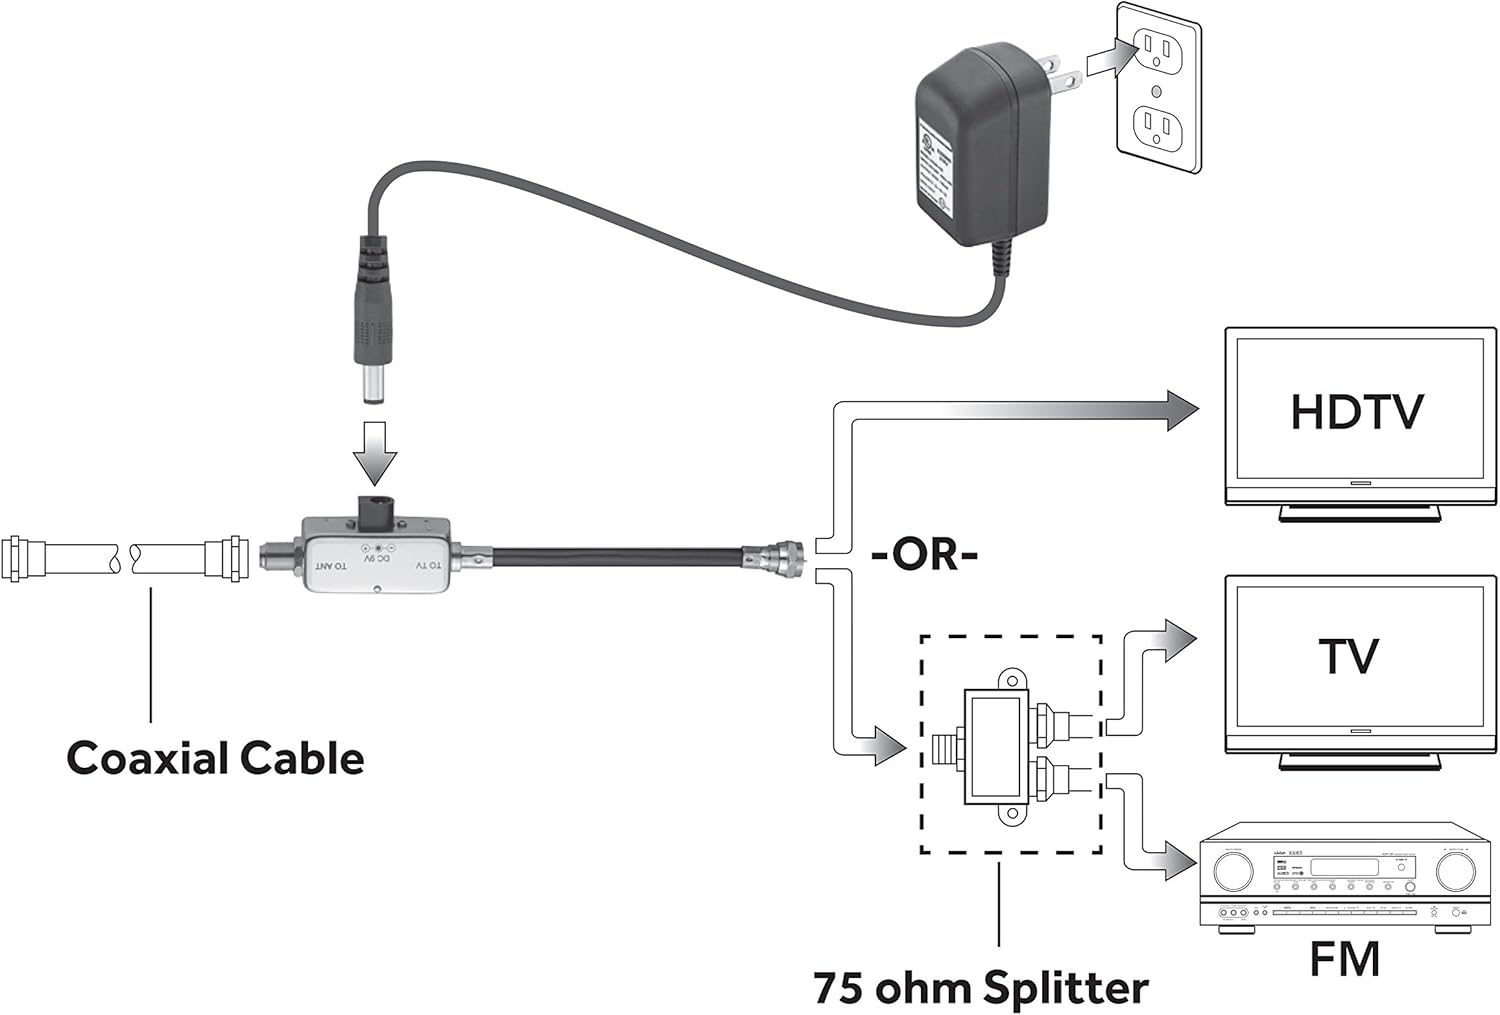
Image: Connection diagram showing the coaxial cable from the antenna (potentially via a power injector) connecting to the inline amplifier. The amplifier's output then connects to a 75 ohm splitter, which distributes the signal to an HDTV, another TV, and an FM receiver.
Operating Instructions
Once the amplifier is installed according to the setup instructions:
- Power on your television and any other connected devices.
- Perform a channel scan on your television. Refer to your TV's instruction manual for specific steps on how to perform a channel scan.
- The amplifier works automatically to boost the signal. No further user interaction is typically required.
- Adjust your antenna's position if necessary to optimize signal reception after the amplifier is installed.
Maintenance
- Keep the amplifier clean and free from dust. Use a soft, dry cloth for cleaning.
- Avoid exposing the unit to excessive moisture or direct sunlight.
- Regularly check coaxial cable connections to ensure they remain secure.
- Do not attempt to open or repair the amplifier yourself. Refer to qualified service personnel.
Troubleshooting
| Problem | Possible Cause | Solution |
|---|---|---|
| No signal or worse reception after installation. |
|
|
| Pixelated picture or intermittent signal. |
|
|
| Fewer channels found after installation. |
|
|
Specifications
| Feature | Detail |
|---|---|
| Brand | RadioShack |
| Model Number | 8541712422 |
| Signal Gain | Up to 15 dB |
| Item Weight | 8.8 ounces |
| Package Dimensions | 6.5 x 3.4 x 3.1 inches |
| Color | Silver |
| Wireless Communication Standard | 802.11g (Note: This specification might be a generic placeholder from the source data and may not directly apply to an antenna amplifier. Focus on RF signal amplification.) |
| Date First Available | October 1, 2014 |
Limited Warranty
RadioShack products are manufactured to high quality standards. This product is covered by a limited warranty. For specific warranty terms, conditions, and duration, please refer to the warranty card included with your purchase or visit the official RadioShack website. Keep your purchase receipt as proof of purchase.
Customer Support
For technical assistance, troubleshooting, or product inquiries, please visit the official RadioShack website or contact their customer service department. Contact information can typically be found on the product packaging or the manufacturer's website.
Online Resources: www.radioshack.com