
RYOBI P325
RYOBI P325 ONE+ 18V 16 Gauge Cordless Finish Nailer Instruction Manual
Model: P325
1. Introduction
The RYOBI P325 ONE+ 18V 16 Gauge Cordless Finish Nailer is designed for various finish nailing applications, offering cordless convenience and eliminating the need for compressors, hoses, or gas cartridges. This tool is part of the RYOBI ONE+ 18V system, compatible with all RYOBI ONE+ 18V batteries.
Key features include:
- AirStrike Technology: Provides cordless operation without the need for external air sources.
- 16 Gauge Nail Capacity: Drives 16 gauge finish nails from 3/4 inch to 2-1/2 inches in length.
- Tool-Free Depth Adjustment: Allows for precise control over nail depth.
- LED Lighting: Illuminates the work area for improved visibility in dim conditions.
- Low Nail Indicator: Alerts the user when the nail magazine is low to prevent dry firing.
- Tool-Free Jam Release: Simplifies clearing nail jams.
- ONE+ Compatibility: Works with any RYOBI ONE+ 18V battery.

Image 1.1: The RYOBI P325 ONE+ 18V 16 Gauge Cordless Finish Nailer, showcasing its compact design and AirStrike Technology branding.
2. General Safety Information
Always read and understand all safety warnings, instructions, illustrations, and specifications provided with this power tool. Failure to follow all instructions listed below may result in electric shock, fire, and/or serious injury.
- Work Area Safety: Keep your work area clean and well-lit. Cluttered or dark areas invite accidents.
- Electrical Safety: Do not expose power tools to rain or wet conditions. Water entering a power tool will increase the risk of electric shock.
- Personal Safety: Always wear eye protection, hearing protection, and appropriate clothing. Stay alert, watch what you are doing, and use common sense when operating a power tool.
- Tool Use and Care: Do not force the power tool. Use the correct power tool for your application. Disconnect the battery pack from the power tool before making any adjustments, changing accessories, or storing power tools.
- Battery Tool Use and Care: Recharge only with the charger specified by the manufacturer. Use power tools only with specifically designated battery packs.
3. Product Components
Familiarize yourself with the various parts of your RYOBI P325 Finish Nailer for safe and effective operation.
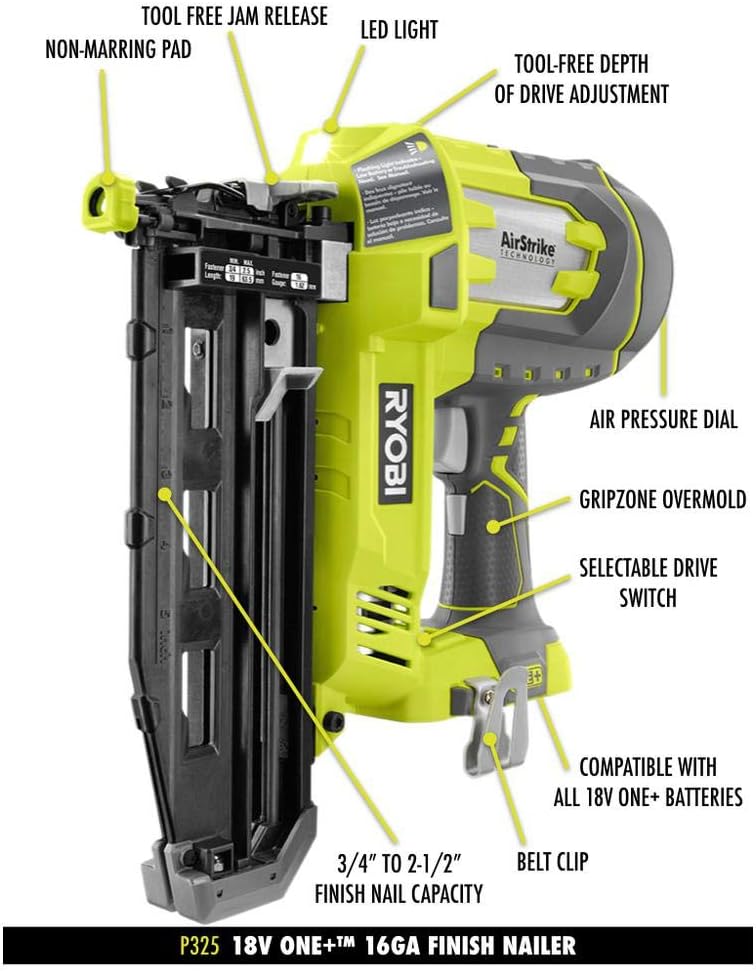
Image 3.1: Labeled diagram illustrating the key components of the RYOBI P325 Finish Nailer.
Key Components:
- Non-Marring Pad: Protects work surfaces from damage.
- Tool-Free Jam Release: Lever for quickly clearing nail jams.
- LED Light: Illuminates the work area.
- Tool-Free Depth of Drive Adjustment: Knob to set nail depth.
- Air Pressure Dial: Adjusts the air pressure for driving nails.
- Gripzone Overmold: Ergonomic handle for comfortable grip.
- Selectable Drive Switch: Controls firing mode (sequential or contact actuation).
- Belt Clip: For convenient carrying.
- Magazine: Holds 16 gauge finish nails.
- Battery Port: Compatible with all 18V ONE+ batteries.
4. Setup
4.1 Battery Installation
- Ensure the nailer is turned off.
- Align the ribs on the battery with the grooves in the tool's battery port.
- Slide the battery into the tool until it clicks securely into place.
- To remove, press the latch on the battery and pull it out.

Image 4.1: Close-up view of the battery port on the RYOBI P325, showing where the ONE+ 18V battery connects.
4.2 Loading Nails
- Ensure the battery is removed for safety.
- Pull the pusher assembly back until it locks into place.
- Insert a strip of 16 gauge finish nails into the magazine, ensuring the nail heads are properly seated in the groove.
- Release the pusher assembly, allowing it to push the nails forward.

Image 4.2: Front view of the RYOBI P325, highlighting the nail magazine ready for loading 16 gauge finish nails.
5. Operating Instructions
5.1 Powering On and Firing Modes
Insert a charged 18V ONE+ battery. The tool is ready for use. Use the selectable drive switch to choose between sequential (single shot) or contact actuation (bump fire) modes, if available on your model. Refer to the tool's markings for specific mode selection.
5.2 Adjusting Depth of Drive
The tool-free depth adjustment knob allows you to control how deep the nail is driven into the material. Turn the knob clockwise to increase depth and counter-clockwise to decrease depth. Test on a scrap piece of material to achieve the desired depth.
5.3 Using the LED Light
The integrated LED light illuminates the work surface. It can be activated by a separate trigger or automatically when the main trigger is pressed, depending on the tool's design. This feature is useful in low-light conditions.
5.4 Nailing Applications
The RYOBI P325 is suitable for various finish applications such as installing crown molding, baseboards, exterior trim, and decorative pieces.

Image 5.1: The RYOBI P325 being used to install baseboard trim, demonstrating its application in finish carpentry.

Image 5.2: The RYOBI P325 being used for installing crown molding, showcasing its versatility for overhead tasks.
6. Maintenance
6.1 General Cleaning
Keep the tool clean and free of debris. Use a clean cloth to wipe down the exterior. Do not use solvents or harsh chemicals, as they may damage plastic parts.
6.2 Clearing Nail Jams
If a nail jam occurs:
- Remove the battery pack immediately.
- Locate the tool-free jam release lever and open the front end of the nailer.
- Carefully remove the jammed nail using pliers if necessary.
- Close the front end securely and re-insert the battery.
6.3 Storage
Store the nailer in a dry, secure location out of reach of children. Remove the battery pack before storing for extended periods.
7. Troubleshooting
| Problem | Possible Cause | Solution |
|---|---|---|
| Nailer does not fire | Battery not charged or improperly installed Nail magazine empty Nail jam Workpiece contact element not fully depressed | Charge battery and ensure proper installation Load nails Clear nail jam (refer to Section 6.2) Ensure workpiece contact element is fully depressed against the work surface |
| Nails not driven to full depth | Depth adjustment set too shallow Low battery charge Incorrect nail length for material | Adjust depth of drive (refer to Section 5.2) Recharge battery Use appropriate nail length for the material |
| Nail jam occurs frequently | Damaged nails Incorrect nail size/type Tool needs cleaning | Use only undamaged, recommended nails Ensure correct 16 gauge finish nails are used Clean the tool and magazine |
8. Specifications
| Specification | Detail |
|---|---|
| Model Number | P325 |
| Brand | RYOBI |
| Voltage | 18 Volts |
| Nail Gauge | 16 Gauge |
| Nail Length Capacity | 3/4 inch to 2-1/2 inches |
| Power Source | Battery Powered (RYOBI ONE+ 18V) |
| Item Weight | 6.6 pounds (approximately 3 kg) |
| Product Dimensions | 4.13 x 11.6 x 12.7 inches |
| Material | Metal |
| Battery Cell Composition | Lithium Ion (Battery not included) |
9. Warranty and Support
9.1 Warranty Information
RYOBI power tools typically come with a manufacturer's warranty. The specific terms and duration of the warranty may vary. Please refer to the warranty card included with your product or visit the official RYOBI website for detailed warranty information. Keep your proof of purchase for warranty claims.
9.2 Customer Support
For technical assistance, parts, or service, please contact RYOBI customer support. Contact information can usually be found on the product packaging, the official RYOBI website, or by calling their dedicated support line.
Online Resources:
- Official RYOBI Website: www.ryobitools.com
Related documentsP325


Ask a question about this manual
Ask about setup, troubleshooting, compatibility, parts, safety, or missing instructions. Manuals+ will review the question and use this page’s manual context to help answer it.