
Pitco 3-SG18D-S/FD
Pitco 3-SG18D-S/FD Gas Solstice Fryer User Manual
Model: 3-SG18D-S/FD | Brand: Pitco
Introduction
This manual provides essential information for the safe and efficient operation, installation, maintenance, and troubleshooting of your Pitco 3-SG18D-S/FD Gas Solstice Fryer. Please read this manual thoroughly before operating the equipment and retain it for future reference. This commercial fryer is designed for professional use and features three 90 lb capacity fry pots, digital controls, and a built-in filter system.
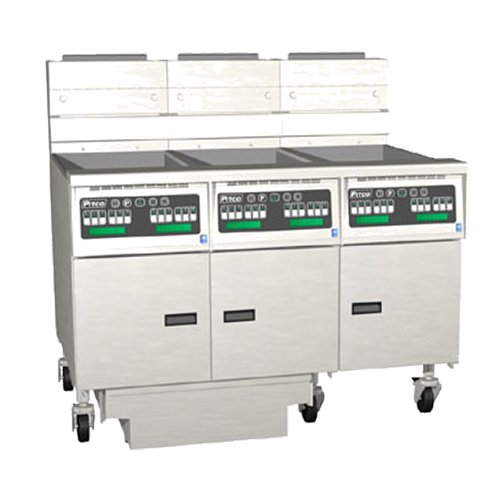
Figure 1: The Pitco 3-SG18D-S/FD Gas Solstice Fryer. This image shows the front view of the triple-fryer unit, featuring three distinct fry pots, each with its own digital control panel. The unit is constructed from stainless steel and is equipped with casters for mobility.
Setup and Installation
Proper installation is crucial for the safe and efficient operation of your fryer. It is recommended that installation be performed by a qualified service technician.
1. Unpacking
- Carefully remove the fryer from its packaging.
- Inspect the unit for any shipping damage. Report any damage immediately to the carrier and your supplier.
- Remove all protective films and packing materials from the unit.
2. Placement and Ventilation
- Position the fryer on a level, non-combustible surface.
- Ensure adequate clearance around the unit for proper ventilation and maintenance access. Refer to local codes for specific clearance requirements.
- The fryer must be installed under an approved commercial exhaust hood with sufficient ventilation capacity.
3. Gas Connection
- All gas connections must comply with local and national codes.
- Connect the fryer to the appropriate gas supply (natural gas or propane) as specified on the unit's data plate.
- Ensure all gas connections are leak-tested before operation.
4. Electrical Connection
- Connect the fryer to a grounded electrical outlet with the correct voltage and amperage as specified on the unit's data plate.
- Do not use extension cords.
5. Initial Cleaning and Oil Filling
- Before first use, clean the fry pots and all internal surfaces that will come into contact with food using a mild detergent and warm water. Rinse thoroughly and dry completely.
- Fill each fry pot with cooking oil to the indicated "MIN" and "MAX" fill lines. Do not overfill or underfill.
Operating Instructions
Familiarize yourself with the digital controls for each fry pot.
1. Powering On and Temperature Setting
- Ensure the gas supply is open and the fryer is plugged in.
- Press the POWER button on each digital control panel to turn on the respective fry pot.
- Use the UP/DOWN arrows to set the desired cooking temperature. The display will show the current oil temperature and the set temperature.
- Allow the oil to preheat to the set temperature before adding food.
2. Frying Procedures
- Carefully lower food into the hot oil using a fryer basket. Do not overload the basket, as this can lower oil temperature and result in soggy food.
- Monitor cooking progress. The digital controls may include timers or other features to assist with cooking.
- Once cooked, carefully lift the basket and allow excess oil to drain.
- Transfer cooked food to a holding area.
3. Powering Off
- After use, press the POWER button on each control panel to turn off the fry pots.
- For extended periods of non-use, turn off the main gas supply valve and unplug the unit.
Safety Precautions During Operation
- Always wear appropriate personal protective equipment (PPE), including heat-resistant gloves and eye protection.
- Never leave an operating fryer unattended.
- Do not allow water or ice to come into contact with hot oil, as this can cause severe splashing and burns.
- Keep the area around the fryer clear of clutter and flammable materials.
Maintenance and Cleaning
Regular maintenance ensures optimal performance and extends the lifespan of your fryer.
1. Daily Cleaning
- Allow oil to cool completely before cleaning.
- Filter the oil using the built-in filtration system. Follow the instructions for your specific filtration process.
- Wipe down the exterior stainless steel surfaces with a damp cloth and mild detergent. Dry thoroughly to prevent streaks.
- Clean fryer baskets and accessories.
2. Oil Filtration and Disposal
- The fryer features a built-in filter. Refer to the specific instructions for operating the filtration cycle.
- Regularly filter oil to remove food particles and extend oil life.
- Dispose of spent cooking oil according to local environmental regulations.
3. Deep Cleaning (Weekly/Bi-Weekly)
- Drain all oil from the fry pots.
- Boil out the fry pots with a commercial fryer cleaner solution following the product's instructions.
- Rinse the fry pots thoroughly with clean water until all cleaner residue is removed.
- Dry the fry pots completely before refilling with fresh oil.
4. Inspections and Professional Servicing
- Periodically inspect gas lines, electrical cords, and controls for any signs of wear or damage.
- Schedule regular preventative maintenance with a qualified service technician to ensure all components are functioning correctly and safely.
Troubleshooting
This section provides solutions to common operational issues. For problems not listed here, contact a qualified service technician.
| Problem | Possible Cause | Solution |
|---|---|---|
| Fryer not heating | No gas supply; Unit not powered on; Thermostat issue; Safety limit tripped. | Check gas valve; Ensure unit is plugged in and power button pressed; Reset safety limit (refer to specific model instructions); Contact service technician. |
| Oil not reaching set temperature | Incorrect temperature setting; Overloading fry pot; Insufficient gas pressure. | Verify temperature setting; Reduce load size; Check gas supply pressure. |
| Excessive smoke from oil | Oil is old or contaminated; Oil temperature too high. | Filter or replace oil; Verify temperature setting and thermostat calibration. |
| Digital display not working | Power issue; Control panel malfunction. | Check power connection; Contact service technician. |
Specifications
Key specifications for the Pitco 3-SG18D-S/FD Gas Solstice Fryer:
| Model Number | 3-SG18D-S/FD |
| Brand | Pitco |
| Product Dimensions | 6 x 6 x 6 inches (Shipping dimensions, actual unit dimensions may vary slightly) |
| Item Weight | 843 pounds |
| BTU Rating | 420,000 BTU |
| Fat Capacity | 90 lbs per fry pot (3 tanks total) |
| Exterior Finish | Stainless steel front and sides |
| Fry Pot Material | Stainless steel |
| Controls | Digital controls |
| Filter System | Built-in filter |
Warranty and Support
For detailed warranty information, please refer to the warranty card included with your product or visit the official Pitco website. Warranty terms and conditions may vary.
For technical support, parts, or service inquiries, please contact Pitco customer service or an authorized Pitco service provider. Ensure you have your model number (3-SG18D-S/FD) and serial number ready when contacting support.
Related documents3-SG18D-S/FD


Ask a question about this manual
Ask about setup, troubleshooting, compatibility, parts, safety, or missing instructions. Manuals+ will review the question and use this page’s manual context to help answer it.