1. Introduction
This manual provides detailed instructions for the installation, setup, operation, and maintenance of your SUNDING SD-563B Wired Multifunction Bicycle Computer. Please read this manual thoroughly before use to ensure proper functionality and to maximize your cycling experience.
2. Key Features
- Wired Connection: Ensures stable and accurate data transmission.
- Multi-functional Display: Provides comprehensive cycling data.
- Auto Backlight: Enhances visibility in low-light conditions.
- Automatic Power ON/OFF: Conserves battery life.
- One-Touch Detachment: Easy removal of the main unit.
- Integrated Clock, Thermometer, and Stopwatch.
- Maintenance and Speed Reminders.
Main Functions Displayed:
- SPD: Current Speed
- ODO: Odometer (Total Distance)
- DST: Trip Distance
- MXS: Maximum Speed
- AVS: Average Speed
- TTM: Total Trip Time
- TM: Trip Time
- RAT: Total Accumulated Time
- CLK: Clock (12h/24h display)
- SW: Stopwatch
- TEMPERATURE: Current Temperature
3. Package Contents
Please check that all items are present in the package:
- Bicycle Computer (Main Unit) x 1
- Sensor x 1
- Magnet x 1
- Cable Ties x 6
4. Installation and Mounting
Follow these steps to properly install your bicycle computer:
- Mount the Meter Holder: Secure the meter holder to your bicycle's handlebar using the provided fixing band. Ensure it is firmly attached and positioned for easy viewing.
- Attach the Main Unit: Slide the main bicycle computer unit onto the meter holder until it clicks securely into place.
- Install the Magnet: Attach the magnet to one of the front wheel spokes. Position it so that it will pass closely by the sensor.
- Mount the Sensor: Attach the sensor to the left front fork. The sensor should be positioned approximately 1mm away from the magnet when the wheel rotates. This precise gap is crucial for accurate speed readings.
- Secure Cables: Use the provided cable ties to neatly secure the sensor cable along the fork and frame, preventing it from interfering with moving parts or getting damaged.

Figure 4.1: Overview of the SUNDING SD-563B Bicycle Computer and its typical use on a bicycle.
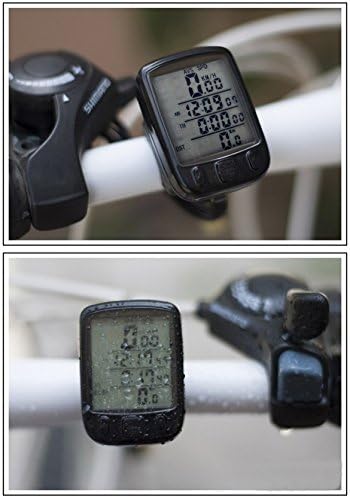
Figure 4.2: The bicycle computer mounted on a handlebar, demonstrating its compact size and display visibility in various conditions.
5. Setup and Configuration
After installing the battery, the device will enter display mode. To configure settings:
- Enter Setting Mode: Press and hold the Set button for 3 seconds. The display will enter the setting mode, starting with temperature unit.
- Navigate and Adjust:
- Use the Up button (left button) to adjust the value of the current setting.
- Press the Set button (right button) to confirm the current setting and move to the next setting option.
- Setting Order: Proceed through the settings in the following order: Temperature Unit, Time (12h/24h format), Tire Circumference, Speed Unit (km/h or mph), ODO (Odometer initial value), and RAT (Total Accumulated Time initial value).
- Tire Circumference: Refer to the tire circumference table provided in the original product manual for accurate values. This setting is critical for precise speed and distance measurements.
6. Operation
The SUNDING SD-563B is designed for straightforward operation with three main buttons:
- Up Button (Left): Used to adjust values during setup and to cycle through display modes.
- Mode Button (Middle): Primarily used to switch between different display functions (e.g., SPD, ODO, DST, MXS, AVS, TTM, TM, RAT, CLK, SW, TEMPERATURE).
- Set Button (Right): Used to confirm settings and to enter/exit setting mode.
Backlight Function:
The device features an auto backlight. In low-light conditions, pressing any button will activate the backlight for a short duration (typically 5 seconds). Some models may allow for continuous backlight activation by holding the Mode button for 5 seconds.
Automatic Power ON/OFF:
The computer will automatically turn on when motion is detected and enter sleep mode after a period of inactivity to conserve battery.
7. Maintenance
To ensure the longevity and accuracy of your bicycle computer, follow these maintenance guidelines:
- Cleaning: Wipe the unit with a soft, damp cloth. Do not use abrasive cleaners or solvents.
- Water Resistance: The unit is designed to withstand splashes and light rain. However, it is not fully waterproof. Avoid submerging the device in water.

Figure 7.1: The bicycle computer demonstrating its resistance to water splashes.
- Battery Replacement: When the battery change sign appears on the display, replace the 2032 battery promptly. Open the battery compartment carefully, replace the old battery with a new one, and ensure the compartment is sealed tightly.
- Sensor and Magnet Alignment: Periodically check the alignment of the sensor and magnet. Ensure the 1mm gap is maintained for accurate readings.
- Cable Integrity: Inspect the sensor cable for any signs of wear, fraying, or damage. Replace if necessary to maintain connection.
8. Troubleshooting
If you encounter issues with your SUNDING SD-563B, try the following solutions:
| Problem | Possible Cause | Solution |
|---|---|---|
| No display or faint display | Low battery or incorrect battery insertion. | Replace the 2032 battery. Ensure it is inserted with the correct polarity. |
| No speed reading / Inaccurate speed | Sensor and magnet misalignment, damaged cable, or incorrect tire circumference setting. | Check the 1mm gap between sensor and magnet. Ensure the sensor cable is intact and securely connected. Verify the tire circumference setting. |
| Unit freezes or becomes unresponsive | Temporary software glitch. | Remove the battery for a few seconds, then reinsert it. You may need to reconfigure settings after this. |
| Backlight not working | Low battery or backlight setting. | Replace battery. Check if the backlight is set to auto or continuous mode. |
9. Specifications
- Model: SD-563B
- Display Type: LCD
- LCD Size: 35 x 30 mm
- Unit Dimensions (Main Unit): 58 x 40 x 19 mm
- Weight: 52 g
- Power Source: 1 x CR2032 Battery (included)
- Sensor Type: Speed Sensor
- Connectivity: Wired
10. Warranty and Support
For warranty information and customer support, please refer to the product packaging or contact your retailer. Keep your purchase receipt as proof of purchase.


