
1. Product Overview
The TurboTorch G Series Nitrogen Purge Regulator (Model 0386-0875) is a heavy-duty single-stage regulator designed for nitrogen purging applications. It offers a delivery range of 0 to 500 psig and incorporates features for enhanced durability and ease of use.
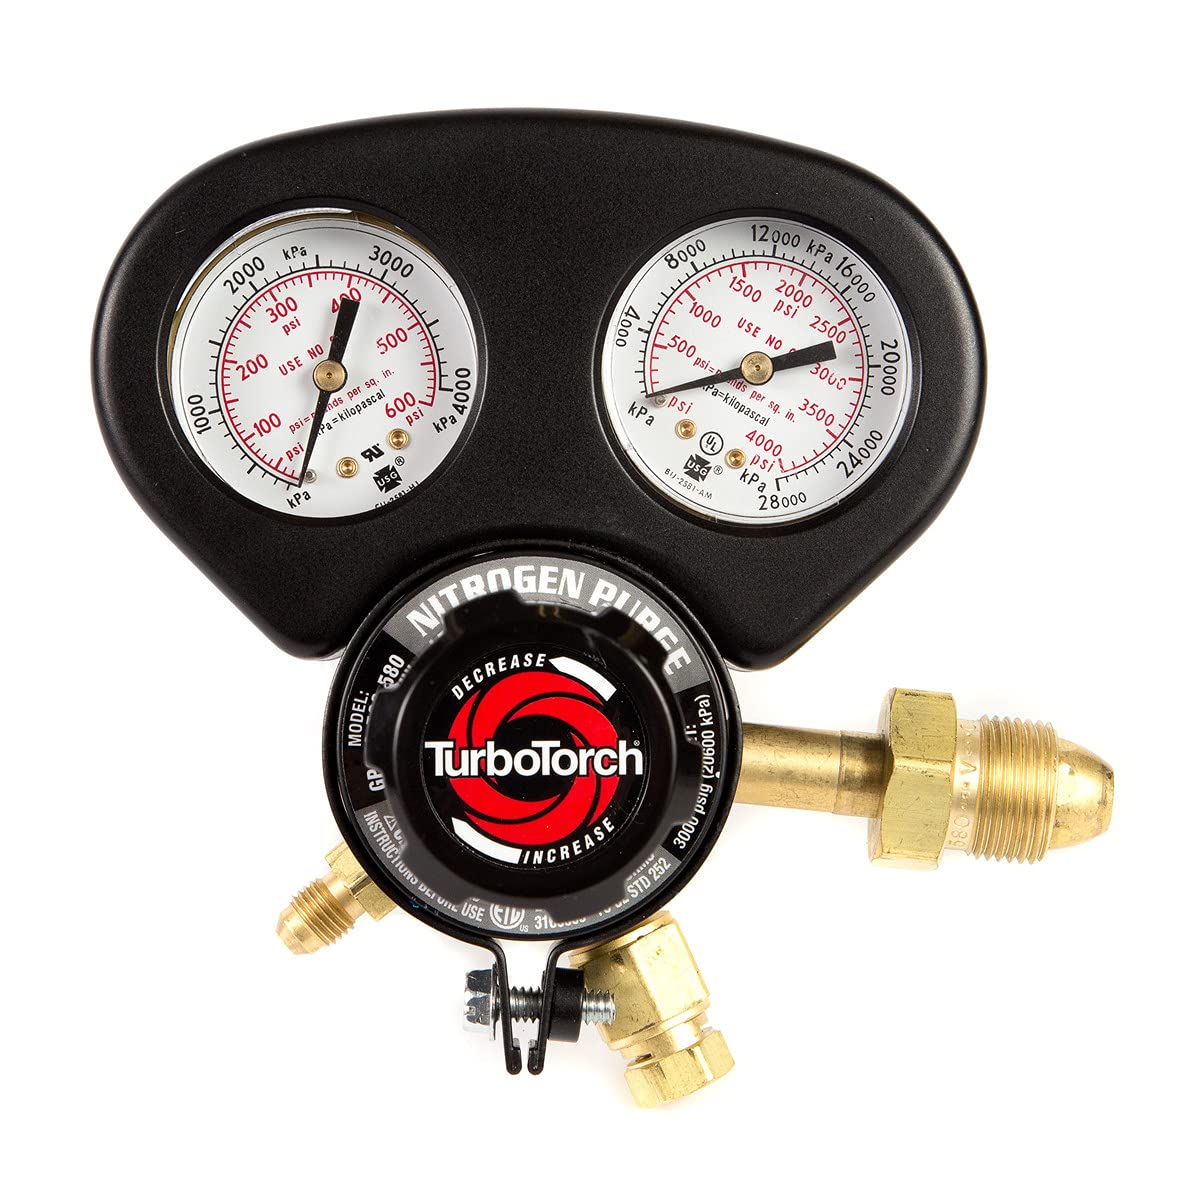
Figure 1: Front view of the TurboTorch G Series Nitrogen Purge Regulator, showing the two gauges and the adjustment knob.
Key Features:
- Delivery Range: 0 - 500 psig for precise nitrogen purging.
- Low Profile Design: Compact and efficient.
- Easy Grip Knob: Facilitates simple pressure adjustment.
- Heavy-Duty Gauge Guard: Steel construction for added protection of the gauges.
- Patented High-Strength Alloy Bonnet: Offers nearly twice the yield strength of traditional brass bonnets for increased durability.
- 1/4" Flare Fitting: Standard connection for various applications.
- Single Stage: Provides consistent pressure output.
2. Safety Information
Always read and understand all instructions and warnings before operating this nitrogen purge regulator. Failure to follow safety guidelines can result in serious injury or property damage.
- Personal Protective Equipment (PPE): Always wear appropriate eye protection (safety glasses or goggles) and other necessary PPE when handling compressed gases and operating regulators.
- Ventilation: Use in a well-ventilated area to prevent accumulation of gas.
- Gas Compatibility: Ensure the regulator is compatible with nitrogen gas. Do not use with other gases unless explicitly stated by the manufacturer.
- Cylinder Securement: Always secure gas cylinders in an upright position to prevent tipping.
- Leak Checks: Perform leak checks using a suitable leak detection solution (e.g., soap solution) on all connections before and during operation.
- Pressure Limits: Never exceed the maximum inlet or outlet pressure ratings of the regulator or the connected equipment.
- Damage Inspection: Inspect the regulator for any signs of damage before each use. Do not use a damaged regulator.
- Maintenance: Only qualified personnel should perform maintenance or repairs on the regulator.
3. Setup
Follow these steps to properly set up your nitrogen purge regulator:
- Inspect Connections: Ensure all connections on the regulator and the nitrogen cylinder are clean and free of debris.
- Connect to Cylinder: Attach the regulator's inlet connection to the nitrogen cylinder valve. Hand-tighten first, then use an appropriate wrench to secure the connection firmly. Do not overtighten.
- Connect Outlet Hose: Connect your purging hose or equipment to the 1/4" flare outlet fitting of the regulator. Ensure this connection is also secure.
- Close Regulator Adjustment: Before opening the cylinder valve, turn the regulator's adjustment knob (Figure 3) counter-clockwise until it spins freely. This ensures no pressure is immediately applied to the outlet.
- Open Cylinder Valve Slowly: Slowly open the nitrogen cylinder valve. The high-pressure gauge (inlet pressure gauge) on the regulator will indicate the cylinder pressure.
- Check for Leaks: Apply a leak detection solution to all connections. Bubbles indicate a leak. Tighten connections as necessary or replace faulty seals/fittings. Do not proceed until all leaks are resolved.

Figure 2: Angled view of the regulator, highlighting the inlet and outlet connections.

Figure 3: Close-up of the nitrogen purge regulator's adjustment knob, indicating "Decrease" and "Increase" directions.
4. Operating Instructions
Once the regulator is securely connected and leak-free, you can begin operation:
- Set Desired Pressure: Slowly turn the adjustment knob clockwise to increase the outlet pressure. Observe the low-pressure gauge (outlet pressure gauge) until the desired purging pressure (0-500 PSI) is reached.
- Begin Purging: Once the desired pressure is set, you can begin your nitrogen purging process.
- Monitor Gauges: Continuously monitor both gauges during operation. The high-pressure gauge will show the remaining cylinder pressure, and the low-pressure gauge will show the delivery pressure.
- Shut Down: To shut down, first turn the adjustment knob counter-clockwise until the outlet pressure gauge reads zero. Then, close the nitrogen cylinder valve. Finally, bleed any remaining pressure from the regulator and hose by briefly opening the purging valve or disconnecting the hose.

Figure 4: Top-down view of the regulator, clearly showing both the high-pressure (cylinder) and low-pressure (delivery) gauges.
5. Maintenance
Proper maintenance ensures the longevity and safe operation of your regulator:
- Regular Inspection: Periodically inspect the regulator for any signs of wear, damage, or corrosion. Pay close attention to the gauges, connections, and the adjustment knob.
- Cleanliness: Keep the regulator clean and free from oil, grease, and dirt. Use a clean, dry cloth for wiping.
- Storage: When not in use, store the regulator in a clean, dry place, protected from extreme temperatures and physical damage. It is recommended to remove the regulator from the cylinder for long-term storage.
- Seal Replacement: Gaskets and seals may degrade over time. Replace them if they show signs of wear or if leaks persist after tightening connections.
- Professional Servicing: For any internal issues or significant damage, do not attempt to repair the regulator yourself. Contact a qualified service technician or the manufacturer for professional servicing.
6. Troubleshooting
This section addresses common issues you might encounter with your nitrogen purge regulator.
| Problem | Possible Cause | Solution |
|---|---|---|
| Gas Leak at Connections | Loose connections, damaged O-rings/seals, incorrect thread sealant. | Tighten connections. Inspect and replace damaged O-rings or seals. Ensure proper thread sealant (if applicable) is used. Perform a leak check after tightening. |
| No Gas Flow / Low Pressure Output | Cylinder valve closed, empty cylinder, regulator adjustment knob not turned clockwise, clogged filter. | Open cylinder valve fully. Check cylinder pressure gauge; replace cylinder if empty. Turn adjustment knob clockwise to increase pressure. If suspected clog, professional servicing is required. |
| Pressure Fluctuations | Inconsistent gas supply, internal regulator issue. | Ensure stable gas supply from cylinder. If problem persists, the regulator may require professional inspection or replacement. |
| Gauges Not Reading Correctly | Damaged gauges, internal regulator malfunction. | Do not use if gauges are inaccurate. Contact manufacturer or qualified technician for repair or replacement. |
7. Specifications
| Attribute | Detail |
|---|---|
| Model Number | 0386-0875 (GP250-500-580) |
| Brand | ESAB (TurboTorch) |
| Delivery Range | 0 - 500 psig |
| Inlet Connection | CGA 580 (Standard for Nitrogen) |
| Outlet Connection | 1/4" Flare Fitting |
| Stage | Single Stage |
| Product Dimensions | 8 x 9 x 9 inches |
| Item Weight | 1.29 Pounds |
| Manufacturer | Turbotorch |
| What's in the Box | Gas Regulator |
8. Warranty and Support
For specific warranty information and technical support, please refer to the documentation included with your purchase or contact ESAB (Turbotorch) directly through their official website or customer service channels. Keep your proof of purchase for warranty claims.
ESAB Official Website: www.esab.com