Introduction
This user manual provides comprehensive instructions for the Sena 3S-W 3S Motorcycle Bluetooth Headset and Intercom. Designed for seamless communication and entertainment while riding, this device offers Bluetooth connectivity for phone calls, music, and rider-to-rider intercom functionality. Please read this manual thoroughly to ensure proper installation, operation, and maintenance of your Sena 3S-W headset.
Product Overview
The Sena 3S-W is a compact and discreet Bluetooth communication system specifically designed for integration into full-face helmets. It consists of two main speakers, a microphone, and a control unit.
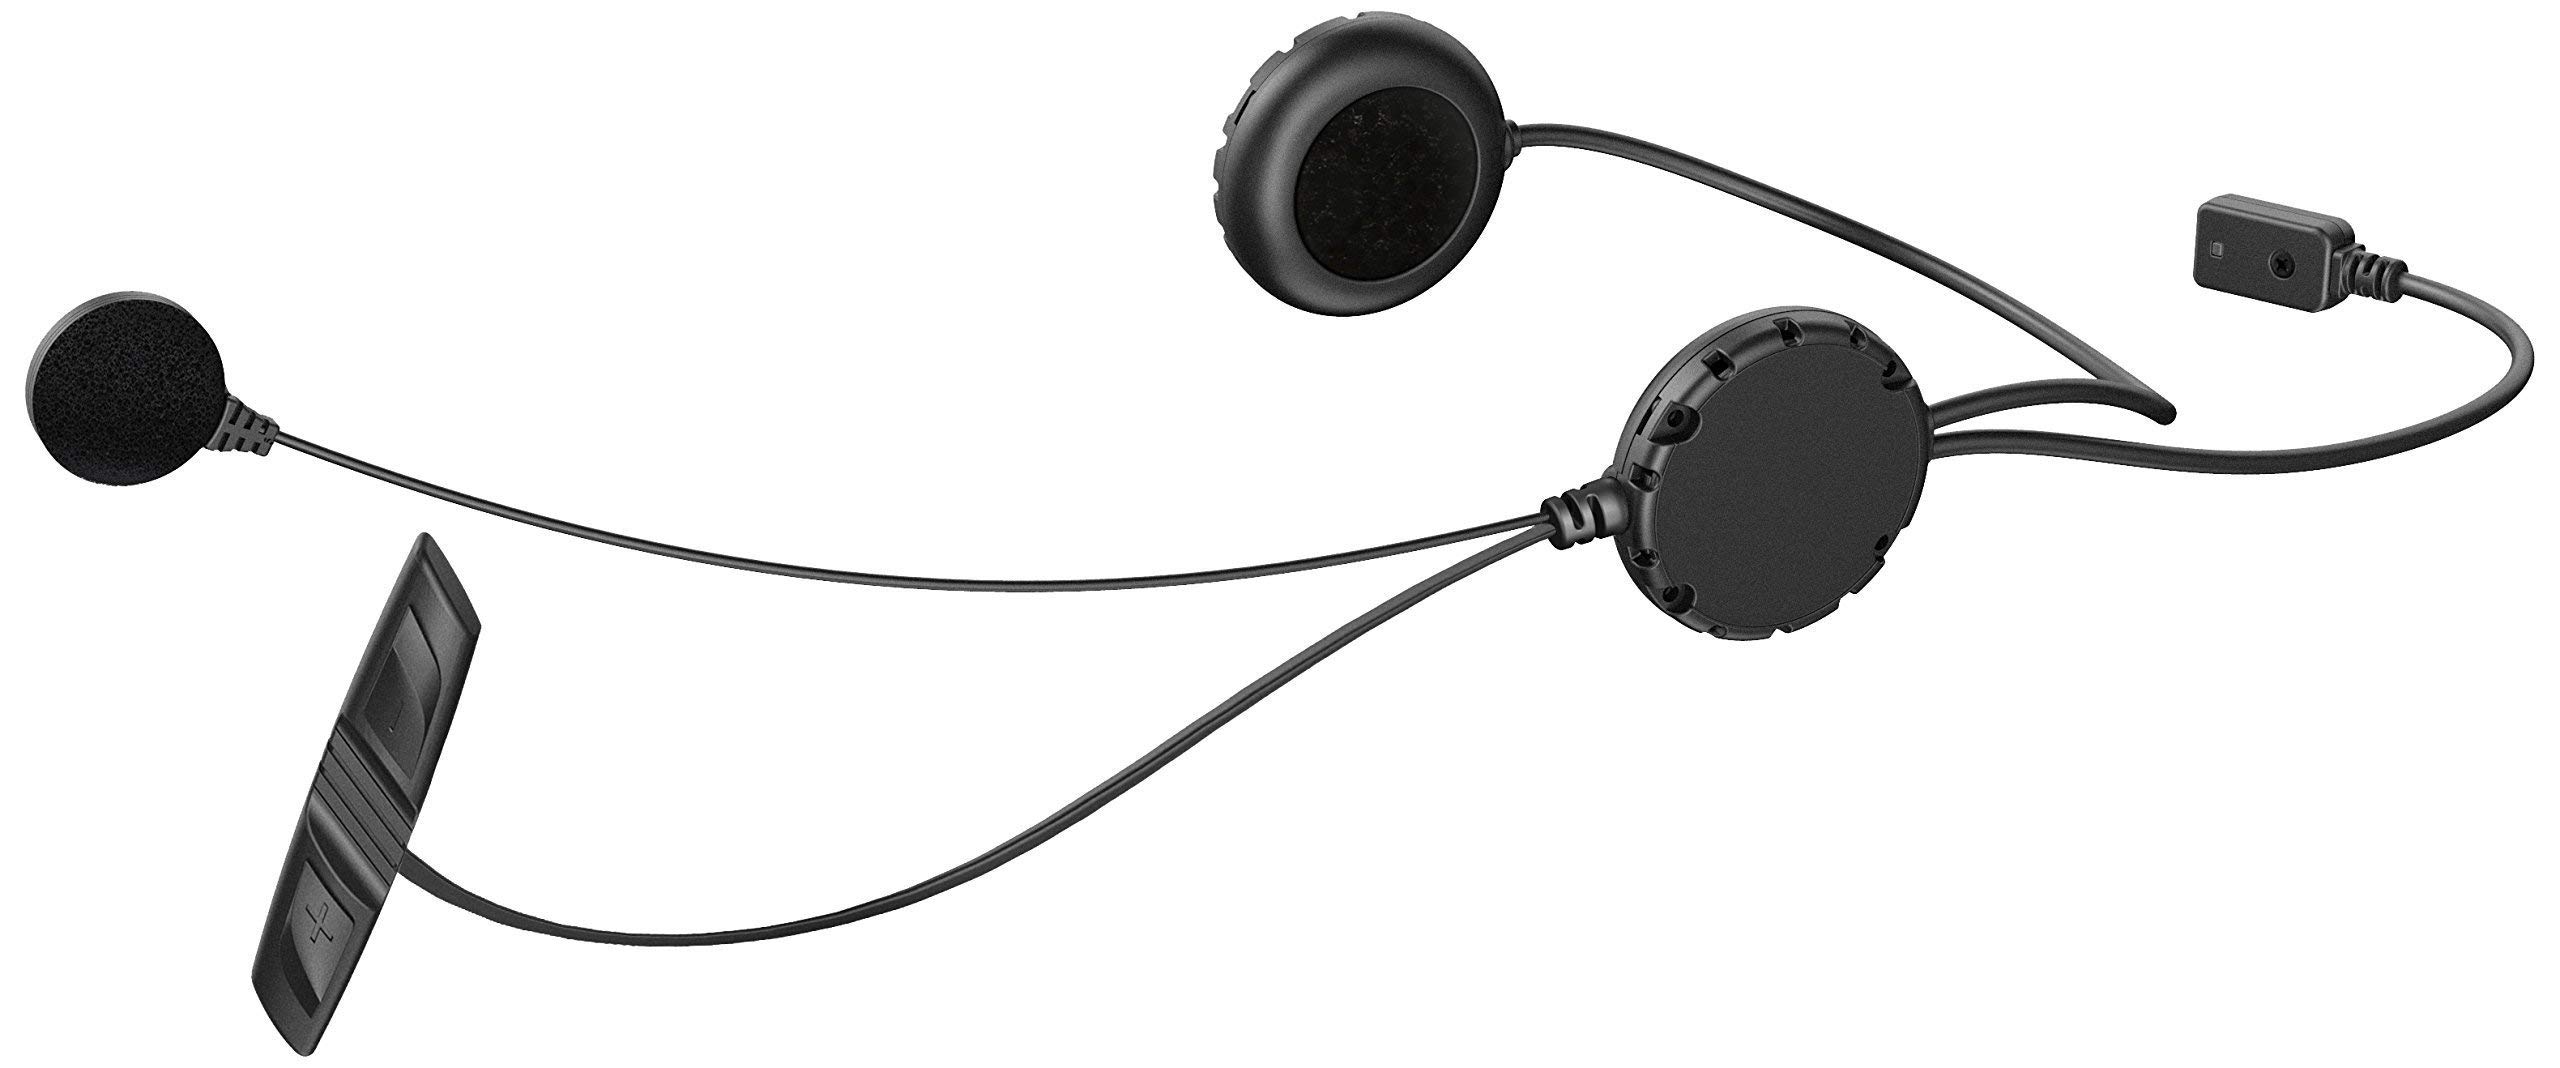
Image: The Sena 3S-W Bluetooth Headset showing its main components: two flat speakers, a wired boom microphone, and a small, rectangular control unit with wires connecting to the speakers and microphone. This setup is designed for discreet installation inside a motorcycle helmet.
The system features a slim control unit that mounts discreetly to the side of the helmet, providing access to volume and function controls. The speakers are designed to fit into helmet ear pockets, and the microphone is positioned for clear voice capture.
Setup and Installation
1. Helmet Installation
The Sena 3S-W is designed for easy installation within most full-face helmets. It is recommended to remove the helmet's cheek pads and liner to access the interior for speaker and microphone placement.
- Speaker Placement: Position the speakers inside the helmet's ear pockets. Ensure they are flush and do not cause discomfort. Some helmets may require minor adjustments or foam removal for optimal fit.
- Microphone Placement: Secure the wired boom microphone near your mouth, ensuring it is not obstructed by the helmet's chin bar or padding.
- Control Unit Mounting: Attach the slim control unit to the exterior or interior edge of the helmet, depending on the specific helmet design and your preference for accessibility.
- Cable Management: Route all cables neatly within the helmet's padding to prevent interference or discomfort.
2. Charging the Device
The Sena 3S-W is powered by a Lithium Metal battery. Before first use, fully charge the device. Connect the charging cable to the headset's charging port and to a standard USB power source. A red LED indicates charging, and a blue LED indicates a full charge.
3. Bluetooth Pairing
To use the headset's features, it must be paired with your Bluetooth-enabled devices (e.g., smartphone, GPS, other Sena headsets).
- Pairing with a Smartphone:
- Turn on the Sena 3S-W.
- Enter pairing mode (refer to the quick start guide for specific button combinations, usually holding a button until an LED flashes a specific pattern).
- On your smartphone, go to Bluetooth settings and select "Sena 3S-W" from the list of available devices.
- Confirm pairing.
- Pairing with another Sena Headset (Intercom):
- Ensure both Sena 3S-W units are in intercom pairing mode.
- The devices will automatically connect when in range.
Operating Instructions
Basic Functions
- Power On/Off: Press and hold the main button for a few seconds.
- Volume Control: Use the dedicated volume rocker or buttons on the control unit to adjust audio levels. Ensure your connected device's volume is also set appropriately for maximum output.
Phone Calls
- Answering/Ending Calls: Press the main button once.
- Making Calls: Use your phone's voice assistant or dial directly from your phone.
- Rejecting Calls: Press and hold the main button for a few seconds.
Music Playback
- Play/Pause: Press the main button once.
- Next Track: Double-press the main button.
- Previous Track: Triple-press the main button.
Intercom Communication
The Sena 3S-W allows for rider-to-rider intercom communication. Once paired, simply initiate the intercom conversation using the designated button (refer to your quick start guide for specific button actions).
- Starting Intercom: Press the intercom button once.
- Ending Intercom: Press the intercom button once again.
- Range: Intercom range can be affected by terrain, obstacles, and other radio frequencies.
Maintenance
- Cleaning: Use a soft, damp cloth to clean the exterior of the control unit and speakers. Avoid using harsh chemicals or abrasive materials.
- Storage: Store the headset in a cool, dry place when not in use. If storing for extended periods, ensure the battery is partially charged (around 50%) to prolong its lifespan.
- Firmware Updates: Periodically check the Sena website for firmware updates. Updating the firmware can improve performance, add new features, and resolve potential issues. Connect the device to your computer and use the Sena Device Manager software for updates.
Troubleshooting
- No Power: Ensure the battery is charged. If the device does not power on after charging, try a factory reset (refer to the quick start guide for reset procedures).
- No Audio/Poor Sound Quality:
- Check volume levels on both the headset and the connected device.
- Ensure speakers are correctly positioned in the helmet and not obstructed.
- Verify Bluetooth connection is stable. Try re-pairing the device.
- Intercom Disconnects:
- Ensure both units are within the specified intercom range.
- Environmental factors (e.g., dense trees, large vehicles) can interfere with signal.
- Try re-establishing the pairing if disconnections are frequent.
- Water Exposure: While designed for outdoor use, the Sena 3S-W is not fully waterproof. Avoid direct exposure to heavy rain or submersion. If the unit gets wet, power it off immediately and allow it to dry completely before attempting to use it again.
Specifications
| Feature | Detail |
|---|---|
| Model Number | 3S-W |
| Product Dimensions | 7.72 x 5.04 x 2.05 inches |
| Item Weight | 1.76 ounces |
| Battery Type | Lithium Metal (included) |
| Manufacturer | Sena |
| First Available Date | January 12, 2015 |
Warranty and Support
For detailed warranty information and further technical support, please refer to the official Sena website or the full user manual PDF.
Official User Manual (PDF): Download PDF
For additional assistance, contact Sena customer support through their official channels.


