1. Introduction
Thank you for choosing the DIGIQUEST Twin Tuner REC DVB-T2 Decoder. This compact, full HD digital terrestrial receiver is designed to provide high-quality television viewing and advanced recording functionalities. It supports the DVB-T2 standard, features dual independent tuners for simultaneous recording, Timeshift for live pause, and 12V power for versatile use in various environments.
This manual provides detailed instructions for setting up, operating, and maintaining your decoder. Please read it carefully before use to ensure optimal performance and to familiarize yourself with all features.
Video: Overview of the Digital Terrestrial Decoder. This video provides a general look at the decoder and its features.
2. What's in the Box
Upon unpacking your DIGIQUEST Twin Tuner REC Decoder, please ensure all the following items are present:
- DIGIQUEST Twin Tuner REC Decoder Unit
- 2-in-1 Remote Control
- External Power Adapter
- User Manual (this document)
- Quick Start Guide
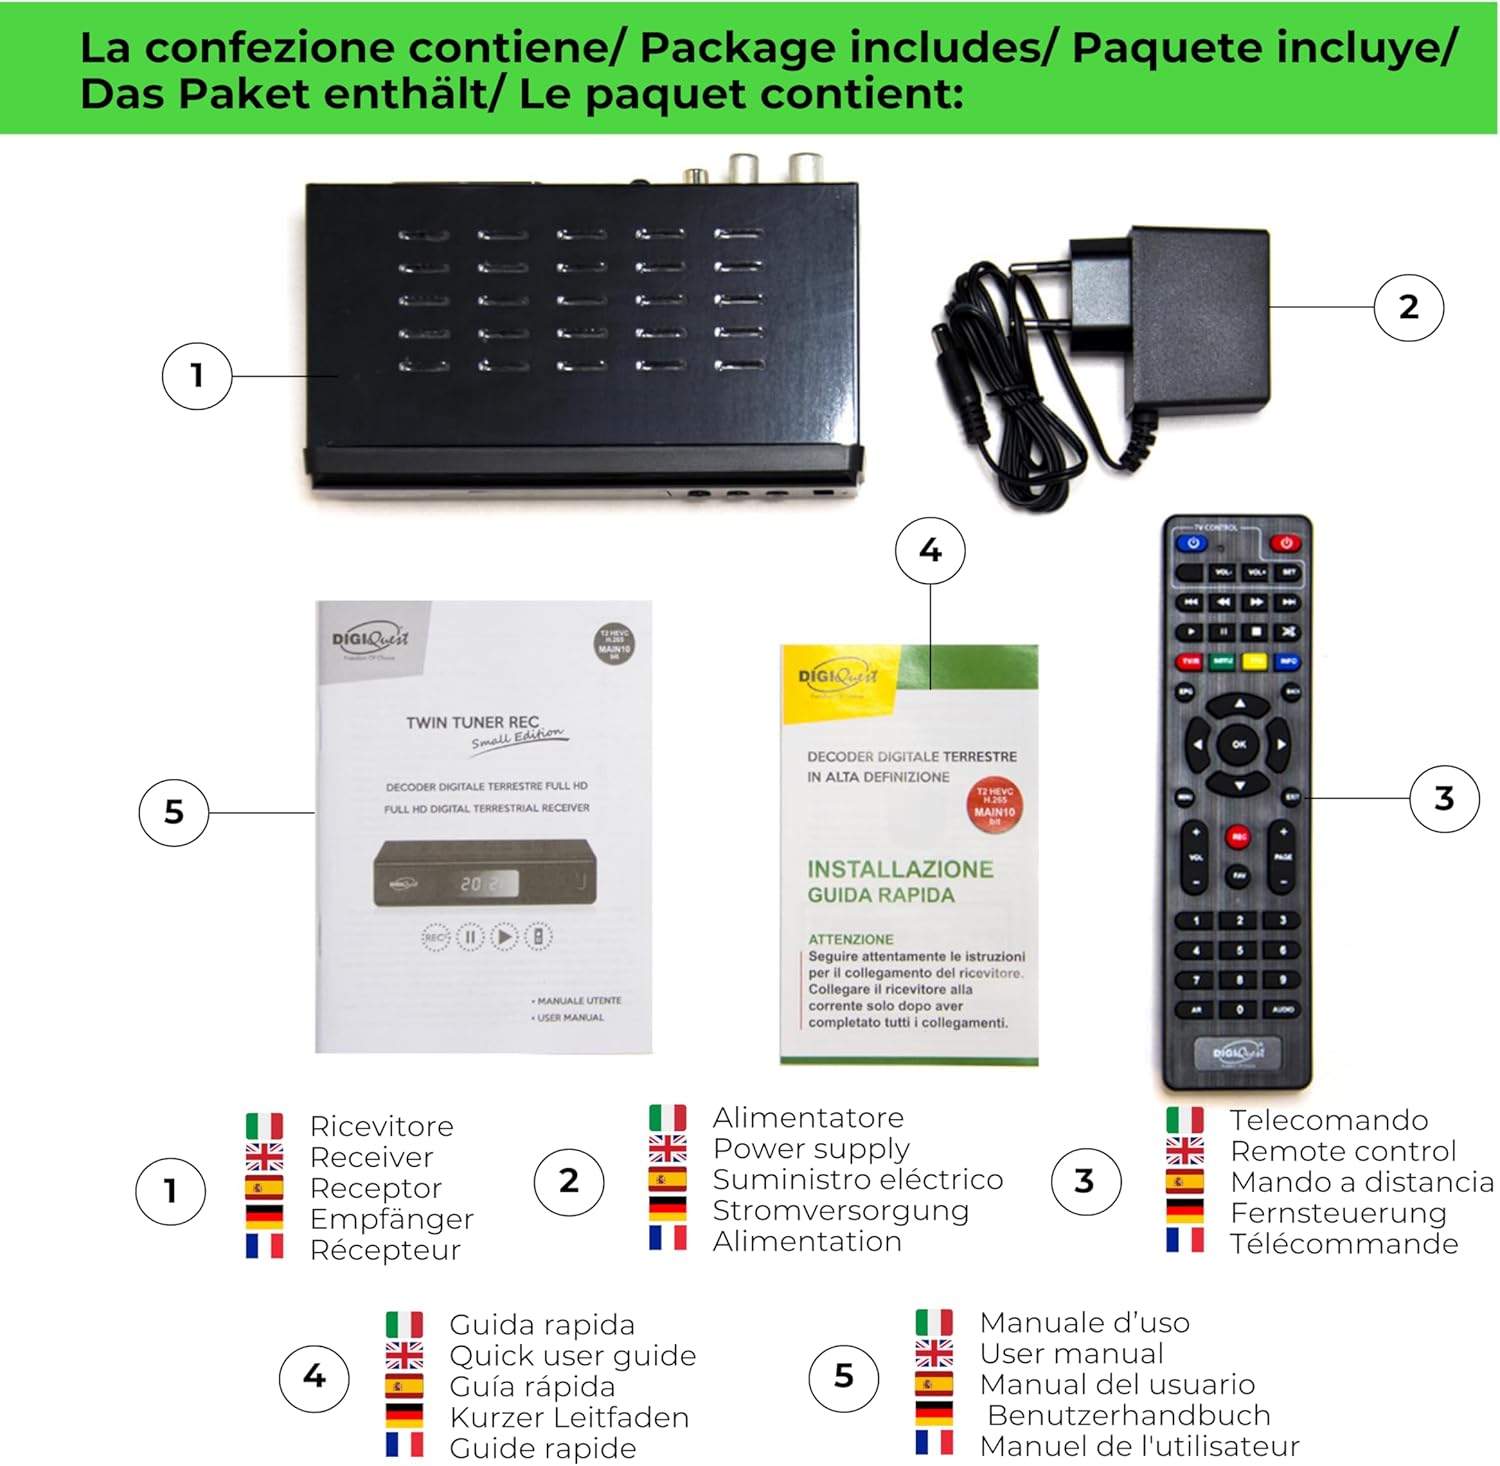
Image: Package contents of the DIGIQUEST Twin Tuner REC Decoder.
3. Product Overview
3.1 Front Panel
The front panel features essential controls and a USB port for media playback and recording.
- Power Button: Turns the device on/off.
- Menu Button: Accesses the main menu.
- USB Port: For connecting USB 2.0 or 3.0 devices (formatted in FAT32 or NTFS) for recording and media playback.
- Channel Up/Down (CH+/CH-): Changes channels.
- Volume Up/Down (V+/V-): Adjusts volume.
- OK Button: Confirms selections.
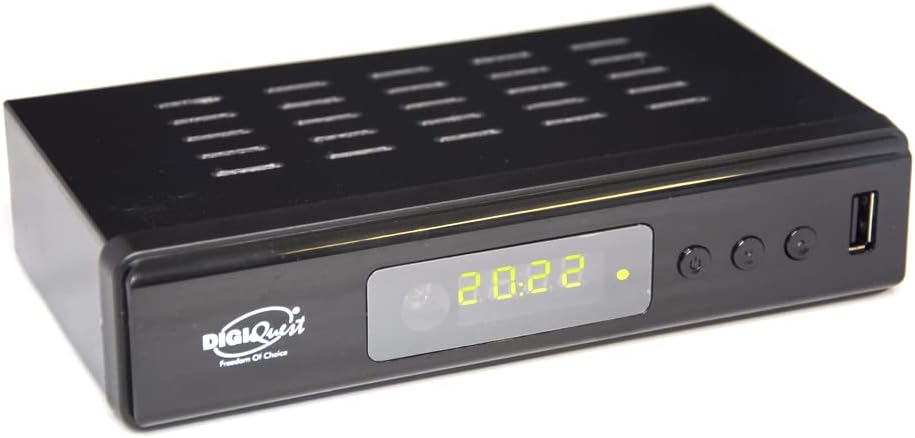
Image: Front panel of the decoder.
3.2 Rear Panel Connections
The rear panel provides all necessary ports for connecting the decoder to your television and other devices.
- RF IN: Terrestrial antenna input.
- RF LOOP OUT: Antenna loop output.
- COAXIAL: Digital audio output.
- HDMI: HDMI cable input for high-definition connection to your TV.
- LAN: Ethernet port for FTP updates and web apps.
- TV SCART: SCART output for older generation TVs.
- 12V-1A: Power input for the external power adapter.

Image: Rear panel connections diagram.
3.3 Remote Control
The 2-in-1 remote control allows you to operate both the decoder and the main functions of your TV for enhanced convenience.
- Power Buttons: Separate buttons for TV and Decoder power.
- Numeric Keypad: For direct channel selection.
- Navigation Buttons: Up, Down, Left, Right, and OK for menu navigation.
- Volume & Channel Controls: Dedicated buttons for adjusting volume and changing channels.
- PVR/Timeshift Buttons: For recording, pausing live TV, and playback functions.
- INFO Button: Displays program information.
- MENU/EXIT: Accesses/exits the main menu.

Image: 2-in-1 Remote Control.
4. Setup
4.1 Connecting the Decoder
- Connect Antenna: Connect your terrestrial antenna cable to the RF IN port on the rear of the decoder. If you wish to loop the signal to another device, connect a cable from RF LOOP OUT.
- Connect to TV:
- For High Definition (HD) TVs: Use an HDMI cable to connect the HDMI port on the decoder to an available HDMI input on your TV.
- For older TVs: Use a SCART cable to connect the TV SCART port on the decoder to the SCART input on your TV.
- Connect Power: Plug the external power adapter into the 12V-1A port on the decoder, then plug the adapter into a power outlet.
- (Optional) Connect USB Device: For recording and media playback, insert a USB 2.0 or 3.0 device (e.g., USB stick, external hard drive) into the front USB port. Ensure it is formatted in FAT32 or NTFS. The decoder can format it via the 'HDD' menu for optimal compatibility.
Video: How to connect the decoder to your TV via HDMI. This video demonstrates the physical connection process.
4.2 Initial Channel Scan
- Power On: Turn on your TV and the DIGIQUEST decoder.
- Select TV Input: Using your TV's remote control, select the correct input source (e.g., HDMI1, AV) that corresponds to where you connected the decoder. If no image appears or a 'No signal' message is displayed, verify the correct input source.
- Access Menu: Press the MENU button on the decoder's remote control.
- Perform Auto Scan: Navigate to the 'Installation' or 'Channel Search' menu. Select 'Automatic Search' or 'Auto Scan' to find available DVB-T2 channels. The decoder will scan and store all detected channels.
5. Operating Instructions
5.1 Channel Navigation
Use the CH+ and CH- buttons on the remote control or the front panel to change channels. Alternatively, use the numeric keypad on the remote to directly enter a channel number.
5.2 Recording (PVR Function)
The DIGIQUEST Twin Tuner REC features a dual independent tuner, allowing you to record two channels simultaneously, even if they belong to different multiplexes (MUX), without requiring a second antenna cable. The tuners work autonomously to provide maximum recording flexibility.
- Initiate Recording: While watching a program, press the REC button on the remote control to start recording.
- Record and Watch: You can watch another channel or a saved recording while a program is being recorded. To view a recording already in progress (started a few minutes ago), simply press the BLUE (INFO) button on the remote control.
- USB Device Recommendation: For stable recording, use USB 2.0 or 3.0 devices formatted in FAT32 or NTFS. You can format directly from the 'HDD' menu of the decoder for optimal compatibility. The decoder automatically analyzes the USB drive upon connection and will alert you if the write speed is too low or if there are issues.
5.3 Timeshift (Live Pause)
The Timeshift function allows you to pause a live program and resume it whenever you want. You can also rewind to re-watch a recently aired scene.
- Activate Timeshift: Press the PAUSE button during live TV to pause the program.
- Resume/Fast Forward/Rewind: Use the playback controls (Play, Fast Forward, Rewind) on the remote to manage the paused content.
5.4 Media Playback
The decoder supports playback of various media formats (video, audio, images) from a connected USB device.
- Access Media Player: Navigate to the 'Media Player' option in the main menu.
- Browse Files: Select your USB device and browse through your stored files.
- Supported Formats: WAV, WMA for audio; common video and image formats are also supported.
6. Troubleshooting
If you encounter issues with your DIGIQUEST Twin Tuner REC Decoder, please refer to the following common solutions:
- No Signal / No Image on TV:
- Verify that you have selected the correct video source on your TV (e.g., HDMI1, AV). Use the SOURCE button on your TV remote (may also be called INPUT, AV, AUX, ZERO, etc.).
- Check that the HDMI or SCART cable is correctly connected between the decoder and the TV.
- Ensure the antenna cable is securely connected to the RF IN port.
- Perform a channel scan again to ensure all channels are properly tuned.
- Recording Issues:
- Ensure your USB device is properly connected and has sufficient free space.
- Check the formatting of your USB device (FAT32 or NTFS). If necessary, format it via the decoder's 'HDD' menu.
- If the decoder warns about low write speed, try a different, faster USB device.
- Remote Control Not Responding:
- Check and replace the batteries in the remote control if necessary.
- Ensure there are no obstructions between the remote control and the decoder's IR sensor.
If the problem persists after trying these steps, please contact DIGIQUEST customer support.
7. Specifications
| Feature | Specification |
|---|---|
| Brand | DIGIQUEST |
| Model Name | DG3300 HD Zapper PRV |
| Model Number | Twin Tuner REC Small Edition |
| Dimensions (L x W x H) | 16.8 x 10.2 x 3.8 cm |
| Weight | 250 g |
| Tuner Technology | DVB-T2 |
| Video Encoding | HEVC Main 10 |
| Output Resolution | Full HD |
| Power Supply | 12V |
| Audio Output Mode | Stereo or Surround |
| Connectivity | USB (1 port), HDMI (1 port), SCART, LAN (Ethernet), Coaxial |
| Additional Features | Built-in PVR, FM Tuner, Timeshift, Media Player (WAV, WMA, video, images) |
| Included Components | 2-in-1 Remote Control, External Power Adapter |
8. Warranty and Support
DIGIQUEST offers dedicated customer support throughout Italy. For any questions, technical assistance, or warranty claims, please refer to the contact information available on our official website and social media channels.
Please retain your proof of purchase for warranty purposes. The warranty covers manufacturing defects under normal use conditions. Damage resulting from improper installation, misuse, or unauthorized repairs is not covered.


