
X-PRO 203-999009
Contents
X-PRO Gas Fuel Tank User Manual
Model: 203-999009
Introduction
This manual provides essential information for the safe and effective installation, operation, and maintenance of your X-PRO Gas Fuel Tank. This fuel tank is designed for use with 110cc, 125cc, and 150cc ATVs and Quad 4 Wheelers. Please read this manual thoroughly before use and retain it for future reference.
Safety Information
- Always handle fuel with extreme caution in a well-ventilated area.
- Ensure the engine is cool before refueling to prevent fire hazards.
- Do not smoke or use open flames near the fuel tank.
- Wear appropriate personal protective equipment (PPE) such as gloves and eye protection when handling fuel.
- Verify all connections are secure and leak-free after installation.
- Keep out of reach of children.
Product Overview
The X-PRO Gas Fuel Tank is a replacement component for compatible ATV and Quad 4 Wheeler models. It is constructed from durable metal and plastic materials to ensure longevity and reliable performance.

Figure 1: Top-down view of the X-PRO Gas Fuel Tank, showing the fuel cap and overall shape.

Figure 2: Side view of the fuel tank, highlighting the integrated fuel petcock at the bottom.
Dimensions
The fuel tank has the following approximate dimensions:
- Length: 36 cm (approximately 14.17 inches)
- Width: 24 cm (approximately 9.45 inches)
- Height: 29 cm (approximately 11.42 inches)

Figure 3: Top view illustrating the length (36cm) and width (24cm) of the fuel tank.
Note: A fuel tank switch is not included with this product.
Setup and Installation
Before beginning installation, ensure your ATV or Quad 4 Wheeler is turned off, cooled down, and on a stable, level surface. It is recommended to consult your vehicle's service manual for specific instructions regarding fuel tank removal and installation.
- Preparation: Drain any remaining fuel from the old tank into an approved container. Disconnect the fuel line and any electrical connections (if present) from the old tank.
- Removal: Carefully unbolt and remove the old fuel tank from its mounting points.
- Inspection: Inspect the new X-PRO Gas Fuel Tank for any damage or defects before installation. Ensure all necessary mounting hardware (not included) is available and compatible.
- Positioning: Place the new fuel tank into the designated mounting area on your ATV.
- Securing: Secure the tank using appropriate bolts and fasteners. Ensure the tank is firmly mounted and does not wobble.
- Connections: Reconnect the fuel line to the fuel petcock on the new tank. If your vehicle uses a separate fuel tank switch, ensure it is properly installed and connected.
- Leak Check: After installation, add a small amount of fuel and check for any leaks around the fuel line connections and the tank itself. Tighten connections as needed.
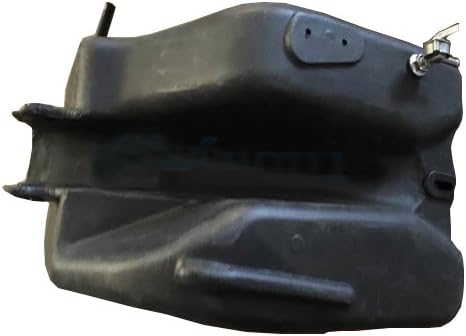
Figure 4: Bottom view of the fuel tank, showing the mounting points for secure installation.

Figure 5: Close-up of one of the mounting brackets on the fuel tank, designed for secure attachment.
Operating Instructions
This fuel tank functions as a standard fuel reservoir for your ATV. Proper operation involves careful refueling and monitoring.
- Refueling:
- Ensure the ATV engine is off and cool.
- Unscrew the fuel cap counter-clockwise.
- Carefully pour the appropriate type of gasoline into the tank, avoiding overfilling. Leave some space for fuel expansion.
- Securely replace the fuel cap by turning it clockwise until tight.
- Wipe up any spilled fuel immediately.
- Fuel Petcock: If your ATV uses a fuel petcock (integrated or separate), ensure it is in the "ON" position for fuel to flow to the engine during operation. Switch to "OFF" when storing the vehicle for extended periods or during maintenance.

Figure 6: Close-up view of the fuel cap, which secures the fuel opening.
Maintenance
Regular maintenance helps ensure the longevity and safe operation of your fuel tank.
- Regular Inspection: Periodically check the fuel tank for cracks, leaks, or damage. Inspect the fuel lines and connections for wear or deterioration.
- Cleaning: Clean the exterior of the tank with a mild detergent and water. Avoid harsh chemicals that could damage the plastic or paint.
- Fuel Quality: Use clean, fresh fuel as recommended by your ATV manufacturer. Stale or contaminated fuel can lead to issues.
- Storage: If storing the ATV for an extended period, it is advisable to drain the fuel tank or use a fuel stabilizer to prevent fuel degradation.
Troubleshooting
| Problem | Possible Cause | Solution |
|---|---|---|
| Fuel Leakage | Loose fuel line connection, damaged tank, faulty fuel cap. | Tighten fuel line clamps. Inspect tank for cracks; replace if damaged. Ensure fuel cap is securely tightened. |
| No Fuel Flow | Fuel petcock in "OFF" position, clogged fuel line, empty tank. | Turn petcock to "ON". Check and clear fuel line. Refill tank. |
| Difficulty Installing | Incorrect model compatibility, obstruction. | Verify tank dimensions and compatibility with your ATV model. Remove any obstructions. |
Specifications
| Feature | Detail |
|---|---|
| Brand | X-PRO |
| Model Number | 203-999009 |
| Compatible Vehicle Types | 110cc, 125cc, 150cc ATVs, Quad 4 Wheelers |
| Material | Metal, Plastic |
| Fuel Type | Gasoline |
| Item Weight | 3.33 Pounds (approximately 1.51 kg) |
| Dimensions (L x W x H) | 36cm x 24cm x 29cm |
| Fuel Tank Switch | Not included |
Warranty and Support
For warranty information or technical support regarding your X-PRO Gas Fuel Tank, please contact X-PRO customer service directly. Refer to your purchase documentation for specific contact details or visit the official X-PRO website.
Documents and downloads
Ask a question about this manual
Ask about setup, troubleshooting, compatibility, parts, safety, or missing instructions. Manuals+ will review the question and use this page’s manual context to help answer it.