1. Product Overview
The X-PRO Exhaust Bolt (Model 320-999016) is designed to securely fasten the exhaust system on various GY6 engine-equipped vehicles. This component is crucial for maintaining the integrity and proper function of the exhaust assembly, preventing leaks and excessive vibration.
2. Compatibility
This exhaust bolt is compatible with a wide range of GY6 engines, specifically those found in:
- GY6 50cc, 70cc, 90cc, 110cc, 125cc, and 150cc engines.
- Vehicles including Scooters, ATVs, Go Karts, Mopeds, Quads, 4-Wheelers, Dune Buggies, and Sandrails.
Note: Always verify the required thread size (M10 or M12) and bolt specifications for your specific vehicle model before installation to ensure proper fitment.
3. Specifications
| Brand | X-PRO |
| Model Number | 320-999016 |
| Material | Zinc |
| Thread Size | M10 or M12 (verify for specific application) |
| Exterior Finish | Zinc |
| Manufacturer Grade | Grade 1 |
| Head Style | Flat, Hex |
| Fastener Type | Hexagon Bolt |
| Item Hardness | Grade 1 |
| Thread Type | Unc |
| Thread Style | Right Hand, Coarse |
| Color | Gold |
| Item Weight | 1.6 ounces |
| Package Dimensions | 4.5 x 3.5 x 0.6 inches |
4. Package Contents
Each package typically contains:
- X-PRO Exhaust Bolts (quantity may vary per order)
- Matching Nuts
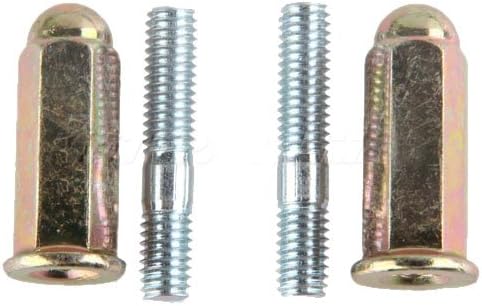
Image 1: X-PRO Exhaust Bolt and Nut Set. This image displays two gold-colored exhaust bolts, each with a corresponding nut, ready for installation.
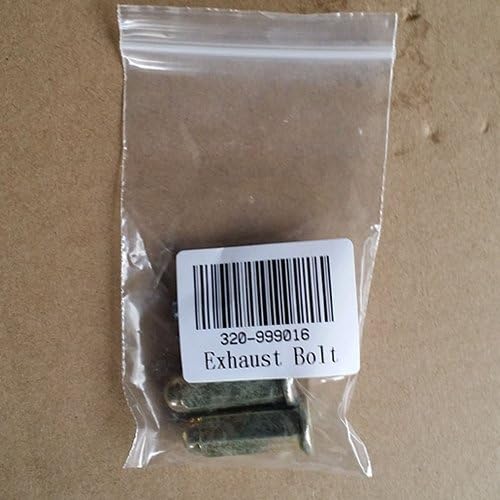
Image 2: X-PRO Exhaust Bolt in Packaging. The bolts are shown inside a clear plastic bag with a label indicating the model number '320-999016' and 'Exhaust Bolt'.
5. Safety Information
Always prioritize safety when working on any vehicle. Follow these guidelines:
- Wear appropriate personal protective equipment (PPE), including safety glasses and gloves.
- Ensure the vehicle is stable and properly supported before beginning any work.
- Allow the exhaust system to cool completely before handling to prevent burns.
- Work in a well-ventilated area.
6. Installation (Setup)
Follow these steps for proper installation of the X-PRO Exhaust Bolt:
- Preparation: Ensure the vehicle's engine and exhaust system are cool. Gather necessary tools, which typically include a wrench or socket set matching the bolt and nut size.
- Remove Old Bolt (if applicable): Carefully remove any existing, damaged, or loose exhaust bolts and nuts. If the old bolts are seized, apply penetrating oil and allow it to work before attempting removal.
- Position Exhaust: Align the exhaust pipe flange with the manifold or connecting pipe. Ensure any gaskets are correctly seated.
- Insert New Bolt: Insert the X-PRO Exhaust Bolt through the aligned holes.
- Attach Nut: Thread the matching nut onto the bolt. Hand-tighten first to ensure proper threading.
- Tighten Securely: Using a wrench or socket, tighten the nut. It is recommended to use a torque wrench to tighten to the vehicle manufacturer's specified torque settings for exhaust bolts. Over-tightening can strip threads, while under-tightening can lead to loosening.
- Apply Thread Locker (Optional but Recommended): For added security against vibration-induced loosening, apply a high-temperature thread locker to the bolt threads before attaching the nut. This is particularly useful for high-vibration applications.
- Final Check: After installation, visually inspect the exhaust connection to ensure it is secure and there are no gaps.
7. Operation
The X-PRO Exhaust Bolt functions by providing a strong, secure connection for your vehicle's exhaust system. Once properly installed, it ensures that the exhaust components remain tightly joined, preventing exhaust leaks and maintaining optimal engine performance and noise levels. There is no operational interaction required from the user after correct installation.
8. Maintenance
Regular maintenance helps ensure the longevity and performance of your exhaust system:
- Periodic Inspection: Periodically inspect the exhaust bolts for any signs of loosening, corrosion, or damage. This is especially important for vehicles subjected to heavy vibration or off-road conditions.
- Tightness Check: If bolts appear loose, re-tighten them to the manufacturer's specifications. Consider applying high-temperature thread locker if not previously used.
- Replacement: If bolts show significant corrosion, stripping, or damage, replace them immediately to prevent exhaust system failure.
9. Troubleshooting
Common issues related to exhaust bolts and their solutions:
- Loose Bolts: If exhaust bolts frequently loosen, ensure they were tightened to the correct torque. Applying a high-temperature thread locker during installation can significantly reduce loosening due to vibration.
- Exhaust Leaks: A whistling or hissing sound from the exhaust connection often indicates a leak. Check the tightness of the bolts and inspect the exhaust gasket for damage. Replace the gasket and re-tighten bolts if necessary.
- Stripped Threads: If threads on the bolt or nut are stripped, the bolt will not hold securely. Replace both the bolt and nut. Avoid over-tightening during installation.
10. Warranty and Support
For specific warranty information or technical support regarding your X-PRO Exhaust Bolt (Model 320-999016), please refer to the original purchase documentation or contact X-PRO customer service directly. General inquiries can often be resolved by consulting the X-PRO official website or authorized dealers.
11. Additional Resources
For more information on X-PRO products and parts, visit the official X-PRO store: X-PRO Store on Amazon


