1. Introduction
This manual provides essential information for the installation, operation, and maintenance of the X-PRO 110cc 4-stroke engine with semi-automatic transmission and electric start. This engine is designed for compatibility with various Chinese-made ATVs and Go Karts, including 50cc, 70cc, 90cc, and 110cc models, provided the mounting holes are compatible. Please read this manual thoroughly before installation and operation to ensure proper function and safety.
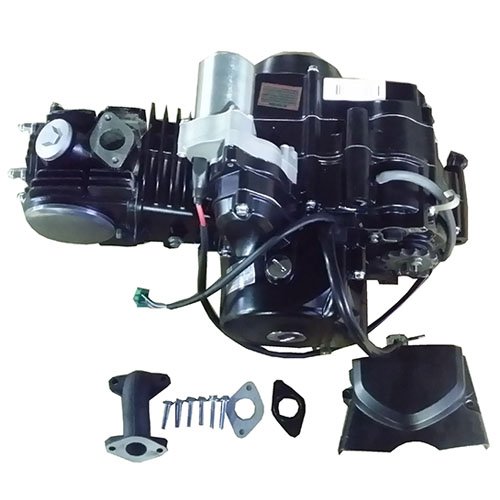
Figure 1: Front view of the X-PRO 110cc ATV Engine Motor, showing the cylinder head and transmission casing.
2. Product Specifications
The following table details the technical specifications of the X-PRO 110cc engine:
| Feature | Specification |
|---|---|
| Engine Model | 308-999020 |
| Engine Type | Single Cylinder, 4-Stroke, 2-Valve |
| Displacement | 107ml (0.02 Gallon) |
| Cooling System | Air Cooled |
| Ignition Method | CDI |
| Starter | Electric Starter |
| Transmission | Semi Automatic (3 forward, 1 reverse) |
| Clutch | Automatic Multi-plate Wet Clutch |
| Max. Horsepower | 6.71HP / 8000 RPM (5.0KW / 8000 RPM) |
| Max. Torque | 6.9N.m / 6500 RPM |
| Min. Stable Idle Speed | 1350-1650 r/min |
| Min. Fuel Consumption | 9.65oz/HP.h (367g/Kw.h) |
| Carburetor Model | PZ19 (Plunger type) |
| Spark Plug Model | A7TC |
| Fuel Requirement | >= 87# Octane |
| Lubrication Model | SF15W/40-SE |
| Lubrication Capacity | 900ml (0.20 Gallon) |
| Bore & Stroke | 52.4mm x 49.5mm (2.06" x 1.95") |
| Compression Ratio | 9.0:1 |
| Item Weight | 65 Pounds |
| Material | Aluminum |
3. Installation and Setup
Proper installation is crucial for the engine's performance and longevity. It is recommended that installation be performed by a qualified technician if you are unfamiliar with engine replacement procedures.
3.1 Compatibility Check
Before installation, verify that the mounting holes and electrical connections of this engine are compatible with your ATV or Go Kart. This engine is designed for models where the starter is not bottom-mounted. Measure the physical dimensions to confirm fitment.
3.2 Mounting the Engine
- Securely mount the engine to the vehicle frame using appropriate hardware. Ensure all mounting bolts are tightened to the manufacturer's specifications.
- Connect the exhaust system to the engine. Ensure a tight seal to prevent leaks.

Figure 2: The X-PRO 110cc engine shown with various components, including intake manifold and mounting hardware.
3.3 Electrical Connections
- Connect the CDI unit, starter motor, and other electrical components. Pay close attention to wiring diagrams specific to your vehicle and the engine.
- Ensure all connections are secure and free from corrosion. If the provided plug-in is not compatible, an additional adapter may be required.
3.4 Fuel and Lubrication
- Connect the fuel line from the tank to the carburetor. Ensure there are no kinks or leaks.
- Fill the engine with 900ml (0.20 Gallon) of recommended SF15W/40-SE lubrication oil. Do not overfill.
- Fill the fuel tank with gasoline of 87# octane or higher.
4. Operating Instructions
Follow these steps for safe and effective operation of your X-PRO 110cc engine.
4.1 Starting the Engine
- Ensure the vehicle is in neutral (N) or park (P) if applicable.
- Turn the ignition key to the "ON" position.
- If the engine is cold, engage the choke.
- Press the electric start button. Release the button once the engine starts.
- Allow the engine to warm up for a few minutes before riding. Disengage the choke as the engine warms.
4.2 Semi-Automatic Transmission
This engine features a semi-automatic transmission with 3 forward gears and 1 reverse gear. The clutch operates automatically, eliminating the need for a manual clutch lever.
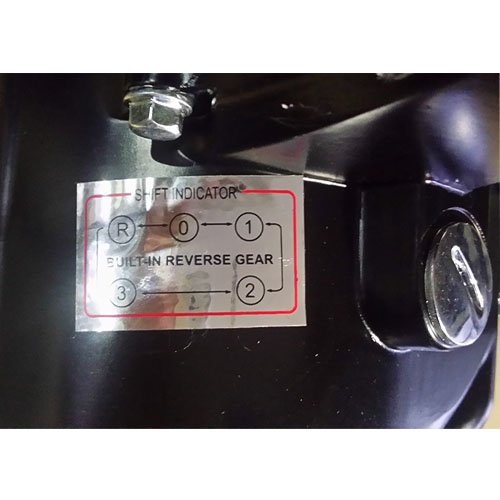
Figure 3: Shift indicator diagram showing Neutral (0), Reverse (R), and Forward Gears (1, 2, 3).
- To shift gears, use the foot shifter.
- Shift down for lower gears (1st) and up for higher gears (2nd, 3rd).
- To engage reverse, typically shift down past 1st gear or follow the specific shifting pattern indicated on your vehicle. Refer to the shift indicator diagram (Figure 3).
- Always ensure the vehicle is stationary or moving slowly when shifting, especially into reverse.
5. Maintenance
Regular maintenance is essential for the optimal performance and longevity of your engine. Adhere to the recommended service intervals.
5.1 Oil Change
- Check the oil level regularly and change the engine oil according to your vehicle's service schedule, typically after the first 20 hours of operation, then every 50-100 hours or annually.
- Use SF15W/40-SE lubrication oil.
- Ensure the oil drain plug is securely tightened after draining old oil and before refilling.
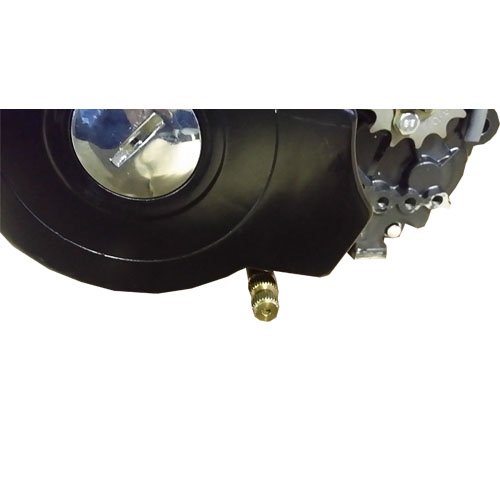
Figure 4: Example of an engine drain plug location, important for oil changes.
5.2 Spark Plug Inspection
- Inspect the A7TC spark plug periodically for wear, fouling, or incorrect gap. Clean or replace as necessary.
5.3 Air Filter Cleaning
- Clean or replace the air filter element regularly, especially when operating in dusty conditions, to ensure proper air intake and prevent engine damage.
5.4 General Inspection
- Regularly check all nuts, bolts, and fasteners for tightness.
- Inspect fuel lines, electrical wiring, and exhaust for any signs of wear, damage, or leaks.
6. Troubleshooting
This section addresses common issues you might encounter with your X-PRO 110cc engine.
6.1 Engine Will Not Start
- No Fuel: Check fuel tank level. Ensure fuel valve is open. Verify fuel line is not clogged.
- No Spark: Inspect spark plug for fouling or damage. Check spark plug wire connection. Verify CDI unit is functioning.
- Battery: Ensure the battery is charged and connections are secure for the electric starter.
- Choke: Ensure choke is properly engaged for cold starts and disengaged once warm.
6.2 Loss of Power or Poor Performance
- Air Filter: A dirty air filter can restrict airflow. Clean or replace.
- Fuel System: Clogged fuel filter or carburetor issues can affect performance.
- Spark Plug: A worn or fouled spark plug can lead to misfires and reduced power.
- Oil Level: Incorrect oil level can impact engine operation.
6.3 Unusual Noises
- Loose Components: Check for loose bolts or engine components.
- Low Oil: Insufficient oil can cause knocking or grinding sounds.
- Exhaust Leak: A leaking exhaust can produce a loud popping or hissing sound.
If troubleshooting steps do not resolve the issue, consult a qualified mechanic or contact customer support.
7. Support and Contact Information
For further assistance, technical support, or inquiries regarding your X-PRO 110cc engine, please contact the manufacturer or your authorized dealer. When contacting support, please have your engine model number (308-999020) and purchase information readily available.
You may visit the official X-PRO store for additional product information and resources: X-PRO Store on Amazon


