1. Safety Information
Please read these safety instructions carefully before using your Philips DL167/94 Portable Radio. Keep this manual for future reference.
- Power Source: Use only the specified 2 x R20 (D-size) batteries or a compatible 3V DC external power adapter. Do not mix old and new batteries, or different types of batteries.
- Battery Handling: Remove exhausted batteries immediately to prevent leakage and damage to the unit. If the radio will not be used for a long period, remove the batteries.
- Water and Moisture: Do not expose the radio to rain, moisture, or excessive humidity. Keep it away from liquids.
- Heat Sources: Do not place the radio near heat sources such as radiators, heat registers, stoves, or other apparatus (including amplifiers) that produce heat.
- Ventilation: Ensure proper ventilation. Do not block any ventilation openings.
- Cleaning: Clean the radio only with a dry cloth. Do not use liquid cleaners or aerosol cleaners.
- Servicing: Do not attempt to service this product yourself. Refer all servicing to qualified service personnel.
2. Product Overview
The Philips DL167/94 is a portable radio receiver designed for clear reception across multiple frequency bands. Its compact design and simple controls make it ideal for everyday use.
2.1 Key Features
- MW, SW, and FM band reception for a wide variety of stations.
- Built-in loudspeaker for clear and powerful audio output.
- Compact design with easy-to-use controls for tuning and band selection.
- Dual power options: operates on 2 x R20 (D-size) batteries or optional 3V DC external power.
- Telescopic aerial for enhanced signal reception.
- Integrated carry handle for easy portability.
2.2 Package Contents
- Philips DL167/94 Portable Radio (1 unit)
Note: Batteries and external DC power adapter are not included.
2.3 Controls and Components

Figure 1: Front View with Labeled Controls
This image highlights the main operational controls on the front of the radio, including the AM/FM tuner, the telescopic antenna, the volume control knob, and the tuning control knob.

Figure 2: Side View with Labeled Controls
This image shows the side profile of the radio, indicating the position of the volume control and tuning control knobs for easy access.

Figure 3: Integrated Carry Handle
The robust carry handle allows for convenient portability of the radio, making it easy to transport.
3. Setup
3.1 Powering the Radio
The Philips DL167/94 radio can be powered by batteries or an external DC power adapter.

Figure 4: Rear View with Power Options and Band Switch
This image illustrates the back panel, showing the battery compartment, the 3V DC input jack, and the band selection switch.
3.1.1 Battery Installation
- Locate the battery compartment cover on the back of the radio.
- Slide or unclip the cover to open the compartment.
- Insert two (2) R20 (D-size) batteries, ensuring the correct polarity (+ and -) as indicated inside the compartment.
- Close the battery compartment cover securely.
Important: Always remove exhausted batteries promptly to prevent damage from leakage. If the radio is not used for extended periods, remove the batteries.
3.1.2 External DC Power (Optional)
The radio can also be powered by an optional 3V DC external power adapter (not included). Locate the 3V DC input jack on the back of the radio. Connect a compatible 3V DC adapter to this jack. When an external adapter is connected, the radio will draw power from the adapter instead of the batteries.
3.2 Antenna Setup
For optimal reception, especially for FM and SW bands, extend the telescopic aerial fully. For MW reception, the radio uses a built-in ferrite antenna, so the telescopic aerial may not be necessary. Adjust the position and direction of the radio and the telescopic aerial for the best signal.
4. Operating Instructions
4.1 Turning On/Off
The radio is turned on and off using the Volume control knob. Rotate the Volume control knob clockwise until you hear a click and the radio powers on. To turn off, rotate the Volume control knob counter-clockwise until it clicks off.
4.2 Band Selection
On the back of the radio, locate the band selection switch. Slide this switch to select your desired frequency band: MW (Medium Wave), SW (Short Wave), or FM (Frequency Modulation).
4.3 Tuning to a Station
Once the desired band is selected, slowly rotate the Tuning control knob on the front of the radio. The tuning dial will indicate the approximate frequency. Continue rotating until you find a clear signal for your desired station.
4.4 Volume Control
Adjust the listening volume by rotating the Volume control knob. Rotate clockwise to increase volume and counter-clockwise to decrease volume.
4.5 Optimal Reception Tips
- FM/SW: Fully extend the telescopic aerial and rotate it for the best reception.
- MW: The radio has a built-in ferrite antenna. Rotate the entire radio for optimal MW reception.
- Interference: Keep the radio away from electronic devices that may cause interference, such as computers, televisions, or fluorescent lights.
- Location: Try different locations in your room or outdoors to find the strongest signal.
5. Maintenance
- Cleaning: Wipe the exterior of the radio with a soft, dry cloth. Do not use abrasive cleaners, waxes, or solvents as they may damage the finish.
- Storage: When not in use for extended periods, store the radio in a dry, cool place, away from direct sunlight and extreme temperatures. Remove batteries before long-term storage.
- Battery Care: Always use fresh batteries of the correct type. Dispose of used batteries responsibly according to local regulations.
6. Troubleshooting
If you encounter issues with your radio, refer to the table below for common problems and their solutions.
| Problem | Possible Cause | Solution |
|---|---|---|
| No power / Radio does not turn on. | Batteries are exhausted or incorrectly inserted. External DC adapter not connected or faulty. | Replace batteries with new ones, ensuring correct polarity. Check external DC adapter connection and ensure it is 3V DC. |
| Poor reception / Static. | Antenna not extended or positioned correctly. Weak signal in your location. Interference from other electronic devices. Incorrect band selected. | Fully extend and adjust the telescopic aerial. For MW, rotate the entire radio. Move the radio to a different location. Move away from interfering devices. Ensure the correct band (MW/SW/FM) is selected. |
| Tuning knob is sensitive. | Normal operation for analog tuning. | Rotate the tuning knob very slowly and precisely to fine-tune to the desired frequency. |
| Sound distortion at high volume. | Volume set too high. | Reduce the volume to a comfortable listening level. |
7. Specifications
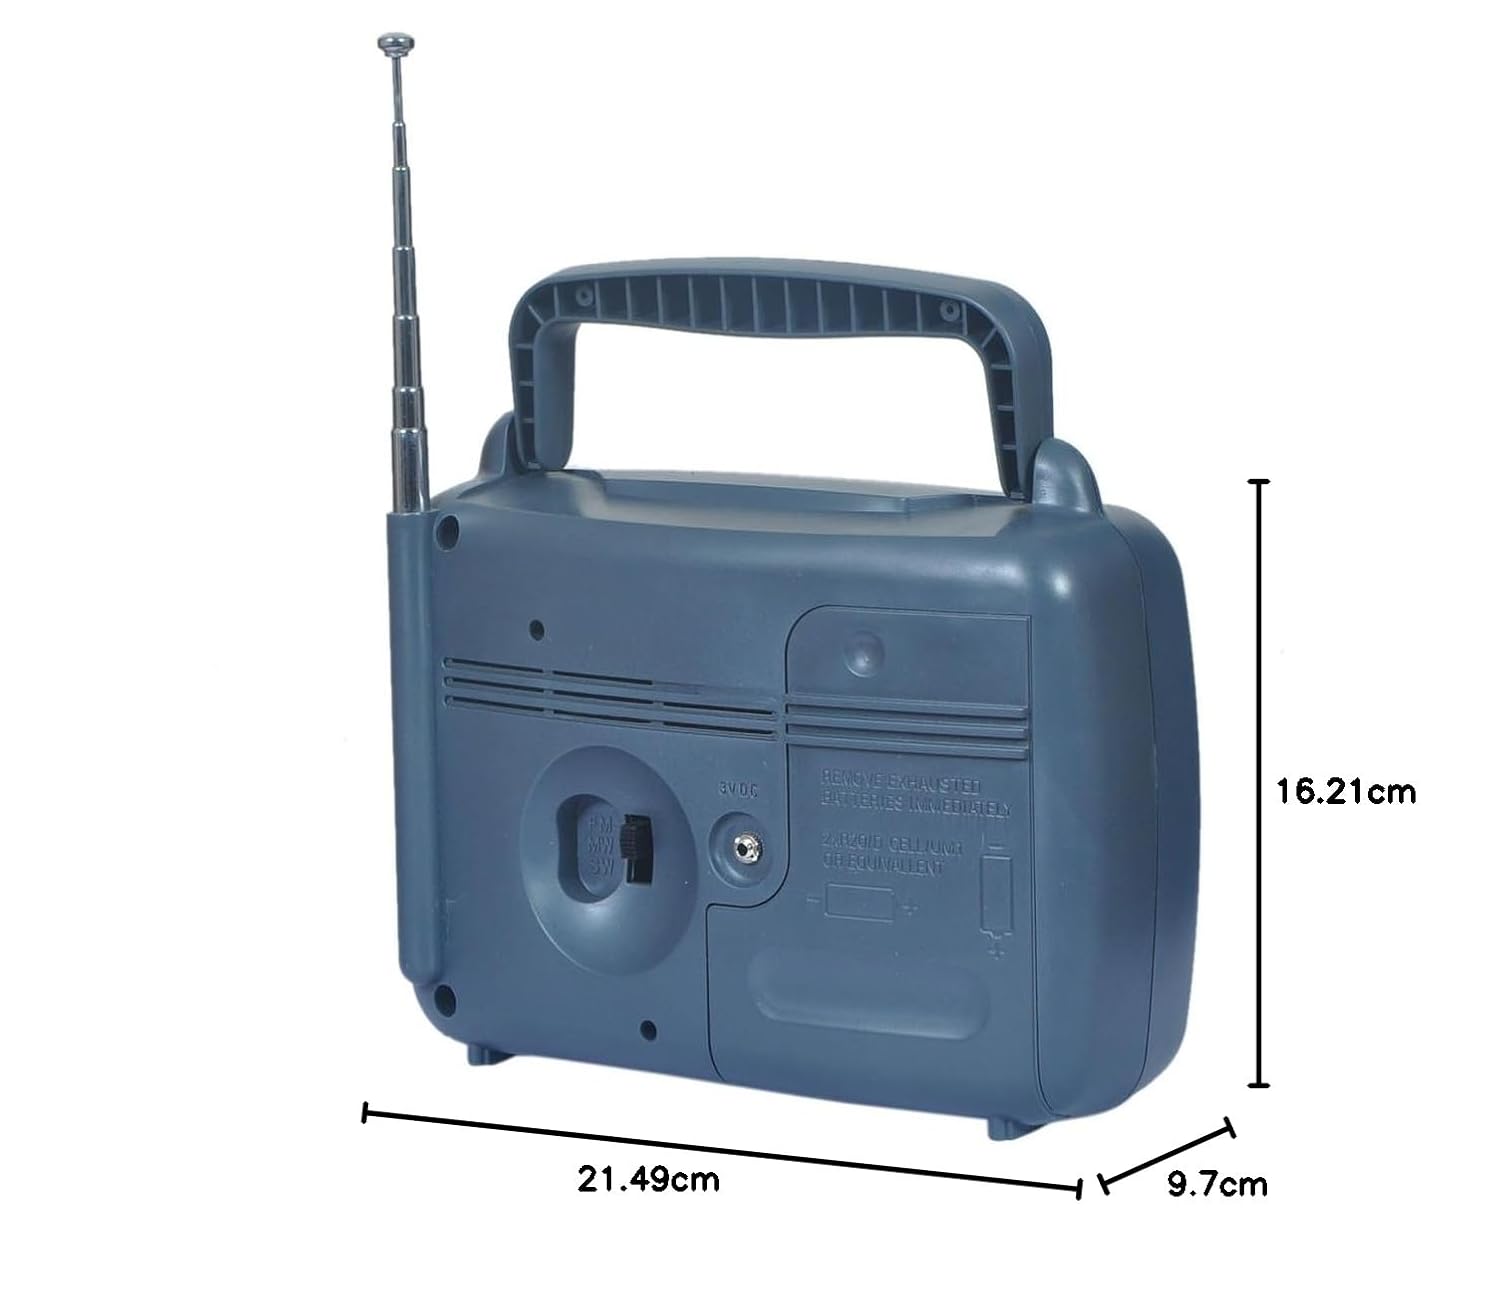
Figure 5: Product Dimensions
This image provides the physical dimensions of the radio for reference.
| Feature | Specification |
|---|---|
| Brand | PHILIPS |
| Model Name | DL167/94 |
| Radio Bands Supported | MW (Medium Wave), SW (Short Wave), FM (Frequency Modulation) |
| Power Source | Battery Powered (2 x R20 / D-size batteries) or 3V DC External Power |
| Batteries Required | Yes (2 x R20 / D-size) |
| Batteries Included | No |
| Voltage | 3 Volts |
| Product Dimensions (L x W x H) | 21.5 x 16.2 x 9.7 cm (approx.) |
| Item Weight | 510 g |
| Material | Plastic |
| Special Feature | Portable |
| Country of Origin | India |
8. Warranty and Support
For warranty information and customer support, please refer to the warranty card included with your product or visit the official Philips support website for your region. Keep your purchase receipt as proof of purchase for any warranty claims.
For further assistance, you may contact Philips customer service through their official channels.


