
Introduction
This manual provides essential information for the safe and efficient operation, maintenance, and troubleshooting of your Briggs & Stratton 19N137-0053-F1 XR Series 10 HP 306cc Horizontal Shaft Engine. This engine is designed to deliver dependable power for demanding work environments, featuring a premium Dual Clean air filtration system, recoil starter, and Maintenance-free Magnetron electronic ignition. It includes a Dura-Bore cast iron cylinder sleeve for extended life, an installed muffler, a low-oil sensor, and a fuel tank. Please read this manual thoroughly before operating the engine.

Figure 1: Angled view of the Briggs & Stratton 19N137-0053-F1 XR Series Engine.
Safety Information
Always prioritize safety when operating or maintaining the engine. Failure to follow safety instructions can result in serious injury or death.
- Read the Manual: Understand all instructions and warnings before operating the engine.
- Carbon Monoxide Hazard: Engine exhaust contains carbon monoxide, a colorless, odorless, poisonous gas. Operate the engine only outdoors in a well-ventilated area.
- Fuel Safety: Gasoline is highly flammable. Store fuel in approved containers, away from ignition sources. Refuel in a well-ventilated area with the engine off and cool. Do not smoke while refueling.
- Hot Surfaces: Engine components, especially the muffler, become very hot during operation and remain hot for a period after shutdown. Avoid contact to prevent burns.
- Moving Parts: Keep hands, feet, and clothing away from moving parts such as the flywheel and PTO shaft.
- Proposition 65 Warning: This product can expose you to chemicals including engine exhaust, which is known to the State of California to cause cancer, and carbon monoxide, which is known to the State of California to cause birth defects or other reproductive harm. For more information go to www.P65Warnings.ca.gov.
Setup
Proper setup ensures optimal performance and longevity of your engine.
1. Mounting the Engine
Ensure the engine is securely mounted to a stable, level surface or equipment frame. Use appropriate hardware and follow the equipment manufacturer's guidelines for installation. The PTO ball bearing helps ensure smooth operation and extends the life of the engine by minimizing wear and tear, making proper mounting crucial for alignment.
2. Adding Engine Oil
The engine is shipped without oil. Before starting, fill the crankcase with the recommended type and amount of oil.
- Place the engine on a level surface.
- Remove the oil fill cap/dipstick.
- Slowly add 37 ounces of recommended engine oil (refer to the engine's oil chart for specific viscosity based on ambient temperature).
- Check the oil level using the dipstick; do not overfill.
- Securely replace the oil fill cap/dipstick.
This engine features a low-oil sensor, which will prevent the engine from starting or shut it down if the oil level is too low, protecting the engine from damage.
3. Adding Fuel
Use fresh, clean, unleaded gasoline with an octane rating of 87 or higher. Do not use E85 fuel or gasoline containing more than 10% ethanol.
- Ensure the engine is off and cool.
- Remove the fuel cap.
- Fill the fuel tank, leaving some space for fuel expansion. Do not overfill.
- Securely replace the fuel cap.

Figure 2: Top view of the engine, highlighting the fuel tank and air filter assembly.

Figure 3: Side view of the engine, showing the recoil starter and operational controls.
Operating the Engine
Follow these steps for starting and stopping your Briggs & Stratton engine.
1. Starting Procedure
- Ensure the engine is on a level surface and connected to the equipment.
- Check oil and fuel levels.
- Move the throttle control to the FAST position.
- Move the choke control to the FULL CHOKE position (for cold starts). For warm starts, the choke may not be necessary.
- Turn the engine switch to the ON position.
- Grasp the recoil starter handle firmly and pull slowly until resistance is felt, then pull rapidly with a full arm stroke. Do not let the rope snap back; guide it gently.
- Once the engine starts, gradually move the choke control to the OFF position as the engine warms up.
2. Stopping Procedure
- Move the throttle control to the SLOW or IDLE position.
- Turn the engine switch to the OFF position.
- If equipped, turn the fuel valve to the OFF position.
Maintenance
Regular maintenance is crucial for the longevity and reliable performance of your engine. Refer to your engine's specific maintenance schedule for detailed intervals.
1. Engine Oil Change
Change the engine oil after the first 5 hours of operation, then every 50 hours or annually, whichever comes first.
- Run the engine for a few minutes to warm the oil.
- Turn off the engine and disconnect the spark plug wire.
- Place a suitable container under the oil drain plug.
- Remove the oil drain plug and oil fill cap/dipstick to allow oil to drain completely.
- Replace the drain plug and refill with 37 ounces of recommended oil.
- Check the oil level and replace the fill cap/dipstick.
2. Air Filter Maintenance
This engine features a premium Dual Clean air filtration system. Inspect the air filter regularly and clean or replace as needed, especially in dusty conditions.
- Remove the air filter cover.
- Carefully remove the foam pre-cleaner and paper cartridge.
- Clean the foam pre-cleaner with warm water and mild detergent, rinse thoroughly, and allow to air dry. Lightly oil with engine oil and squeeze out excess.
- Tap the paper cartridge gently to remove loose dirt. Replace if heavily soiled or damaged.
- Reassemble the air filter components.

Figure 4: Carburetor side of the engine, showing the air filter assembly.
3. Spark Plug Inspection
Inspect the spark plug annually or every 100 hours. Clean or replace as necessary.
- Remove the spark plug wire.
- Use a spark plug wrench to remove the spark plug.
- Inspect for fouling, wear, or damage. Clean with a wire brush if necessary.
- Check the spark plug gap (refer to engine specifications for correct gap).
- Reinstall the spark plug and torque to specifications. Reconnect the spark plug wire.
The Maintenance-free Magnetron electronic ignition system ensures reliable starting without requiring ignition timing adjustments.
Troubleshooting
This section provides solutions to common engine problems.
| Problem | Possible Cause | Solution |
|---|---|---|
| Engine will not start | No fuel or stale fuel | Add fresh fuel. Drain old fuel if necessary. |
| Low oil level | Add engine oil to the correct level. The low-oil sensor prevents starting. | |
| Spark plug faulty or fouled | Clean or replace spark plug. Check gap. | |
| Choke not set correctly | Adjust choke for cold or warm start conditions. | |
| Engine runs rough | Dirty air filter | Clean or replace air filter. |
| Stale fuel | Drain fuel tank and carburetor, refill with fresh fuel. | |
| Spark plug issues | Inspect and clean or replace spark plug. | |
| Loss of power | Dirty air filter | Clean or replace air filter. |
| Incorrect engine speed | Adjust throttle control. |
Specifications
Detailed technical specifications for the Briggs & Stratton 19N137-0053-F1 XR Series Engine.
- Model: 19N137-0053-F1
- Brand: Briggs & Stratton
- Displacement: 306cc
- Power Rating: 14.50 Gross Torque*
- Maximum RPM: 3600
- Crankshaft Dimensions: 3/4" diameter x 2-1/2" length
- Crankshaft Drilled & Tapped: 3/8-24
- Crankshaft Keyway: 1/4"
- Oil Capacity: 37 oz (1.09 liters)
- Charging System: 9 Amp
- Ignition System: Maintenance-free Magnetron Electronic Ignition
- Cylinder Sleeve: Dura-Bore Cast Iron
- Valve Design: Overhead Valve (OHV)
- Air Filtration: Premium Dual Clean System
- Weight: 81.1 pounds (approximate)
*Briggs & Stratton uses Gross Torque (GT) to measure power on smaller engines and Gross Horsepower (GHP) for larger engines.
Dimensional Drawings
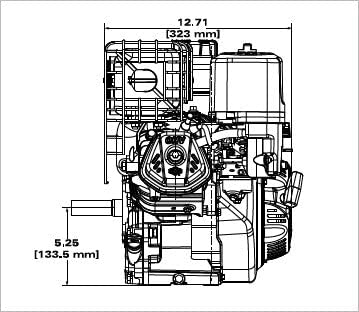
Figure 5: Side view dimensional drawing of the engine, showing key measurements.
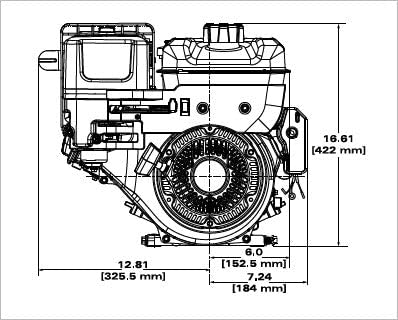
Figure 6: Front view dimensional drawing of the engine, showing key measurements.
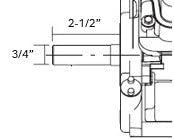
Figure 7: Detailed drawing of the crankshaft dimensions.
Warranty Information
This Briggs & Stratton engine comes with a manufacturer limited warranty:
- Consumer Use: 2 years
- Commercial Use: 1 year
Please retain your proof of purchase for warranty claims. For full warranty terms and conditions, refer to the documentation included with your engine or visit the official Briggs & Stratton website.
Support & Contact
For technical assistance, replacement parts, or further inquiries regarding your Briggs & Stratton engine, please contact Briggs & Stratton customer support or an authorized service dealer.
It is crucial to ensure you are choosing the right replacement for your original equipment or engine model. If you are unsure, contact the manufacturer with your engine's model, type, and code numbers for accurate assistance.
Visit the official Briggs & Stratton website for service locator and contact information: www.briggsandstratton.com


