
ONN ONA13AV501
Contents
ONN FM Clock Radio with Docking Station
Model: ONA13AV501
Introduction
This manual provides detailed instructions for the setup, operation, and maintenance of your ONN FM Clock Radio with Docking Station. This device combines a digital FM radio, a dual alarm clock, and a docking station compatible with various iPhone and iPod models, offering a versatile audio and timekeeping solution.
Safety Information
Please read and understand all safety instructions before using this product. Retain this manual for future reference.
- Do not expose the unit to rain or moisture to prevent fire or electric shock.
- Do not place objects filled with liquids, such as vases, on the unit.
- Ensure proper ventilation. Do not block ventilation openings.
- Use only the power adapter supplied with the unit.
- Do not attempt to disassemble or modify the unit. Refer all servicing to qualified personnel.
- Keep batteries out of reach of children. Dispose of used batteries properly.
Package Contents
Verify that all items listed below are included in your package:
- ONN FM Clock Radio with Docking Station
- AC Power Adapter
- 4 Interchangeable Graphic Skins
- 2 Customizable Blank Skins
- User Manual (this document)
Product Overview
Familiarize yourself with the components of your clock radio.
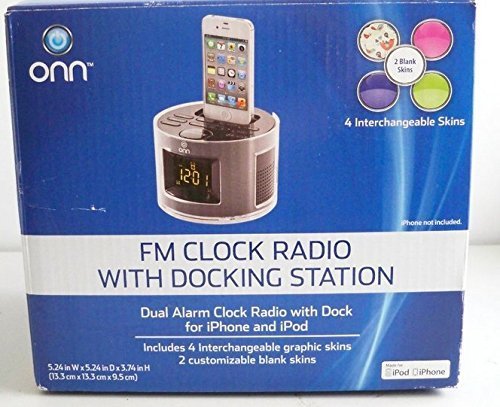
Image: The ONN FM Clock Radio with Docking Station, as seen in its retail packaging. The image highlights the main unit with an iPhone docked, the digital display showing "12:01", and a visual representation of the four interchangeable graphic skins and two blank customizable skins included with the product. The packaging also indicates compatibility with iPod and iPhone devices.
Key Components:
- Docking Port: Located on top, for connecting compatible iPhone/iPod devices.
- LCD Display: Front-facing, shows time, alarm status, and radio frequency. Features a backlight for visibility.
- Control Buttons: Various buttons on the top panel for power, volume, tuning, alarm settings, and snooze.
- Speakers: Integrated speakers for audio output.
- Battery Compartment: Located on the bottom, for installing AA batteries for backup power.
- DC IN Jack: Rear panel, for connecting the AC power adapter.
- FM Antenna: Integrated or wire antenna for FM radio reception.
Setup
1. Power Connection:
- Insert the small plug of the AC power adapter into the DC IN jack on the back of the clock radio.
- Plug the other end of the AC power adapter into a standard wall outlet.
- The unit will power on and the display will illuminate.
2. Battery Backup Installation:
The clock radio requires 2 AA batteries (not included) for battery backup. This feature maintains time and alarm settings during power outages.
- Locate the battery compartment on the bottom of the unit.
- Open the battery compartment cover.
- Insert 2 AA batteries, observing the correct polarity (+ and -) as indicated inside the compartment.
- Close the battery compartment cover securely.
3. Installing/Changing Skins:
Your clock radio comes with interchangeable graphic skins and customizable blank skins to personalize its appearance.
- Gently remove the existing skin from the front panel of the unit.
- Select your desired graphic or blank skin.
- Align the new skin with the front panel and carefully press it into place until it is secure.
Operating Instructions
Setting the Time:
- Press and hold the "TIME SET" button (location may vary, typically on top or back).
- While holding "TIME SET", press the "HOUR" button to adjust the hour.
- While holding "TIME SET", press the "MINUTE" button to adjust the minute.
- Release the "TIME SET" button to save the time.
- Note: Some models may have a 12/24 hour format toggle. Refer to specific button labels.
Setting Alarms (Dual Alarms):
This unit features two independent alarms (Alarm 1 and Alarm 2).
- Press and hold the "ALARM 1 SET" or "ALARM 2 SET" button.
- While holding the respective alarm set button, use the "HOUR" and "MINUTE" buttons to set the desired alarm time.
- Release the alarm set button.
- Press the "ALARM 1 ON/OFF" or "ALARM 2 ON/OFF" button repeatedly to cycle through alarm modes (e.g., Buzzer, Radio, Dock, Off).
Snooze Function:
When an alarm sounds, press the "SNOOZE" button to temporarily silence the alarm for approximately 9 minutes. The alarm will sound again after the snooze period.
Sleep Function:
The sleep function allows you to fall asleep to the radio or docked device, which will automatically turn off after a set period.
- While the radio or docked device is playing, press the "SLEEP" button repeatedly to cycle through sleep timer options (e.g., 90, 60, 30, 15 minutes, Off).
- The unit will automatically turn off after the selected duration.
FM Radio Operation:
- Press the "RADIO" button to turn on the FM radio.
- Press the "TUNE +" or "TUNE -" buttons to manually tune to a desired frequency.
- Press and hold "TUNE +" or "TUNE -" to automatically scan for the next available station.
- Setting Presets:
- Tune to the desired station.
- Press and hold the "PRESET SET" button until the preset number flashes.
- Use the "PRESET +" or "PRESET -" buttons to select the desired preset number (e.g., P01, P02).
- Press "PRESET SET" again to confirm and save the station.
- Recalling Presets: Press "PRESET +" or "PRESET -" to cycle through saved stations.
Docking Station Operation:
The docking station is compatible with iPhone 4, 4S, 3G, 3GS, iPod Touch (1st through 4th generation), iPod Classic, and iPod Nano (1st through 6th generation).
- Carefully place your compatible iPhone or iPod onto the docking connector. Ensure it is seated firmly.
- The device will begin charging automatically.
- To play audio from the docked device, select the "DOCK" mode using the "MODE" or "SOURCE" button (if available), or ensure the alarm is set to "DOCK" mode.
- Control playback (play/pause, skip tracks) directly from your docked device. Volume can be adjusted using the clock radio's volume controls.
Maintenance
Cleaning:
Wipe the exterior of the unit with a soft, dry cloth. Do not use abrasive cleaners, waxes, or solvents as they may damage the finish.
Storage:
If the unit is to be stored for an extended period, disconnect it from the power outlet and remove the backup batteries.
Troubleshooting
| Problem | Possible Cause | Solution |
|---|---|---|
| No power / Display off | Power adapter not connected; Power outlet not active. | Ensure AC adapter is securely plugged into the unit and a working wall outlet. |
| Alarm does not sound | Alarm not set; Alarm volume too low; Alarm mode incorrect. | Verify alarm time is set correctly; Increase volume; Ensure alarm mode is set to Buzzer, Radio, or Dock. |
| Poor FM reception | Antenna not extended/positioned; Interference. | Adjust the position of the FM antenna; Move the unit away from other electronic devices. |
| Docked device not charging/playing | Device not seated properly; Device incompatible. | Ensure the iPhone/iPod is firmly seated in the docking port; Verify device compatibility (iPhone 4/4S/3G/3GS, iPod Touch 1-4 gen, iPod Classic, iPod Nano 1-6 gen). |
| Time/settings lost after power outage | Backup batteries not installed or drained. | Install new 2 AA batteries in the battery compartment. |
Specifications
| Feature | Detail |
|---|---|
| Brand | ONN |
| Model Number | ONA13AV501 |
| Display Type | Digital, Backlight Green LCD |
| Special Features | Snooze, Dual Alarm, Digital FM Radio with Presets, Docking Station |
| Power Source | AC Powered (Adapter included), Battery Powered (2 AA batteries for backup, not included) |
| Shape | Rectangular |
| Mounting Type | Tabletop |
| Compatible Devices | iPhone 4, 4S, 3G, 3GS; iPod Touch (1st-4th gen); iPod Classic; iPod Nano (1st-6th gen) |
| Product Dimensions (LxWxH) | 13.3 x 12.7 x 13.3 Centimeters (5.24 x 5.0 x 5.24 inches approx.) |
| Item Weight | 726 g (1.6 lbs approx.) |
Warranty and Support
For warranty information or technical support, please refer to the contact details provided on the product packaging or the manufacturer's official website. Keep your purchase receipt as proof of purchase.
Ask a question about this manual
Ask about setup, troubleshooting, compatibility, parts, safety, or missing instructions. Manuals+ will review the question and use this page’s manual context to help answer it.