
1. Introduction
Thank you for choosing the TAKEX SA-6 Sensor Guard Intruder Alarm System. This manual provides essential information for the safe and effective installation, operation, and maintenance of your device. Please read this manual thoroughly before use and retain it for future reference.
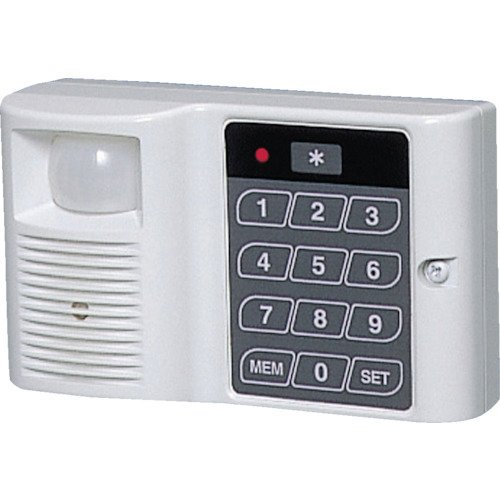
Image 1.1: The TAKEX SA-6 Sensor Guard. This image shows the compact design of the SA-6 unit, typically mounted on a wall or placed on a flat surface, with its sensor lens visible.
2. Product Features
- Intruder Detection: Utilizes passive infrared (PIR) technology to detect movement within its detection area.
- High-Volume Alarm: Activates a loud alarm of 90dB or more upon detection to deter intruders.
- Customizable PIN: Arm and disarm the system using a personal identification number (PIN) of 1 to 8 digits.
- Expandable Functionality: Equipped with output terminals for connecting external devices such as chimes, additional sirens, wireless transmitters, or remote notification systems.
- Flexible Installation: Can be used as a freestanding unit or securely mounted on a wall.
- Battery Status Indicator: Features a function to notify the user when battery replacement is required.
3. Safety Precautions
To ensure safe operation and prevent damage, please observe the following precautions:
- Do not expose the device to direct sunlight, extreme temperatures, or high humidity.
- Avoid installing the device near heat sources, air conditioners, or areas with strong air currents, as these can cause false alarms.
- Do not disassemble or modify the device. This may void the warranty and cause malfunction.
- Keep the device out of reach of children.
- Use only the specified battery type for replacement.
- Ensure the mounting surface is stable and can support the device's weight.
4. Package Contents
Verify that all items are present in the package:
- TAKEX SA-6 Sensor Guard Unit
- Mounting Screws (x2)
- Wall Plugs (x2)
- User Manual (this document)
- Batteries (AA x 3, typically included)
5. Setup
5.1 Battery Installation
- Open the battery compartment cover located on the back of the SA-6 unit.
- Insert three (3) AA batteries, ensuring correct polarity (+/-) as indicated inside the compartment.
- Close the battery compartment cover securely.
- The unit will emit a short beep, indicating it is powered on.
5.2 Mounting the Unit
The SA-6 can be placed on a flat surface or mounted on a wall. For optimal detection, position the unit where intruders are likely to pass through the detection area.
Wall Mounting:
- Choose a suitable location, typically 1.8 to 2.4 meters (6 to 8 feet) above the floor, ensuring a clear line of sight for the sensor.
- Mark the positions for the two mounting screws using the unit's mounting holes as a template.
- Drill pilot holes at the marked positions. Insert wall plugs if mounting into drywall or masonry.
- Secure the unit to the wall using the provided mounting screws. Do not overtighten.
Surface Placement:
Place the unit on a stable, flat surface at an appropriate height to cover the desired detection area. Ensure it is not easily knocked over.
6. Operating Instructions
6.1 Setting/Disarming the System
The SA-6 uses a PIN code for arming and disarming.
To Arm:
- Enter your 1-8 digit PIN code on the keypad.
- Press the "ARM" button.
- The unit will emit a confirmation beep, and the indicator light will show the armed status. You will have a short exit delay period before the system is fully armed.
To Disarm:
- Enter your 1-8 digit PIN code on the keypad.
- Press the "DISARM" button.
- The unit will emit a confirmation beep, and the indicator light will show the disarmed status.
6.2 Changing the PIN Code
Refer to the specific instructions provided with your unit for changing the PIN code. Typically, this involves entering a master code or a sequence of button presses followed by the new PIN.
6.3 Using Output Terminals (Optional)
The SA-6 features output terminals for connecting external devices.
- Chime/Siren Connection: Connect a compatible chime or siren to the designated output terminals. When an alarm is triggered, the connected device will also activate.
- Wireless Transmitter/Notification Device: For remote alerts, connect a wireless transmitter or a notification device to the output terminals. This allows the SA-6 to trigger other security systems or send alerts to your mobile phone (requires compatible third-party equipment).
Consult the documentation for your external devices for specific wiring instructions.
7. Maintenance
7.1 Battery Replacement
The SA-6 unit will indicate when the batteries are low, typically through a specific LED indicator or a series of beeps.
- When the low battery indicator activates, replace all three (3) AA batteries promptly.
- Follow the steps in Section 5.1 "Battery Installation" to replace the batteries.
- Dispose of used batteries according to local regulations.
7.2 Cleaning
To maintain optimal performance, keep the sensor lens clean.
- Gently wipe the exterior of the unit and the sensor lens with a soft, dry cloth.
- Do not use abrasive cleaners, solvents, or spray directly onto the unit.
8. Troubleshooting
| Problem | Possible Cause | Solution |
|---|---|---|
| Unit does not power on. | Batteries are incorrectly installed or depleted. | Check battery polarity. Replace with new AA batteries. |
| False alarms. | Heat sources, air currents, or pets in detection area. | Relocate the unit away from heat vents, windows, or areas where pets roam. Adjust sensitivity if possible (refer to advanced settings if available). |
| Alarm does not sound. | Unit is not armed. Batteries are low. Speaker malfunction. | Ensure the unit is armed. Replace batteries. Contact customer support if speaker is faulty. |
| Cannot arm/disarm with PIN. | Incorrect PIN entered. Keypad malfunction. | Verify the correct PIN. Try resetting the PIN if possible (refer to advanced settings). Contact support if keypad is unresponsive. |
9. Specifications
| Model: | SA-6 |
| Detection Method: | Passive Infrared (PIR) |
| Detection Area: | Stereoscopic detection (104° x max 5m) |
| Alarm Sound Level: | 90dB or more |
| Power Source: | 3 x AA Batteries |
| Operating Temperature: | 0°C to +40°C (32°F to 104°F) |
| Weight: | Approx. 200g (excluding batteries) |
10. Warranty and Support
TAKEX products are designed for reliability and performance. For warranty information, please refer to the warranty card included with your purchase or visit the official TAKEX website.
If you encounter any issues or require technical assistance, please contact TAKEX customer support through their official channels. Provide your product model (SA-6) and a detailed description of the problem for efficient service.
Official Website: www.takex.com (Please note: This is a placeholder URL, verify the actual official website for TAKEX if available.)