
1. Introduction
This manual provides essential instructions for the safe and effective use of your Mitutoyo Digital Micrometer, Series 293, Model 293-240-30. This precision instrument is designed for accurate external measurements within a range of 0-25 mm. Please read this manual thoroughly before operation to ensure proper handling and to maintain the instrument's accuracy and longevity.
2. Product Overview and Features
The Mitutoyo Digital Micrometer Series 293 is a high-precision measuring device built for reliability and durability. Key features include:
- Measuring Range: 0-25 mm
- Resolution: 0.001 mm
- Protection Level: IP65 (Dust-tight and protected against water jets from any direction)
- Measuring Faces: Carbide-tipped, ground, and finely lapped for accuracy
- Thimble and Sleeve: Matte chrome finish for glare-free reading
- Ratchet Stop: Ensures constant measuring force for repeatable results
- Digital Display: Clear LCD for easy reading
- Functions: Automatic power off, low voltage alarm, locking function
- Data Output: This specific model (293-240-30) does not include a data output function.

Image: The Mitutoyo Digital Micrometer Series 293 (Model 293-240-30) shown in its protective storage case, alongside an included LR44 battery.
3. Components and Package Contents
Your Mitutoyo Digital Micrometer package includes the following items:
- Mitutoyo Digital Micrometer (Model 293-240-30)
- Protective Storage Box
- 1 x LR44 Battery (installed or separate)
- Setting Standard (for 25 mm and above, if applicable for calibration)
- Factory Inspection Certificate (up to 50 mm range)
Familiarize yourself with the main parts of the micrometer:

Image: Technical diagram illustrating the dimensions and key components of the micrometer, including the anvil, spindle, and measuring faces. All units are in millimeters.
- Frame: The main body of the micrometer.
- Anvil: The stationary measuring face.
- Spindle: The movable measuring face (diameter: 6.35 mm).
- Thimble: Rotated to move the spindle (diameter: 18 mm).
- Ratchet Stop: Located at the end of the thimble, used to apply consistent measuring force.
- Lock Clamp: Used to fix the spindle position.
- LCD Display: Shows the digital measurement.
- Buttons: For power, zero-setting, and other functions.
4. Setup
4.1 Battery Installation
The micrometer requires one LR44 battery. If the battery is not pre-installed or needs replacement:
- Locate the battery compartment cover, usually on the back or side of the display unit.
- Use a small screwdriver or coin to open the cover.
- Insert the LR44 battery with the positive (+) side facing up, according to the diagram inside the compartment.
- Replace the cover securely.
4.2 Initial Cleaning
Before first use, gently wipe the measuring faces and spindle with a clean, lint-free cloth. Ensure no dust or debris is present on the measuring surfaces.
4.3 Zero-Setting
Accurate measurement depends on proper zero-setting. Perform this procedure before each use or if accuracy is in doubt:
- Clean the measuring faces thoroughly.
- Gently bring the anvil and spindle into contact by rotating the ratchet stop until it clicks 2-3 times. Do not overtighten.
- Press the ZERO button on the display unit. The display should show "0.000 mm".
- If using a setting standard (for micrometers with a range starting above 0 mm, e.g., 25-50 mm), use the standard to set the zero point. For this 0-25 mm model, direct contact is sufficient.
5. Operation
5.1 Holding the Micrometer
Hold the micrometer by the frame, ensuring your body heat does not significantly affect the instrument's temperature, which could lead to measurement errors. Avoid gripping the thimble or spindle directly during measurement.
5.2 Measuring Procedure
- Ensure the micrometer is clean and zero-set.
- Open the measuring faces slightly wider than the workpiece.
- Position the workpiece between the anvil and spindle.
- Slowly rotate the ratchet stop until the spindle makes contact with the workpiece and the ratchet clicks 2-3 times. This ensures consistent measuring pressure.
- Read the measurement directly from the digital LCD display.
- To lock the measurement, engage the lock clamp. This prevents accidental changes to the reading.
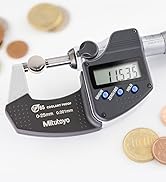
Image: A close-up view of the Mitutoyo Digital Micrometer in use, displaying a measurement on its digital screen while measuring a small, coin-like object.
5.3 Automatic Power Off
The micrometer is equipped with an automatic power-off function to conserve battery life. The device will power off after a period of inactivity. To reactivate, press any button or rotate the thimble.
6. Maintenance
6.1 Cleaning
Despite its IP65 protection, regular cleaning is crucial for maintaining accuracy and extending the life of your micrometer.
- Wipe the entire instrument with a clean, dry, lint-free cloth after each use.
- For stubborn dirt, use a cloth lightly dampened with isopropyl alcohol. Avoid harsh solvents.
- Ensure measuring faces are free of dust, oil, or fingerprints.
- The IP65 rating means it can withstand water jets, but it is not designed for immersion. Avoid prolonged exposure to liquids.
6.2 Storage
Store the micrometer in its protective case when not in use. Keep it in a dry environment, away from direct sunlight, extreme temperatures, and corrosive substances. Ensure the measuring faces are slightly separated to prevent pressure on the spindle.
6.3 Battery Replacement
When the low voltage alarm appears on the display, replace the LR44 battery as described in Section 4.1. Dispose of used batteries according to local regulations.
6.4 Calibration
For critical applications, periodic calibration by a qualified technician is recommended to ensure continued accuracy. Refer to the factory inspection certificate for initial calibration details.
7. Troubleshooting
| Problem | Possible Cause | Solution |
|---|---|---|
| Display shows "Low Battery" or is blank. | Battery is depleted or incorrectly installed. | Replace the LR44 battery (see Section 4.1). Ensure correct polarity. |
| Inaccurate readings. | Measuring faces are dirty; improper zero-setting; inconsistent measuring force; environmental factors. | Clean measuring faces. Perform zero-setting (Section 4.3). Use the ratchet stop for consistent force. Ensure stable temperature. |
| Display does not change. | Lock clamp is engaged. | Release the lock clamp. |
| Micrometer does not power on. | Dead battery; internal malfunction. | Replace battery. If problem persists, contact Mitutoyo support. |
8. Specifications
| Specification | Detail |
|---|---|
| Model Number | 293-240-30 |
| Measuring Range | 0 - 25 mm |
| Resolution | 0.001 mm |
| Protection Level | IP65 (Dust-tight, protected against water jets) |
| Spindle Pitch | 0.5 mm |
| Spindle Diameter | 6.35 mm |
| Thimble Diameter | 18 mm |
| Battery Type | 1 x LR44 (included) |
| Product Dimensions (Packaged) | 20.6 L x 11.4 W x 0.1 H cm |
| Item Weight | 270 g |
| Manufacturer | Mitutoyo |
| Country of Origin | Japan |
9. Warranty and Support
For warranty information, technical support, or service inquiries, please contact your authorized Mitutoyo dealer or visit the official Mitutoyo website. Keep your purchase receipt and factory inspection certificate for reference.
Manufacturer: Mitutoyo
Website: www.mitutoyo.com (This is a general link, specific regional sites may vary)


