1. Introduction
This manual provides essential instructions for the safe and effective operation, maintenance, and troubleshooting of your Banshee TE4-0232 10/2/50 Amp 12V Automatic Battery Charger and Engine Starter. Please read this manual thoroughly before using the product to ensure proper function and to prevent damage or injury.
Important Safety Notice:
This charger is designed exclusively for 12-volt LEAD ACID batteries (SLI and Deep Cycle). It is NOT compatible with lithium batteries. Attempting to charge lithium batteries may result in damage to the charger, battery, or personal injury.

Image: Warning indicating the charger is for lead-acid batteries only, not lithium batteries.
2. Product Overview
The Banshee TE4-0232 is a versatile 12V automatic battery charger and engine starter, offering multiple charging rates and an engine start function for various lead-acid battery applications.
2.1 Key Features
- 2/10/50 Amp selectable charging rates.
- 50 Amp Engine Start function for emergency starting.
- Two LED indicators: "Full Charge" and "Power On".
- Battery type switch for SLI (Starting, Lighting, Ignition) or Deep Cycle batteries.
- Integrated ammeter to display charging current.
- Suitable for 12V Lead-acid batteries.
2.2 Package Contents
- Banshee TE4-0232 Automatic Battery Charger
- AC Power Cord
- Battery Clamps (Red for Positive, Black for Negative)
- Instruction Manual
2.3 Component Identification
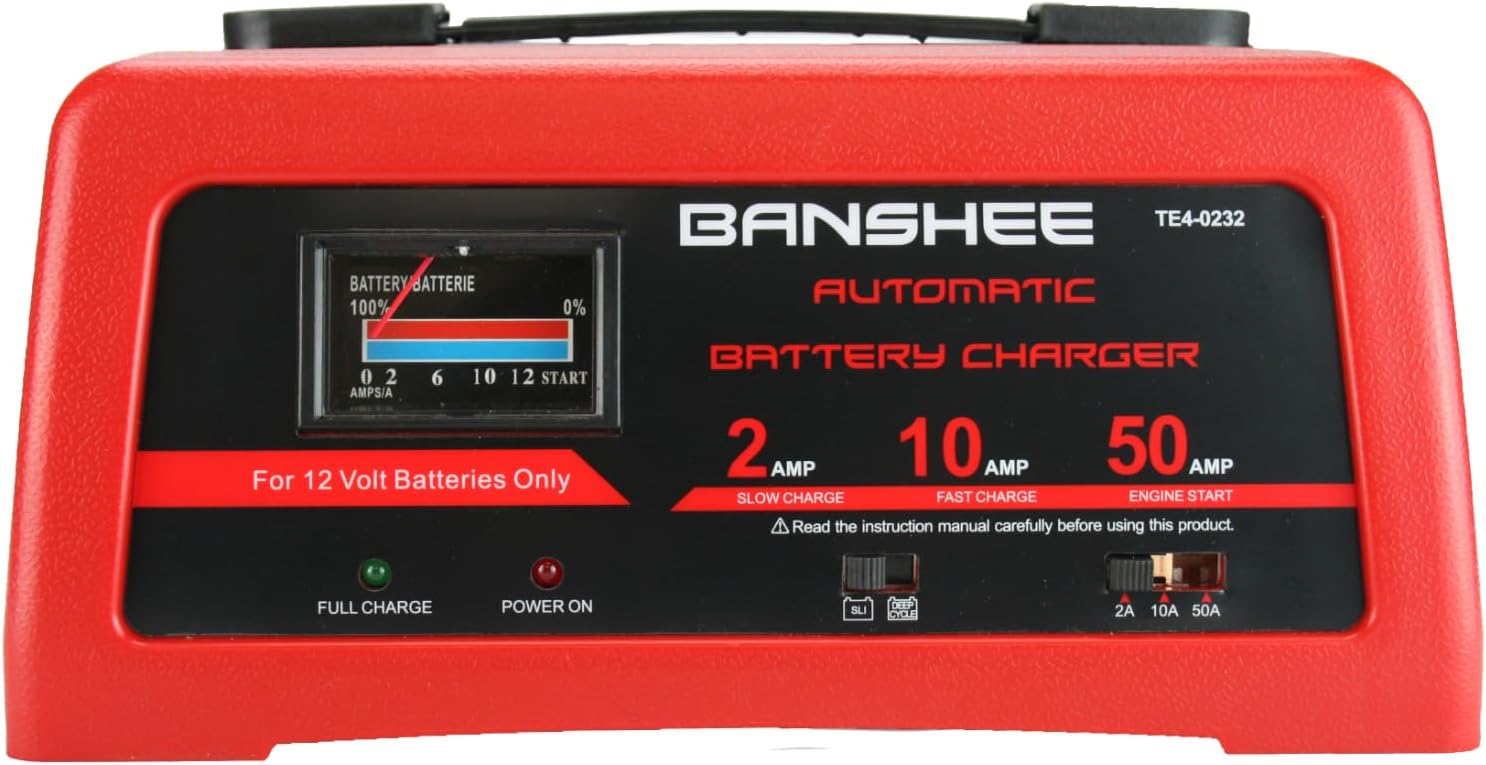
Image: Front view of the Banshee TE4-0232 Automatic Battery Charger, showing the control panel with ammeter, LED indicators, and switches.

Image: Close-up of the control panel, highlighting the Battery Type Switch (SLI/Deep Cycle) and Charge Rate Selector Switch (2A/10A/50A).

Image: Ammeter display on the charger, indicating the amount of current (Amps) being drawn by the battery during charging.

Image: The AC power plug and the red (positive) and black (negative) alligator-style battery clamps.
3. Safety Instructions
WARNING: Risk of explosive gases. Working in the vicinity of a lead-acid battery is dangerous. Batteries generate explosive gases during normal operation. For this reason, it is of utmost importance that you read this manual and follow the instructions exactly each time you use the charger.
- Always wear eye protection and protective clothing when working with batteries.
- Ensure adequate ventilation in the charging area.
- Keep sparks, flames, and smoking materials away from batteries.
- Never charge a frozen battery.
- Do not operate the charger if it has received a sharp blow, been dropped, or otherwise damaged.
- Disconnect the AC power cord before making or breaking connections to the battery.
- Connect the battery clamps to the battery terminals in the correct polarity: Red to Positive (+), Black to Negative (-).
- Do not use this charger for charging dry-cell batteries that are commonly used with home appliances. These batteries may burst and cause injury to persons and damage to property.
4. Setup and Connection
- Prepare the Battery: Ensure the battery terminals are clean. If the battery has removable caps, check the fluid level and add distilled water if necessary (for non-sealed batteries).
- Position the Charger: Place the charger on a stable, flat surface as far away from the battery as the cables permit. Do not place the charger directly above the battery.
- Connect Battery Clamps:
- Connect the RED positive (+) clamp to the positive (+) battery terminal.
- Connect the BLACK negative (-) clamp to the negative (-) battery terminal.
- Ensure connections are secure.
- Connect to AC Power: Plug the charger's AC power cord into a standard 120V AC electrical outlet. The "Power On" LED indicator should illuminate.
5. Operating Instructions
5.1 Selecting Battery Type
Locate the Battery Type Switch on the control panel. Select the appropriate setting for your battery:
- SLI: For Starting, Lighting, Ignition batteries (standard automotive batteries).
- Deep Cycle: For deep cycle batteries (commonly used in marine, RV, and golf cart applications).
5.2 Selecting Charge Rate
Locate the Charge Rate Selector Switch on the control panel. Choose the desired charging current:
- 2 AMP (Slow Charge): Ideal for charging small batteries such as those found in garden tractors, snowmobiles, and motorcycles. This rate provides a gentle, prolonged charge.
- 10 AMP (Fast Charge): Suitable for everyday charging of automotive, marine, and deep-cycle batteries. This rate charges faster than 2 AMP but is not intended for industrial applications.
- 50 AMP (Engine Start): Provides a high current boost to assist in starting an engine with a weak or run-down battery. This function should always be used in combination with a battery, not as a standalone power source.

Image: Explanation of the 2 AMP (Slow Charge), 10 AMP (Fast Charge), and 50 AMP (Engine Start) functions.
5.3 Charging Process
- After connecting the charger to the battery and AC power, and selecting the battery type and charge rate, the charging process will begin automatically.
- Monitor the ammeter. It will indicate the current flowing into the battery. As the battery charges, the current will gradually decrease.
- The "Full Charge" LED indicator will illuminate when the battery is fully charged. The charger will then switch to a maintenance mode to prevent overcharging.
5.4 Engine Start Function (50 AMP)
The 50 AMP Engine Start function provides a temporary boost to start an engine with a weak battery. It is not a battery charger and should not be used for prolonged periods.
- Ensure the charger is connected to the battery and AC power as described in Section 4.
- Set the Charge Rate Selector Switch to 50 AMP.
- Attempt to start the vehicle. If the engine does not start within 5 seconds, wait at least 3 minutes before trying again. This allows the charger to cool down and the battery to recover slightly.
- Do not crank the engine for more than 5 seconds at a time to prevent overheating the charger.
- Once the engine starts, immediately disconnect the AC power cord from the outlet, then disconnect the battery clamps (negative first, then positive).
6. Maintenance
- Cleaning: Disconnect the charger from AC power and the battery before cleaning. Wipe the case with a soft, dry cloth. Do not use solvents or abrasive cleaners.
- Cable Care: Inspect the battery cables and clamps for damage (cuts, frayed insulation, loose connections) before each use. Replace damaged components immediately.
- Storage: Store the charger in a cool, dry place when not in use. Coil the cables neatly to prevent tangling and damage.
7. Troubleshooting
| Problem | Possible Cause | Solution |
|---|---|---|
| Charger not turning on / "Power On" LED off. | No AC power, faulty outlet, damaged power cord. | Check AC outlet with another appliance. Inspect power cord for damage. Ensure charger is properly plugged in. |
| Battery not charging / Ammeter shows no current. | Incorrect battery clamp connection, deeply discharged battery, faulty battery, incorrect battery type selection. | Verify correct polarity and secure connection of battery clamps. Ensure battery type switch is set correctly. A deeply discharged battery may take some time to register current. If no change, battery may be faulty. |
| Engine Start function not working. | Battery too weak, poor connections, charger overheating. | Ensure battery clamps are securely connected. Do not crank for more than 5 seconds; allow 3 minutes cool-down between attempts. Ensure the battery itself is not completely dead, as the engine start function assists, but does not replace, a completely dead battery. |
| Charger becomes hot during use. | Normal operation, prolonged high current use, poor ventilation. | Some heat is normal. Ensure adequate ventilation around the charger. If excessively hot or smoking, immediately disconnect from AC power and battery, and discontinue use. |
8. Specifications
- Model: TE4-0232
- Input Voltage: 120V AC, 60Hz
- Output Voltage: 12 Volts DC
- Charging Current: 2 Amp (Slow Charge), 10 Amp (Fast Charge)
- Engine Start Current: 50 Amp
- Compatible Battery Types: 12V Lead-Acid (SLI, Deep Cycle)
- Manufacturer: BatteryJack inc.
9. Warranty and Support
The Banshee TE4-0232 Battery Charger comes with a 2-Year Warranty. For warranty claims, technical support, or service inquiries, please refer to the contact information provided with your purchase or visit the official Banshee website.
Video: Overview of the Banshee 10/2/50 Amp 12V Automatic Charger, highlighting its features and 2-year warranty.


