Introduction
Thank you for purchasing the Marantz CD5005 CD Player. This manual provides detailed instructions for the proper setup, operation, and maintenance of your new audio component. The CD5005 is designed to deliver high-quality audio playback from various disc formats, including CD, CD-R, CD-RW, MP3, and WMA files. It features high-quality audio components such as the CS4398 DAC and Marantz HDAM SA2, ensuring exceptional sound reproduction. Please read this manual thoroughly before using the unit to ensure optimal performance and longevity.
Safety Instructions
Always follow these basic safety precautions when operating the CD5005 CD Player:
- Power Source: Connect the unit only to an AC outlet of the voltage specified on the rear panel.
- Ventilation: Ensure adequate ventilation. Do not block ventilation openings. Avoid installing in confined spaces.
- Water and Moisture: Do not expose the unit to rain, moisture, or excessive humidity. Do not place objects filled with liquids on the unit.
- Heat: Keep the unit away from heat sources such as radiators, heat registers, stoves, or other apparatus that produce heat.
- Cleaning: Unplug the unit from the wall outlet before cleaning. Use a dry cloth only.
- Servicing: Do not attempt to service the unit yourself. Refer all servicing to qualified service personnel.
- Disc Handling: Handle discs by their edges. Avoid touching the shiny surface. Keep discs clean and free from scratches.
Package Contents
Verify that your package contains the following items:
- Marantz CD5005 CD Player
- Detachable Power Cord
- Audio Cables (L/R Analog)
- Digital Audio Cable (Coaxial)
- Remote Control Unit
- AA Batteries for Remote Control (x2)
- Quick Setup Guide (Printed)
- Interactive CD-ROM Manual (except Japan)
Product Overview
Front Panel

Figure 1: Front view of the Marantz CD5005 CD Player. This image shows the disc tray, display, control buttons, and headphone jack on the front panel.
The front panel of the CD5005 features the disc tray, a clear dual-line display, essential playback control buttons (Play, Pause, Stop, Skip), and a headphone output with a dedicated volume control. The power button is located on the left side.
Rear Panel

Figure 2: Rear view of the Marantz CD5005 CD Player. This image displays the various input and output terminals, including analog audio outputs, digital coaxial and optical outputs, and the AC power inlet.
The rear panel provides connectivity options including gold-plated analog audio outputs, digital coaxial output, and digital optical output for connecting to an amplifier or receiver. A remote control input/output terminal is also present for system integration, along with the detachable AC power inlet.
Remote Control
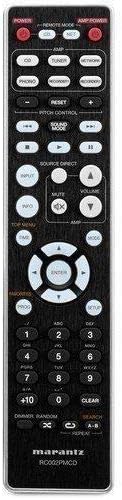
Figure 3: The remote control unit for the Marantz CD5005 CD Player. This remote allows for comprehensive control of the CD player's functions, including playback, track selection, pitch control, and display dimmer.
The included remote control unit provides full functionality for the CD5005, including features not available on the front panel such as pitch control, display dimmer, track randomization, and various repeat functions. It also allows for control of other compatible Marantz components.
Setup
1. Placement
Place the CD5005 on a stable, level surface away from direct sunlight, heat sources, and excessive vibration. Ensure there is adequate space around the unit for proper ventilation.
2. Connecting Audio Cables
Choose one of the following methods to connect the CD5005 to your amplifier or receiver:
- Analog Connection: Use the supplied L/R analog audio cables to connect the AUDIO OUT jacks on the CD5005 to the corresponding CD input jacks on your amplifier. Ensure red plugs connect to red jacks (right channel) and white plugs to white jacks (left channel).
- Digital Coaxial Connection: Use the supplied digital coaxial cable to connect the COAXIAL DIGITAL AUDIO OUT jack on the CD5005 to a digital coaxial input on your amplifier or receiver.
- Digital Optical Connection: Use an optical digital audio cable (not supplied) to connect the OPTICAL DIGITAL AUDIO OUT jack on the CD5005 to a digital optical input on your amplifier or receiver.
Note: Do not connect both analog and digital outputs to the same input on your amplifier simultaneously, as this may cause interference or unexpected behavior. Select the appropriate input on your amplifier after connecting.
3. Connecting the Power Cord
Connect the detachable power cord to the AC inlet on the rear panel of the CD5005, then plug the other end into a suitable AC wall outlet.
4. Installing Remote Control Batteries
Open the battery compartment on the back of the remote control unit. Insert two AA batteries, ensuring correct polarity (+/-) as indicated inside the compartment. Close the cover securely.
Operating Instructions
Basic CD Playback
- Press the POWER button on the front panel or remote control to turn on the unit.
- Press the OPEN/CLOSE button to open the disc tray.
- Place a CD, CD-R, CD-RW, MP3, or WMA disc onto the disc tray with the label side facing up.
- Press the OPEN/CLOSE button again to close the disc tray. The unit will read the disc.
- Press the PLAY button to start playback.
- To pause playback, press the PAUSE button. Press again to resume.
- To stop playback, press the STOP button.
- Use the SKIP buttons to navigate between tracks.
Advanced Features (Remote Control)
- Pitch Control: Use the PITCH CONTROL buttons on the remote to adjust the playback speed and pitch.
- CD Text Display: If a disc supports CD Text, the display will show track and artist information. Use the DISPLAY button on the remote to cycle through display modes.
- Repeat Playback: Press the REPEAT button on the remote to select repeat modes (e.g., repeat one track, repeat all tracks, repeat A-B segment).
- Random Playback: Press the RANDOM button on the remote to play tracks in a random order.
- Headphone Output: Connect headphones to the front panel headphone jack. Adjust the LEVEL knob next to the jack to control headphone volume independently. Note that plugging in headphones does not mute the main analog or digital outputs.
- App Control: The CD5005 supports app control via RC-5 with a compatible Marantz network player. Refer to the network player's manual for details on this integration.
Maintenance
Cleaning the Unit
Wipe the exterior surfaces of the CD5005 with a soft, dry cloth. Do not use abrasive cleaners, waxes, or solvents, as these can damage the finish. Avoid spraying liquids directly onto the unit.
Disc Handling and Care
- Always hold discs by their edges to prevent fingerprints and scratches on the playing surface.
- If a disc is dirty, wipe it gently from the center outwards with a soft, lint-free cloth. Do not use circular motions.
- Do not use solvents such as benzene, thinner, or commercially available record cleaners, as they may damage the disc.
- Store discs in their cases when not in use to protect them from dust and scratches.
- Avoid exposing discs to direct sunlight or high temperatures for extended periods.
Troubleshooting
If you experience issues with your Marantz CD5005, refer to the following common problems and solutions:
| Problem | Possible Cause | Solution |
|---|---|---|
| No power | Power cord not connected securely. | Check power cord connection to the unit and wall outlet. |
| No sound output | Incorrect audio cable connection; wrong input selected on amplifier; amplifier volume too low. | Verify audio cable connections. Select the correct input on your amplifier. Increase amplifier volume. |
| Disc does not play / "No Disc" error | Disc inserted incorrectly; disc is dirty or scratched; disc format not supported. | Insert disc with label side up. Clean the disc. Try a different disc. Ensure disc format (CD, CD-R/RW, MP3, WMA) is supported. |
| Skipping or intermittent playback | Disc is dirty or scratched; unit is subject to vibration. | Clean the disc. Place the unit on a stable surface away from vibrations. |
| Remote control not working | Batteries are depleted or inserted incorrectly; obstacle between remote and unit; remote sensor blocked. | Replace batteries, ensuring correct polarity. Remove any obstacles. Ensure the remote sensor on the unit is clear. |
If the problem persists after trying these solutions, please contact Marantz customer support.
Specifications
| Feature | Detail |
|---|---|
| Model Number | CD5005 |
| Disc Compatibility | CD, CD-R/RW, MP3, WMA |
| Digital-to-Analog Converter (DAC) | CS4398 |
| Analog Output Circuit | Marantz HDAM SA2 |
| Outputs | Analog L/R (Gold-plated), Digital Coaxial, Digital Optical, Headphone |
| Special Features | Pitch Control, CD Text Display, App Control (via RC-5 with Marantz network player), Auto Standby |
| Power Consumption (Standby) | Low |
| Product Dimensions (W x D x H) | 17.3 x 14.6 x 4.1 inches (43.9 x 37.1 x 10.4 cm) |
| Item Weight | 11.02 pounds (5.0 kg) |
| Manufacturer | Marantz |
| Color | Black |
Warranty and Support
For warranty information and customer support, please refer to the warranty card included with your product or visit the official Marantz website. Keep your proof of purchase for warranty claims.
Marantz Official Website: www.marantz.com