
Introduction
This manual provides detailed instructions for the safe and proper installation and operation of your Mounting Dream MD2393-MX Full Motion TV Wall Mount. This mount is designed for most 26-55 inch LED, LCD, OLED, and Plasma flat screen TVs weighing up to 60 lbs, with VESA patterns ranging from 100x100mm to 400x400mm. Please read all instructions carefully before beginning installation.
Important Safety Information
WARNING: Failure to read and follow all instructions can result in personal injury, property damage, or voiding of your warranty.
- Do not install on drywall alone. This mount is designed for single wood stud or concrete/brick walls.
- Ensure your TV's weight does not exceed 60 lbs (27.2 kg).
- Verify your TV's VESA pattern is within 100x100mm to 400x400mm.
- Always use a stud finder to locate wood studs accurately.
- For concrete or brick walls, concrete anchors are required and can be requested if not included.
- Check for potential cable blockage by the mount before final installation.
- If you have any doubts about installation, consult a qualified professional.
Package Contents
Please check that all parts are included and undamaged. If any parts are missing or defective, contact customer service.
- Full Motion TV Wall Mount Assembly
- TV Brackets (for attaching to TV back)
- Wall Plate (main wall-mounted component)
- Assorted TV Screws and Spacers
- Lag Bolts for Wall Mounting
- Bubble Level
- Cable Ties (3 included)
- Instruction Manual
- Concrete Anchors (available upon request for concrete/brick installation)
Specifications
| Feature | Detail |
|---|---|
| Model Number | MD2393-MX |
| Compatible TV Sizes | 26-55 inches |
| Maximum TV Weight | 60 lbs (27.2 kg) |
| VESA Compatibility | 100x100mm to 400x400mm |
| Mounting Type | Wall Mount |
| Movement Type | Swivel, Tilt, Full Motion, Articulating |
| Tilt Angle | Up 5°, Down 15° |
| Swivel Angle | Up to ±90° (depending on TV size) |
| Extension from Wall | 2.9 inches (retracted) to 19 inches (extended) |
| Leveling Adjustment | ±5° post-installation |
| Compatible Wall Types | Single Wood Stud, Concrete/Brick Wall (Do not install on drywall only) |
| Material | Metal |
| Color | Black |
Setup and Installation
Follow these steps for a secure installation. Ensure you have all necessary tools (e.g., drill, stud finder, level, screwdriver, wrench).
Step 1: Prepare the TV and Mount
- Disassemble the Wall Plate: The mount unit may come assembled. Carefully disassemble the wall plate from the TV plate using the provided tools.
- Attach Brackets to TV: Secure the TV brackets to the back of your television using the appropriate screws and spacers from the hardware kit. Ensure all screws are tightened securely.
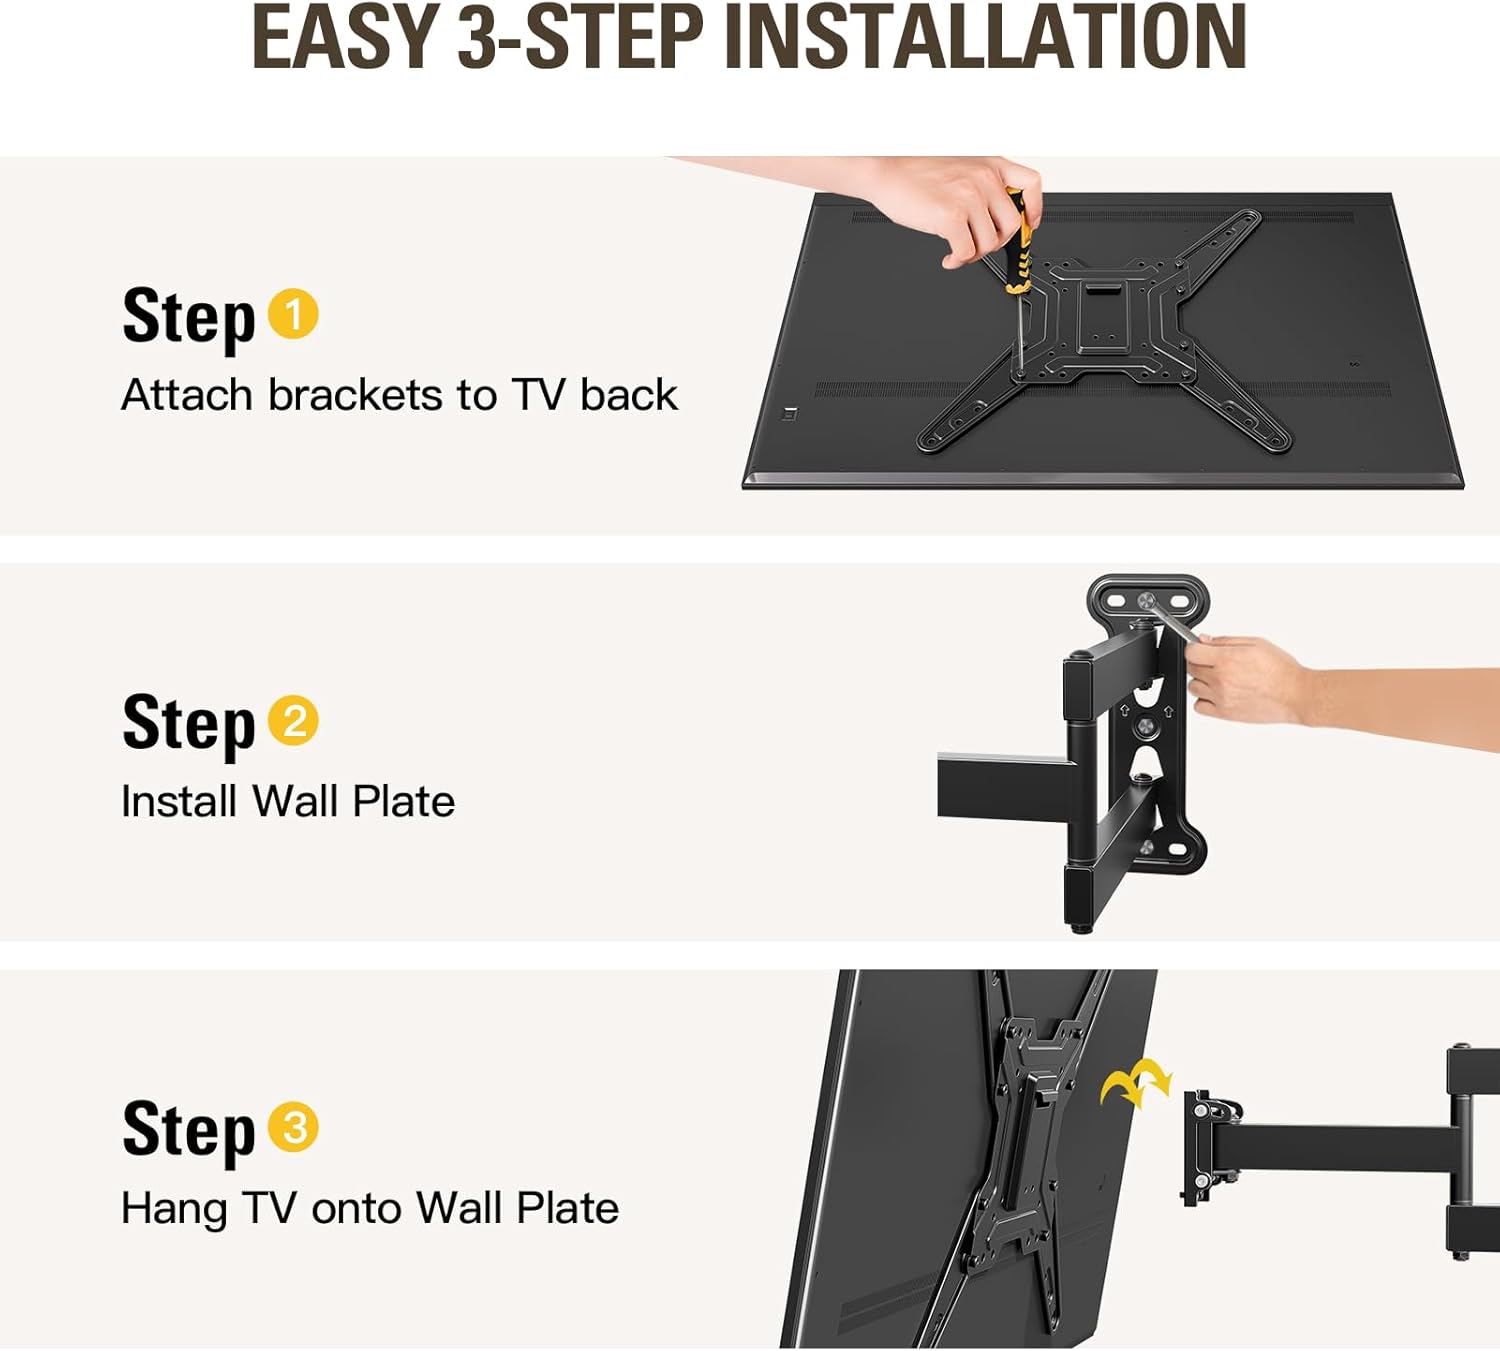
Figure 1: Overview of the 3-step installation process.
Step 2: Prepare the Wall
- Identify Wall Type: This mount is suitable for single wood stud or concrete/brick walls. DO NOT install on drywall only.
- Locate Studs (for Wood Stud Installation): Use a stud finder to accurately locate the center of the wood stud where you intend to mount the TV. Mark the drilling locations.
- Mark Mounting Holes: Use the wall plate as a template to mark the precise drilling locations on the wall. Use the included bubble level to ensure the marks are perfectly horizontal.
- Drill Pilot Holes: Drill pilot holes at the marked locations. The size of the drill bit will depend on your wall type and the lag bolts provided. For wood studs, ensure the pilot hole is slightly smaller than the lag bolt. For concrete/brick, use a masonry drill bit and insert concrete anchors (if applicable).

Figure 2: Pre-installation checks for TV compatibility and wall type.
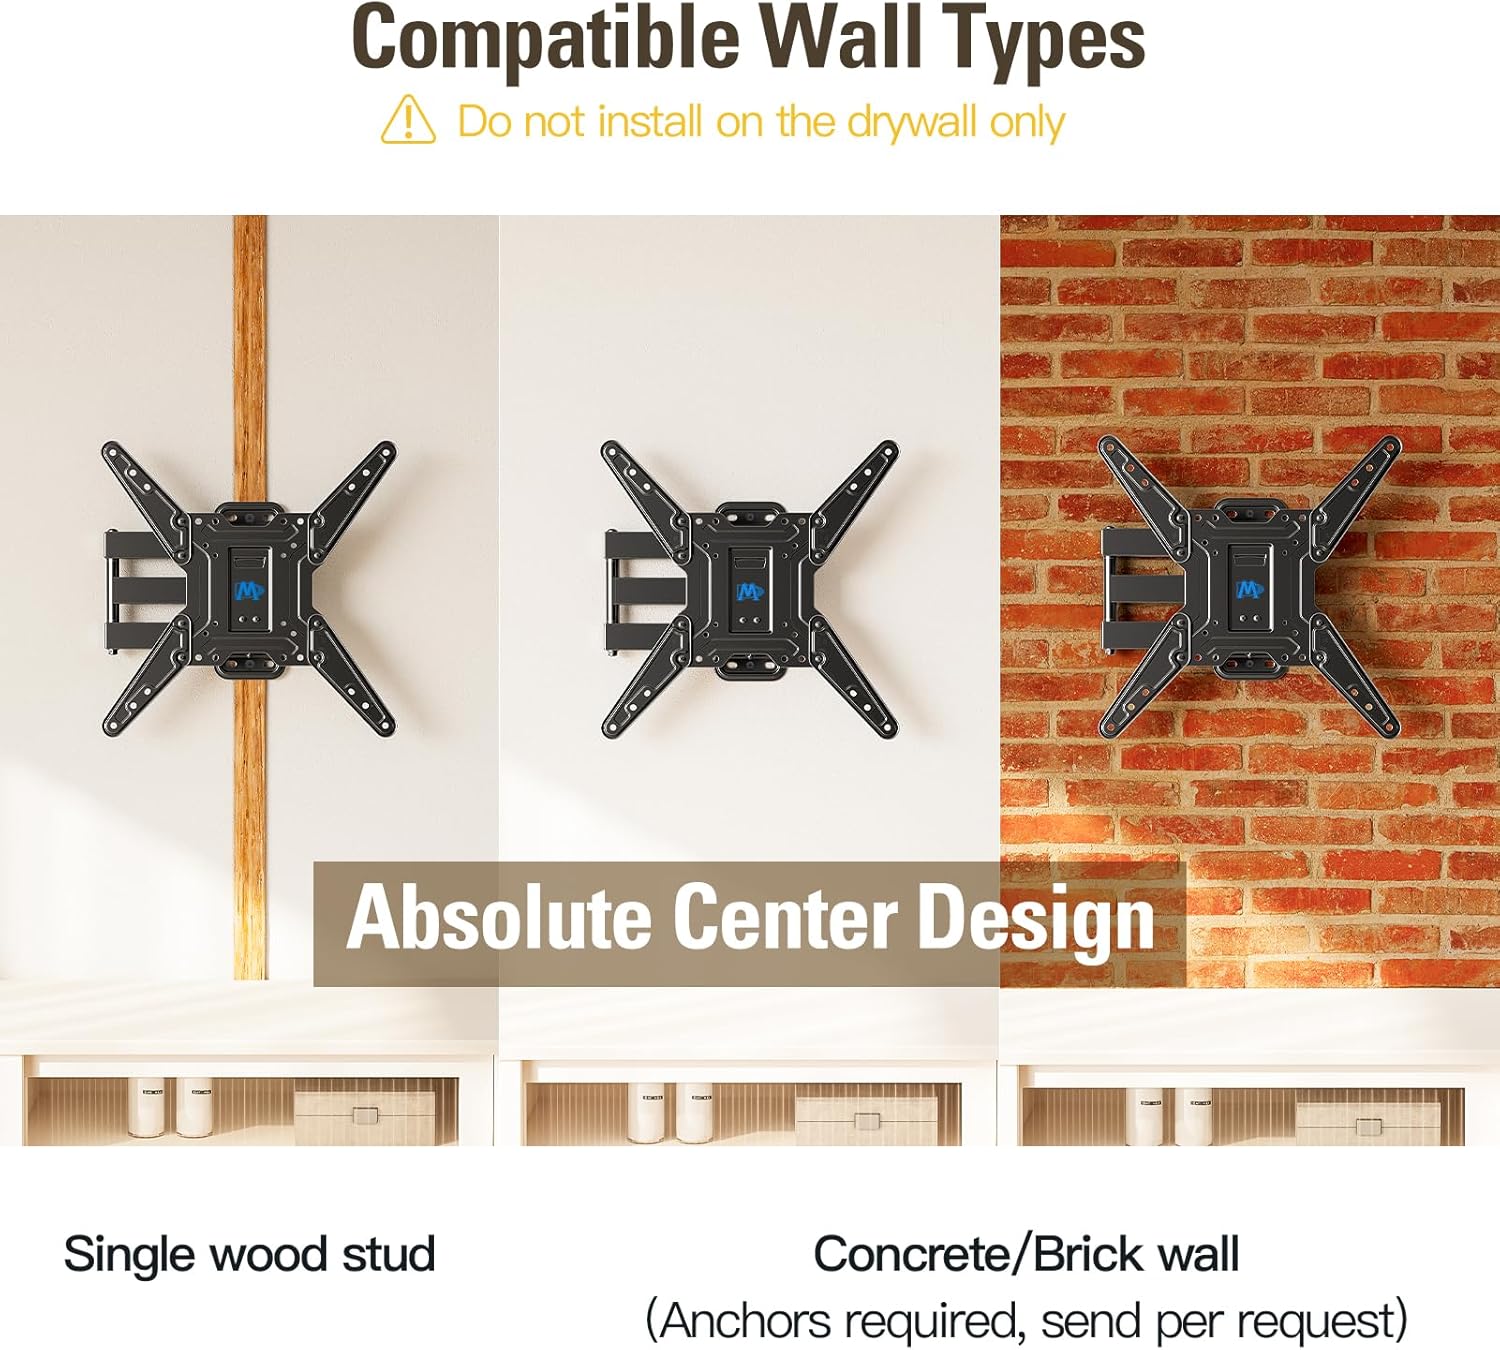
Figure 3: Compatible wall types for installation.
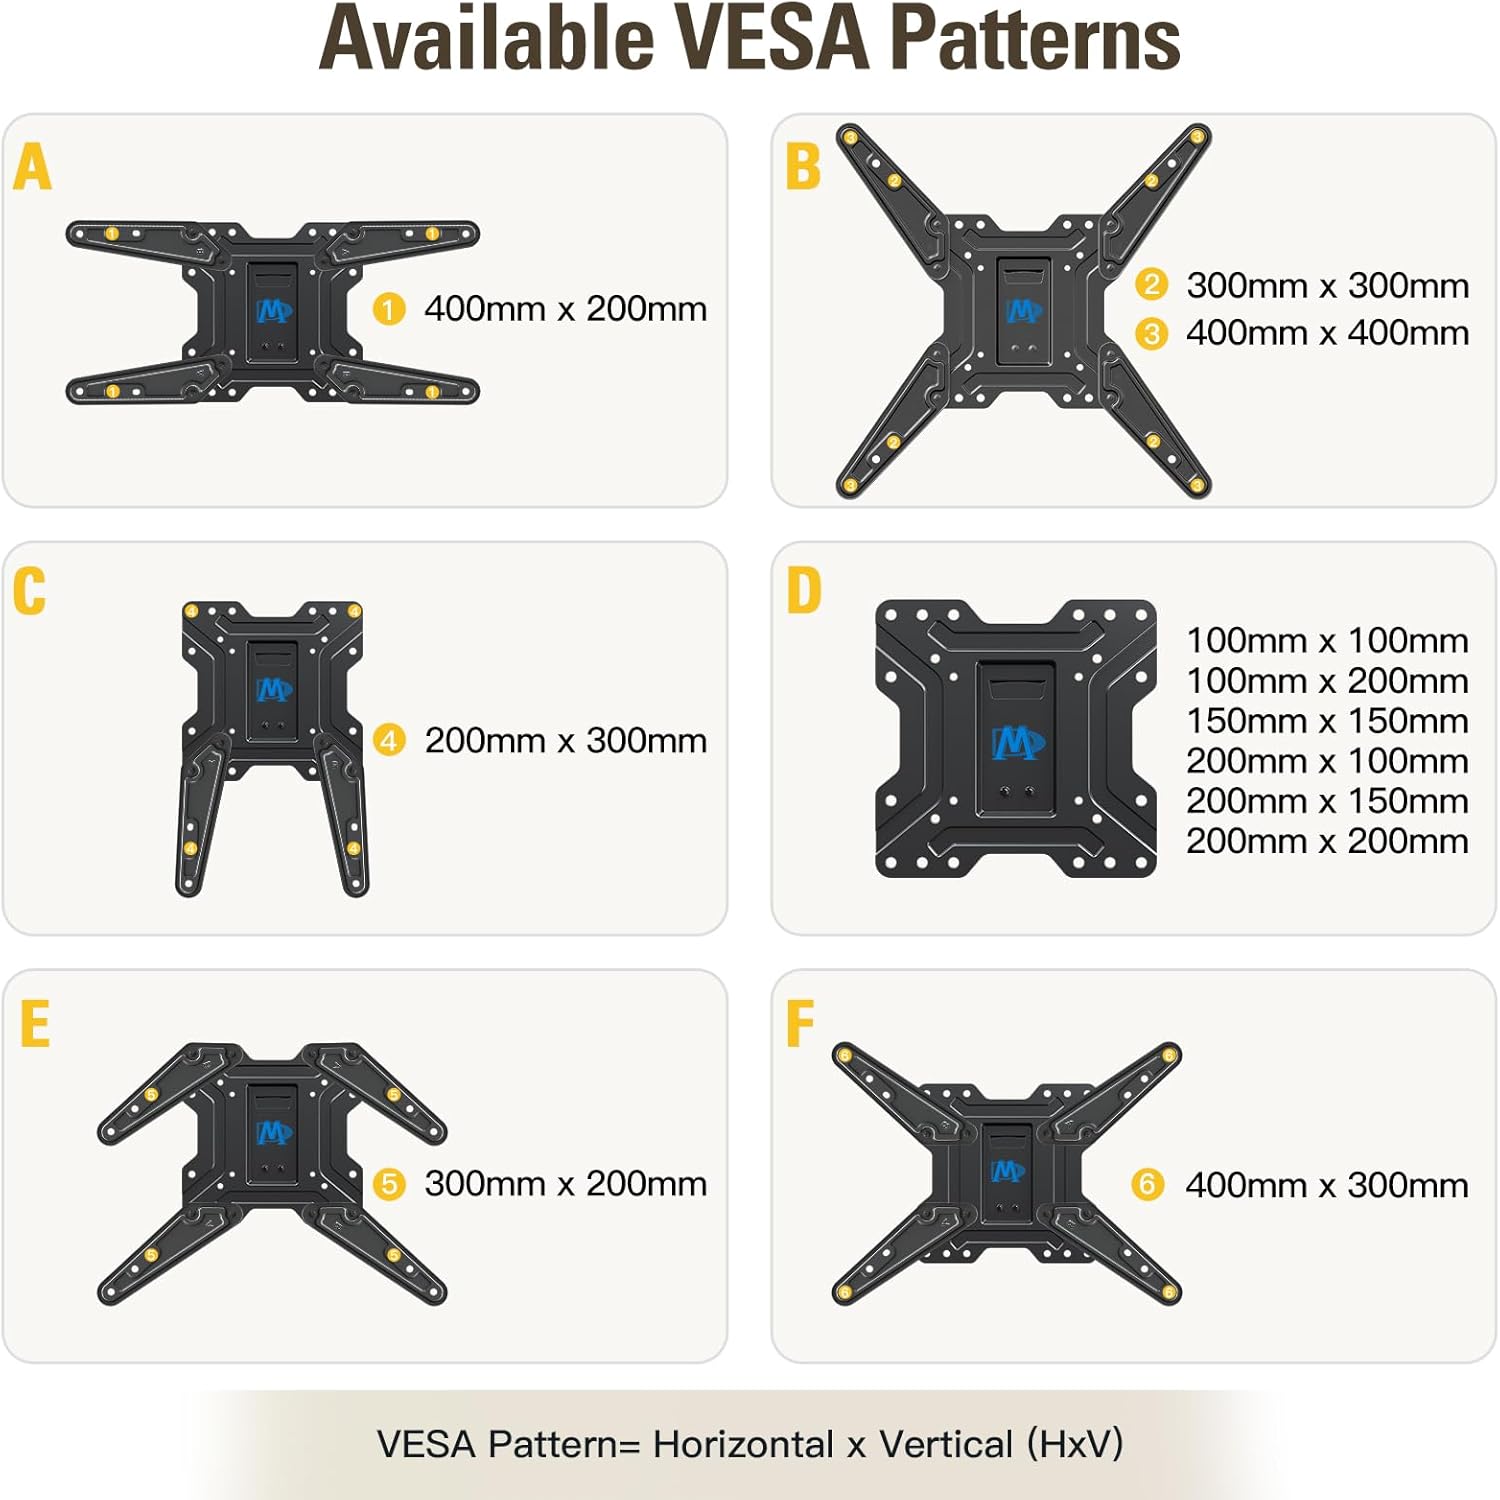
Figure 4: Available VESA patterns and their measurements.
Step 3: Install Wall Plate and Hang TV
- Attach Wall Plate to Wall: Align the wall plate with the drilled pilot holes. Secure it to the wall using the lag bolts. Tighten them firmly but do not overtighten.
- Hang TV onto Wall Plate: Carefully lift your TV (with brackets attached) and hook it onto the wall plate. Ensure it is seated correctly and securely.
- Secure TV to Wall Plate: Tighten the two security screws located on the TV brackets to prevent accidental dislodgement.
Video 1: Mounting Dream TV Wall Mount Installation MD2393-MX. This video demonstrates the step-by-step process of installing the TV wall mount, including preparing the TV, marking the wall, and securing the mount and TV.
Video 2: Full Motion TV Wall Mount MD2393-MX Installation Guide. A comprehensive guide to installing the full motion TV wall mount, covering all essential steps for a secure setup.
Operating the TV Mount
The MD2393-MX mount offers versatile adjustments for optimal viewing comfort.
Adjusting the TV Position
- Extend and Retract: Gently pull the TV forward to extend it up to 19 inches from the wall, or push it back to retract it to a slim 2.9 inches.
- Swivel: The articulating arm allows you to swivel the TV left or right up to ±90°, depending on your TV size, to achieve the best viewing angle from any seat.
- Tilt: Adjust the TV's vertical angle by tilting it up 5° or down 15° to reduce glare and improve viewing comfort.
- Leveling Adjustment: After installation, you can make a ±5° post-installation leveling adjustment to ensure your TV is perfectly horizontal.

Figure 5: Extend and Retract functionality of the mount.

Figure 6: Swivel capability for best viewing angle.

Figure 7: Tilt function to reduce glare.

Figure 8: Easy post-installation leveling adjustment.
Maintenance
Regular maintenance ensures the longevity and safety of your TV mount.
- Periodic Inspection: Periodically check all screws and connections to ensure they remain tight and secure.
- Cleaning: Wipe the mount with a soft, dry cloth to remove dust. Avoid using abrasive cleaners or solvents.
- Lubrication: If the articulating arm movement becomes stiff over time, a small amount of silicone-based lubricant can be applied to the pivot points.
Troubleshooting
If you encounter any issues, refer to the following common solutions:
- TV is not level: Use the post-installation leveling adjustment feature (±5°) to correct the tilt. Ensure the wall plate was installed level initially.
- Mount feels loose: Re-check all wall and TV attachment screws. Ensure they are tightened securely. If installed on a wood stud, confirm the lag bolts are firmly seated in the stud. If on concrete/brick, ensure anchors are properly installed.
- Difficulty moving the arm: Check for any obstructions. If the joints are stiff, apply a small amount of silicone lubricant.
- Cables are blocked: Before final installation, ensure the mount does not block any TV input ports. If already installed, carefully reroute cables or consider using angled adapters.
If problems persist, contact Mounting Dream customer support.
Warranty and Support
Mounting Dream products are backed by a 10-year warranty, reflecting our commitment to quality and durability.
For any pre-purchase questions, installation assistance, or technical support, our US-based customer service team is ready to help. Please refer to the contact information provided with your product packaging or visit the official Mounting Dream website for support.


