1. Introduction
This instruction manual provides detailed information for the TIMBERTECH Dual-Action Gravity Feed Airbrush Kit, Model ABPST03. This kit includes two distinct airbrushes: the AG-130K Gravity Feed Airbrush and the AG-134K Side Feed Airbrush, along with essential accessories. This manual covers setup, operation, maintenance, and troubleshooting to ensure optimal performance and longevity of your airbrush equipment.

Figure 1: Overview of the TIMBERTECH Airbrush Kit components in their protective cases.
2. Safety Information
Please read the instructions carefully before use and make sure you handle and dispose of the product according to the specified safety precautions. Adhering to these guidelines will help prevent injury and damage to the equipment.
- Always work in a well-ventilated area to avoid inhaling paint fumes or atomized particles.
- Wear appropriate personal protective equipment (PPE), including safety glasses or goggles and a respirator mask, especially when using solvent-based paints.
- Ensure your air compressor is properly grounded and maintained according to its own instruction manual.
- Never point the airbrush at yourself or others.
- Keep the airbrush and paints out of reach of children and pets.
- Disconnect the airbrush from the air supply when not in use or during cleaning and maintenance.
- Use only paints and thinners compatible with your airbrush and intended for airbrushing.
- Dispose of paint and cleaning solutions responsibly according to local regulations.
3. Package Contents
The TIMBERTECH Airbrush Kit ABPST03 includes the following components:
- 1x AG-130K Gravity Feed Dual-Action Airbrush
- 1x AG-134K Side Feed Dual-Action Airbrush
- 1x 6 ft Fabric Airbrush Hose
- 1x 1/4''-1/8'' Adapter
- 3x Needles: 0.2 mm, 0.3 mm, 0.5 mm
- 3x Nozzles: 0.2 mm, 0.3 mm, 0.5 mm
- 1x 7 CC Gravity Feed Cup (pre-installed on AG-130K)
- 1x 7 CC Side Feed Cup (for AG-134K)
- 1x 22 CC Side Feed Bottle (for AG-134K)
- 1x Small Jaw Spanner (Wrench)
- 1x Pipettes
- 1x Instruction Manual (this document)
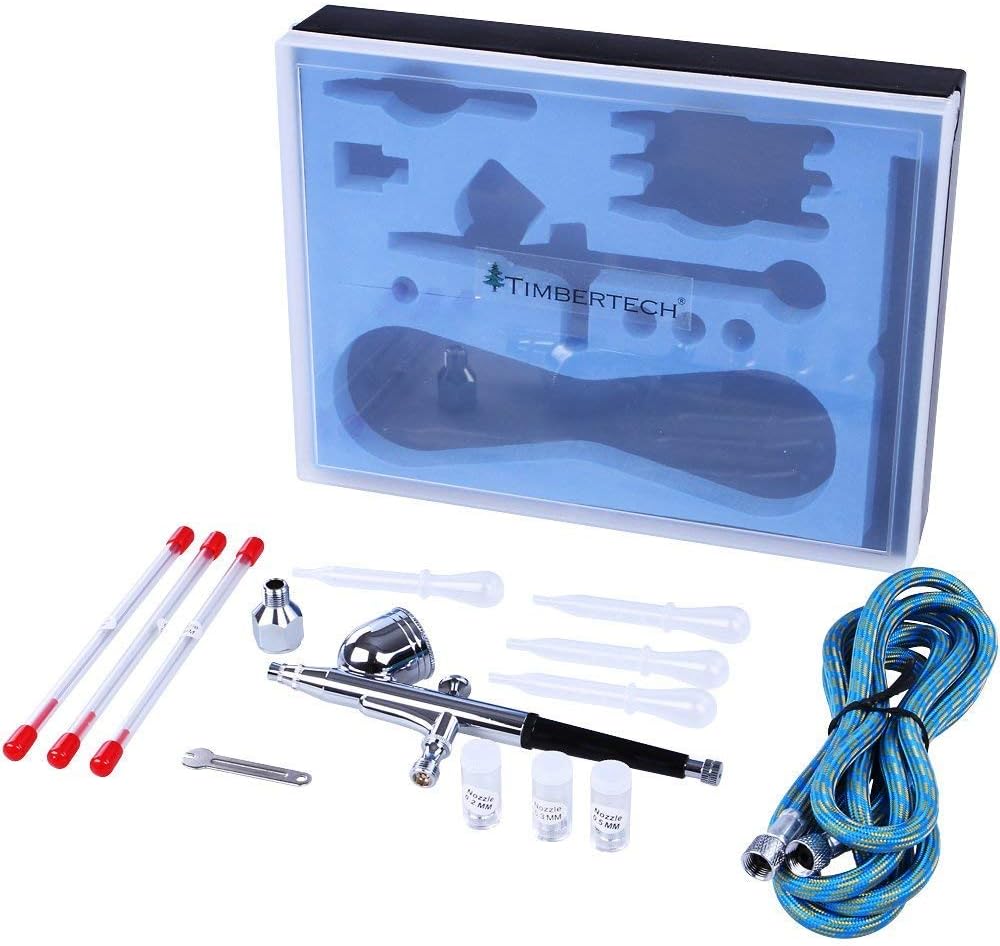
Figure 2: Components of the AG-134K Side Feed Airbrush Kit.

Figure 3: Components of the AG-130K Gravity Feed Airbrush Kit.
4. Product Features
- Dual-Action Trigger: Allows precise control over both air and fluid release with a single finger movement, enabling fine atomization and accurate spray control.
- High-Quality Construction: Airbrushes are made of durable copper material with stainless steel needles for longevity and consistent performance.
- Versatile Nozzle Sizes: Includes 0.2mm, 0.3mm, and 0.5mm needles and nozzles to achieve a wide range of effects, from very fine lines to broader coverage and coarse textures.
- Gravity Feed (AG-130K): Features a top-mounted 7 CC cup, ideal for small amounts of paint and fine detail work, utilizing gravity for efficient paint flow.
- Side Feed (AG-134K): Equipped with interchangeable 7 CC cup and 22 CC bottle, offering flexibility for various paint volumes and angles, suitable for both detail and larger area coverage.
- Wide Application: Suitable for hobbies, crafts, nail art, auto graphics, temporary tattoos, tanning, cake decorating, model coloring, and general painting.

Figure 4: AG-130K Gravity Feed Airbrush.

Figure 5: AG-134K Side Feed Airbrush.
5. Setup Instructions
Follow these steps to set up your TIMBERTECH airbrush for first use:
- Connect Air Hose: Attach one end of the 6 ft fabric airbrush hose to the air inlet on the bottom of your airbrush. Ensure a secure connection. If your air compressor has a 1/4'' outlet, use the provided 1/4''-1/8'' adapter to connect the hose.
- Connect to Air Compressor: Connect the other end of the air hose to your air compressor's air outlet. Ensure the air compressor is off before connecting.
- Install Nozzle and Needle:
- Unscrew the needle chucking guide at the rear of the airbrush and pull out the needle.
- Unscrew the nozzle cap and then the nozzle itself.
- Carefully screw in the desired nozzle size (0.2mm, 0.3mm, or 0.5mm) using the small jaw spanner provided. Do not overtighten.
- Replace the nozzle cap.
- Carefully reinsert the needle from the rear of the airbrush until it seats firmly in the nozzle. Tighten the needle chucking guide.

Figure 6: Airbrush Nozzles and Needles.

Figure 7: Airbrush Hose Connectors.
- Attach Paint Cup/Bottle:
- For AG-130K (Gravity Feed): The 7 CC cup is integrated.
- For AG-134K (Side Feed): Choose either the 7 CC cup or the 22 CC bottle and attach it securely to the side port.

Figure 8: Gravity Feed Paint Cup.

Figure 9: Side Feed Paint Cup.
- Initial Test: Before adding paint, fill the cup with clean water. Turn on your air compressor and set the pressure between 15-50 PSI. Test the airbrush by pressing down on the trigger for air and pulling back for water. Ensure a consistent spray pattern.
6. Operating Instructions
Understanding the dual-action trigger is key to effective airbrushing:
- Filling the Cup: Prepare your paint by thinning it to the consistency of milk (or as recommended by the paint manufacturer for airbrushing). Use a pipette to carefully transfer the paint into the airbrush cup or bottle. Do not overfill.
- Air Control: Press down on the trigger to release air. This should be done before pulling back for paint, and maintained throughout the spraying process.
- Paint Control: While holding the trigger down for air, gently pull the trigger back to release paint. The further you pull back, the more paint will be released.
- Spray Distance: Hold the airbrush approximately 2-6 inches (5-15 cm) from your surface, adjusting based on the desired effect. Closer for fine lines, further for broader coverage.
- Movement: Keep the airbrush moving while spraying to avoid paint buildup and uneven coverage.
- Achieving Different Effects:
- Fine Lines: Use a 0.2mm nozzle, hold the airbrush closer to the surface, and pull the trigger back minimally for paint.
- Broad Coverage: Use a 0.5mm nozzle, hold the airbrush further from the surface, and pull the trigger back more for paint.
- Stippling/Texture: Adjust air pressure and paint flow to create desired textures.
- Finishing a Spray: Release the paint trigger first (push forward), then release the air trigger (release upward). This prevents paint from drying in the nozzle.
7. Maintenance and Cleaning
Proper cleaning after each use is crucial to prevent clogging and ensure the longevity of your airbrush. Never allow paint to dry inside the airbrush.
- Initial Rinse: Empty any remaining paint from the cup/bottle. Add a few drops of appropriate cleaner (water for acrylics, thinner for enamels/lacquers) to the cup. Spray through the airbrush onto a paper towel until the spray runs clear.
- Back-Flushing: With cleaner in the cup, cover the nozzle tip with your finger or a cap. Press down for air, then pull back the trigger. Air bubbles will back-flush into the cup, cleaning the paint passage. Repeat several times, emptying and refilling with fresh cleaner.
- Disassembly for Deep Cleaning:
- Disconnect the airbrush from the air hose.
- Unscrew the needle chucking guide and carefully remove the needle from the rear. Clean the needle with a soft cloth and cleaner.
- Unscrew the handle, spring guide, and main lever.
- Unscrew the nozzle cap and carefully remove the nozzle. Clean the nozzle thoroughly with a small brush and cleaner. Be extremely gentle as the nozzle is delicate.
- Clean the paint cup/bottle and the airbrush body's paint channel with brushes and cleaner.
- Reassembly: Reassemble the airbrush in reverse order. Apply a tiny amount of airbrush lubricant (if available and recommended) to the needle before reinserting it. Ensure all parts are securely but not overly tightened.
- Storage: Store your clean and dry airbrush in its original case or a protective stand to prevent damage.
8. Troubleshooting
Here are common issues and their potential solutions:
| Problem | Possible Cause | Solution |
|---|---|---|
| No air flow | Air hose disconnected; compressor off; air valve clogged. | Check hose connections; turn on compressor; clean air valve. |
| No paint flow | Clogged nozzle/needle; paint too thick; air pressure too low; bent needle. | Clean nozzle/needle; thin paint; increase air pressure (15-50 PSI); straighten or replace needle. |
| Inconsistent spray / Spitting | Partially clogged nozzle; loose nozzle/needle; damaged nozzle tip; paint consistency. | Thoroughly clean nozzle; ensure nozzle/needle are seated correctly; inspect for damage; adjust paint thinning. |
| Paint bubbling in cup | Clogged nozzle; loose nozzle; damaged nozzle. | Clean nozzle thoroughly; ensure nozzle is tightened correctly; inspect for cracks or damage. |
| Paint spraying too wide/narrow | Incorrect nozzle size; air pressure too high/low; distance from surface. | Change nozzle size; adjust air pressure; vary spray distance. |
9. Specifications
| Feature | Description |
|---|---|
| Model Name | ABPST03 |
| Brand | TIMBERTECH |
| Airbrush Type (AG-130K) | Gravity Feed, Dual-Action |
| Airbrush Type (AG-134K) | Side Feed, Dual-Action |
| Nozzle/Needle Sizes | 0.2 mm, 0.3 mm, 0.5 mm |
| Cup Capacity (AG-130K) | 7 CC |
| Cup/Bottle Capacity (AG-134K) | 7 CC Cup & 22 CC Bottle |
| Connection Thread | 1/8'' (with 1/4''-1/8'' adapter included) |
| Working Pressure | 15-50 PSI |
| Airbrush Hose Length | 6 ft (1.8m) |
| Material | Copper (body), Stainless Steel (needles) |
| Item Weight | 4.36 pounds (total package) |
10. Warranty and Support
TIMBERTECH is committed to providing high-quality products. If you encounter any quality issues with your airbrush kit, we guarantee to provide a refund or replacement. For support, troubleshooting assistance, or warranty claims, please contact the manufacturer or your point of purchase. Please refer to your purchase documentation for specific contact details.


