
LDG Electronics Z-11PROII
Contents
LDG Electronics Z-11PROII Automatic Antenna Tuner User Manual
Model: Z-11PROII
Introduction
The LDG Electronics Z-11PROII is a semi-automatic antenna tuner designed for amateur radio use. It provides efficient antenna tuning across the entire HF spectrum plus 6 meters, handling power levels up to 125 watts. This manual provides essential information for the proper setup, operation, and maintenance of your Z-11PROII tuner.
Key Features
- Power Handling: 0.1 to 125 watts SSB and CW peak power, 30 watts on PSK and digital modes, and 100 watts on 6 meters.
- Frequency Coverage: 1.8 to 54.0 MHz.
- Memory: 2,000 memories for instantaneous frequency and band changing.
- Frequency Counter: Built-in for memory operation.
- SWR Indication: Easy-to-read LEDs indicate SWR and operating status.
- Impedance Matching: Tunes 6 to 1000 ohm loads (16 to 150 on 6M), 6 to 4000 ohms with optional 4:1 Balun.
- Antenna Compatibility: Suitable for Dipoles, Verticals, Vees, Beams or any Coax Fed Antenna.
- Low Power Operation: Latching relays for ultra-low power consumption, especially in standby.
- Portability: Designed for battery-powered operation with onboard solder pads for user-supplied internal battery pack.
- Dimensions: 8.25 inches (L) x 5.0 inches (W) x 1.5 inches (H).
Product Overview

Figure 1: Front panel of the Z-11PROII tuner. This image displays the front panel, highlighting its control buttons for capacitance (C Up, C Dn), inductance (L Up, L Dn), Tune, Store, Auto, and Thresh. The SWR/Status LEDs (1.5, 2.0, >3.0, Tune) are also visible.
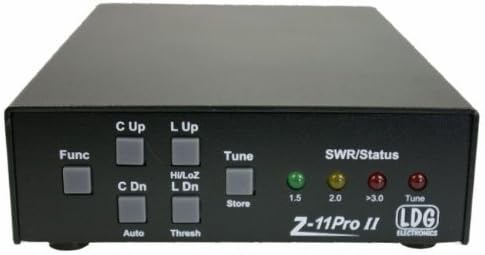
Figure 2: Angled view of the Z-11PROII tuner. This perspective provides a clearer view of the button layout and the overall compact design of the unit.
Setup and Installation
Power Requirements
The Z-11PROII requires a DC power source of 7 to 16 volts. Maximum current draw during tuning is 250mA, with an idle current of 25µA. A DC power cable is included. For portable operation, onboard solder pads are available for connecting a user-supplied internal battery pack.
Antenna Connection
Connect your radio's antenna output to the "TX" connector on the Z-11PROII. Connect your antenna's coaxial cable to the "ANT" connector. The tuner is designed for coax-fed antennas such as dipoles, verticals, Yagis, and Vees. For random length, long wire, or ladder line fed antennas, an optional external balun (e.g., LDG 4:1 Balun) is required.
Operating Instructions
Basic Tuning
To initiate a tune cycle, press the Tune button. The tuner will automatically adjust its internal components to achieve the lowest possible SWR. During the tuning process, the "Tune" LED will illuminate. Once a match is found, the LED will extinguish, and the SWR status LEDs will indicate the achieved SWR.
Memory Operation
The Z-11PROII features 2,000 memories, allowing for rapid recall of previously found tuning solutions for specific frequencies. When you transmit on a frequency that has been previously tuned and stored, the tuner will automatically recall the settings, providing instantaneous tuning. The built-in frequency counter assists in this memory operation.
SWR Indication
The front panel includes three LEDs to indicate SWR status:
- 1.5: Illuminates when SWR is 1.5:1 or lower.
- 2.0: Illuminates when SWR is between 1.5:1 and 2.0:1.
- >3.0: Illuminates when SWR is greater than 3.0:1.
Manual Tuning (C Up/Dn, L Up/Dn)
For fine-tuning or specific adjustments, the C Up/Dn (Capacitance) and L Up/Dn (Inductance) buttons allow manual control over the tuning elements. This can be useful in situations where automatic tuning does not yield the desired SWR or for experimentation.
Auto and Thresh Buttons
The Auto button enables or disables automatic tuning when a change in frequency or SWR is detected. The Thresh button adjusts the SWR threshold at which the tuner will initiate an automatic tune cycle.
Maintenance
The Z-11PROII is designed for reliable operation with minimal maintenance. Keep the unit clean and free from dust. Use a soft, dry cloth for cleaning. Avoid exposing the tuner to extreme temperatures or moisture. Ensure proper ventilation around the unit during operation.
Battery Installation (Optional)
For internal battery operation, the Z-11PROII features onboard solder pads. Users can connect a suitable battery pack (not included) to these pads. Refer to the detailed wiring diagram in the full product manual for correct polarity and connection. Use of latching relays ensures very low power consumption when idle, extending battery life.
Troubleshooting
- Tuner not tuning or high SWR after tuning:
- Check all cable connections (radio to tuner, tuner to antenna) for proper seating and continuity.
- Ensure adequate power supply to the tuner (7-16V DC).
- Verify that the antenna is suitable for the operating frequency.
- Try a manual tune cycle using the C Up/Dn and L Up/Dn buttons.
- Ensure transmit power is within the tuner's specifications.
- Tuner not powering on:
- Check DC power cable connection and ensure the power supply is active.
- Verify power supply voltage is within the specified range.
- Intermittent tuning or SWR readings:
- Inspect coaxial cables for damage or shorts.
- Ensure connectors are clean and securely fastened.
- Check for strong RF interference in the operating environment.
Technical Specifications
| Feature | Value |
|---|---|
| Power Handling (SSB/CW) | 0.1 to 125 Watts Peak |
| Power Handling (PSK/Digital) | 30 Watts |
| Power Handling (6 Meters) | 100 Watts |
| Frequency Coverage | 1.8 to 54.0 MHz |
| Impedance Range | 6 to 1000 ohms (16 to 150 on 6M), 6 to 4000 ohms with optional 4:1 Balun |
| Memories | 2,000 |
| Power Requirements | 7 to 16 VDC at 250mA max (tuning), 25µA (idle) |
| Dimensions (L x W x H) | 8.25" x 5.0" x 1.5" |
| Weight | 1 pound 6 ounces (without internal batteries) |
| Model Number | Z-11PROII |
| ASIN | B00K5T6J74 |
| UPC | 702685258331 |
Warranty and Support
The LDG Electronics Z-11PROII Automatic Antenna Tuner comes with a two-year fully transferable warranty. For technical support, service, or warranty claims, please refer to the official LDG Electronics website or contact their customer service directly. Ensure you have your product model number and purchase details available when seeking support.
Ask a question about this manual
Ask about setup, troubleshooting, compatibility, parts, safety, or missing instructions. Manuals+ will review the question and use this page’s manual context to help answer it.