1. Introduction
Thank you for purchasing the SINGER monami Delight SP-70P Computer Sewing Machine. This manual provides essential information for the safe and efficient operation, maintenance, and troubleshooting of your new sewing machine. Please read this manual thoroughly before using the machine and keep it in a safe place for future reference.
The monami Delight SP-70P is designed for ease of use, featuring large, intuitive buttons and a wide sewing base, making it suitable for various sewing projects.
2. Safety Instructions
To ensure safe operation, always follow these basic safety precautions:
- Always unplug the machine from the electrical outlet when cleaning, lubricating, or when the machine is not in use.
- Keep fingers away from all moving parts. Special care is required around the sewing machine needle.
- Use the correct needle plate. The wrong plate can cause the needle to break.
- Do not use bent needles.
- Do not pull or push fabric while stitching. This may deflect the needle, causing it to break.
- Wear safety glasses when operating the machine.
- Never operate the machine with any air openings blocked. Keep ventilation openings of the sewing machine and foot controller free from the accumulation of lint, dust, and loose cloth.
- This appliance is not intended for use by persons (including children) with reduced physical, sensory or mental capabilities, or lack of experience and knowledge, unless they have been given supervision or instruction concerning use of the appliance by a person responsible for their safety.
3. Product Overview
The SINGER monami Delight SP-70P is a versatile computer sewing machine designed for various sewing tasks. It features a user-friendly interface and robust construction.
Key Features:
- 12 Stitch Patterns: Offers a variety of practical stitches for different sewing needs.
- Automatic Needle Threader: Simplifies the threading process.
- Automatic Thread Tension: Adjusts tension automatically for various fabric types.
- 7-Point Feed Dog: Ensures smooth fabric feeding.
- Horizontal Full Rotary Hook: Prevents thread tangles and allows easy bobbin setting.
- Free Arm: Convenient for sewing cylindrical items like sleeves and pant hems.
- LED Hand Lamp: Provides bright, long-lasting illumination of the sewing area.
- Quiet Design: Equipped with a small, powerful magnet motor for reduced noise.
Machine Components:
Refer to the image below for a visual guide to the main components of your sewing machine.

Figure 3.1: Front view of the SINGER monami Delight SP-70P sewing machine, showcasing its design and control panel.

Figure 3.2: Overview of the SINGER monami Delight SP-70P, highlighting key operational areas and design elements.
4. Setup
4.1 Unpacking and Placement
- Carefully remove the machine from its packaging.
- Place the machine on a stable, flat surface.
- Ensure there is adequate space around the machine for comfortable operation and fabric handling.
4.2 Power Connection
- Connect the power cord to the machine and then to a 100V (50/60Hz) electrical outlet.
- Turn on the power switch, usually located on the side of the machine. The LED hand lamp should illuminate.
4.3 Bobbin Winding
The machine features an easy bobbin winding system:
- Place an empty bobbin onto the bobbin winder spindle.
- Follow the numbered guide on the machine for threading the bobbin winding path.
- Push the bobbin winder spindle to the right.
- Press the foot controller or start button to begin winding. The machine will automatically stop when the bobbin is full.
- Cut the thread and return the bobbin winder spindle to the left.
4.4 Threading the Upper Thread
The New Threading System makes upper threading simple:
- Raise the presser foot lever.
- Place a spool of thread on the spool pin.
- Follow the numbered threading path indicated on the machine, ensuring the thread passes through all guides and the take-up lever.
- Use the automatic needle threader by lowering the lever and engaging it with the needle eye.
- Pull the thread loop through the needle eye.
5. Operating Instructions
5.1 Stitch Selection
The monami Delight SP-70P offers 12 practical stitch patterns. Use the direct pattern selection buttons on the control panel to choose your desired stitch.

Figure 5.1: Visual representation of the 12 practical stitch patterns available on the SP-70P.
5.2 Basic Sewing
- Select your desired stitch pattern.
- Place the fabric under the presser foot.
- Lower the presser foot.
- Press the foot controller or start button to begin sewing.
- Use the lock stitch function at the beginning and end of your seam to prevent unraveling.
5.3 Advanced Features
- Fully Automatic Buttonhole: Select the buttonhole stitch, place your button in the buttonhole foot, and the machine will automatically sew a buttonhole to the correct size.
- One-Touch Slow Button: Press this button during sewing to reduce the speed, which is useful for intricate details, curves, and corners.
- Needle Up/Down: Control the needle's stopping position (up or down) for easy pivoting or continuous sewing.
- Drop Feed: Lower the feed dog for free-motion sewing, such as quilting or embroidery.
- Leveling Presser Foot Button: Use this button to keep the presser foot level when starting to sew on thick fabrics or multiple layers.
- Stitch Length and Width Adjustment: Adjust the stitch length and width according to your fabric and desired pattern.
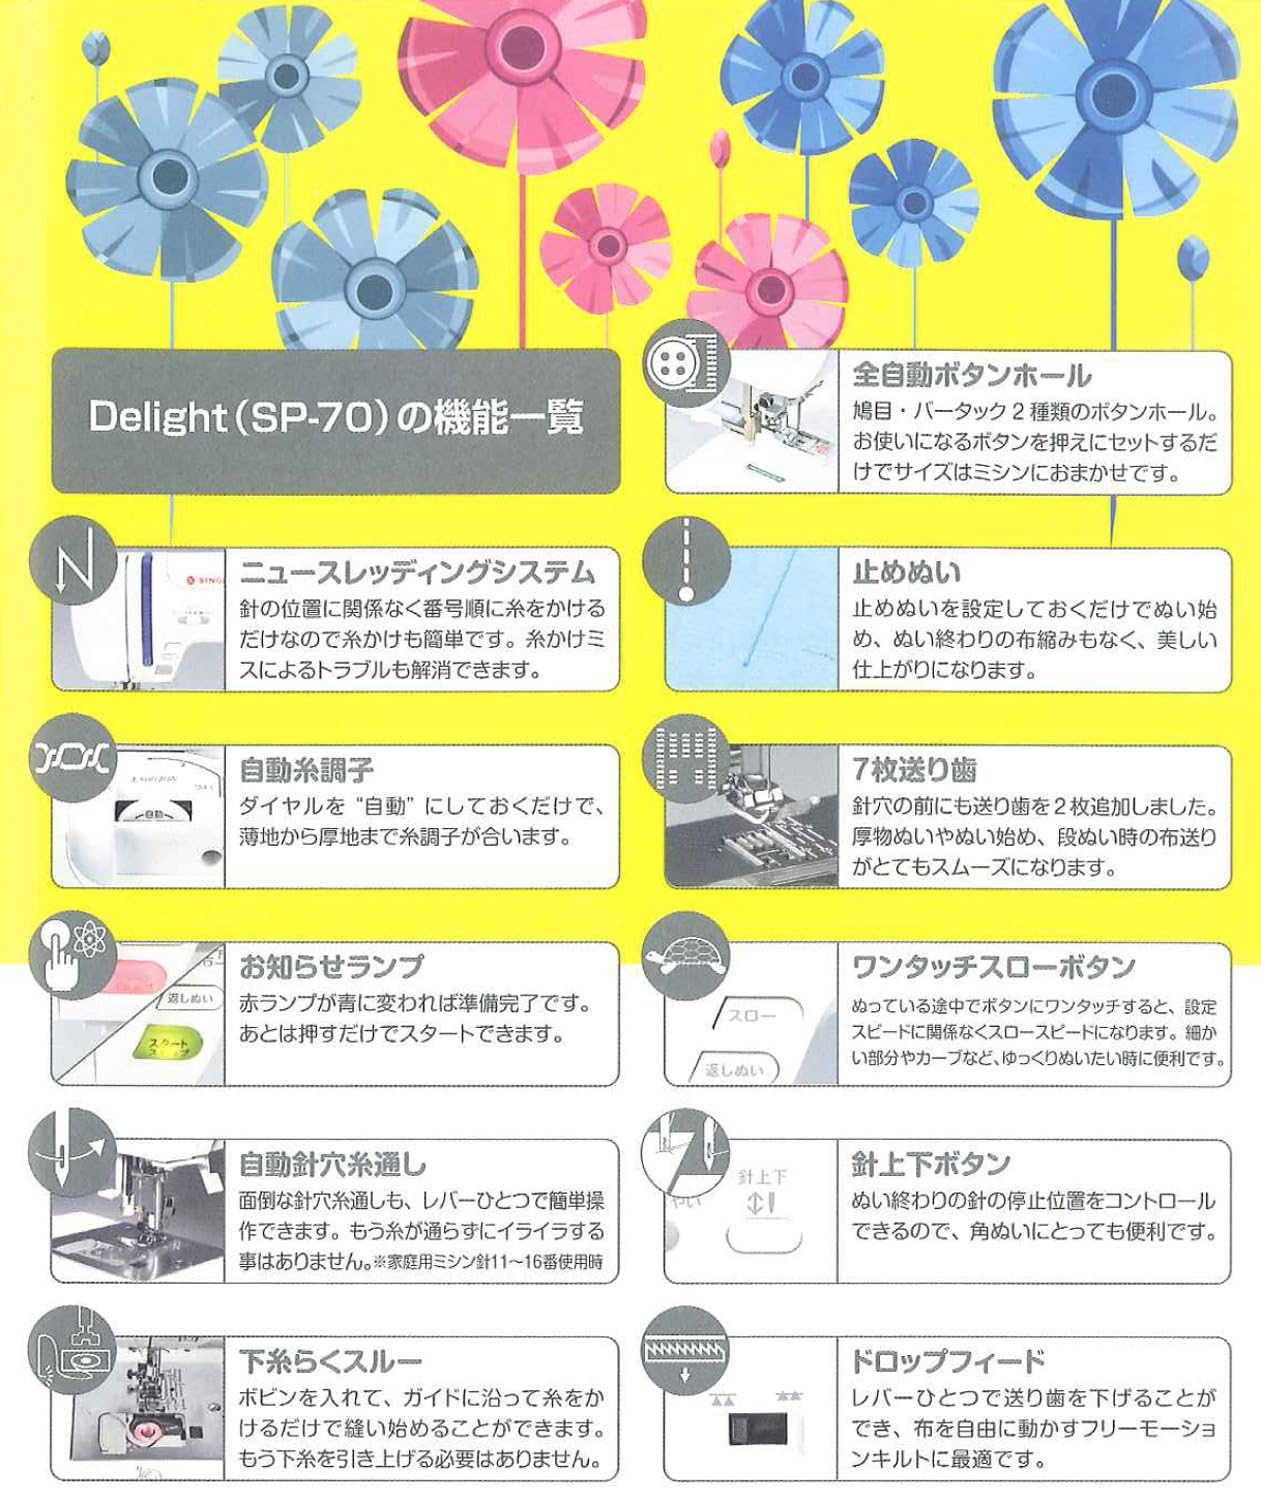
Figure 5.2: Detailed list of functions and features of the SINGER monami Delight SP-70P.

Figure 5.3: Overview of additional useful features of the SINGER monami Delight SP-70P.
6. Maintenance
Regular maintenance ensures the longevity and optimal performance of your sewing machine.
6.1 Cleaning
- Always unplug the machine before cleaning.
- Use the provided brush to remove lint and dust from the bobbin case area and feed dogs.
- Wipe the exterior of the machine with a soft, dry cloth. Do not use harsh chemicals or abrasive cleaners.
6.2 Needle Replacement
- Replace needles regularly, especially if they become bent or dull, to prevent skipped stitches or fabric damage.
- Use the screwdriver to loosen the needle clamp screw, remove the old needle, and insert a new one with the flat side facing the back.
- Tighten the needle clamp screw securely.
7. Troubleshooting
If you encounter issues with your sewing machine, refer to the following common problems and solutions:
| Problem | Possible Cause | Solution |
|---|---|---|
| Skipped Stitches | Incorrect needle, bent needle, improper threading. | Replace needle with correct type/size, re-thread the machine correctly. |
| Thread Breakage | Incorrect threading, thread tension too high, burr on needle plate, poor quality thread. | Re-thread, adjust tension, check for burrs, use good quality thread. |
| Fabric Puckering | Thread tension too high, incorrect stitch length, wrong presser foot. | Adjust tension, increase stitch length, use appropriate presser foot. |
| Machine Not Starting | Power cord not plugged in, power switch off, bobbin winder engaged. | Check power connection, turn on switch, disengage bobbin winder. |
If the problem persists after attempting these solutions, please contact customer support.
8. Specifications
| Feature | Specification |
|---|---|
| Model Number | SP-70P |
| Manufacturer | SINGER |
| Body Size (W x D x H) | 43.9 x 19.5 x 28.7 cm |
| Body Weight | 8.2 kg |
| Power Supply | 100V (50/60Hz) |
| Power Consumption | 45W |
| Stitch Patterns | 12 types |
| Color | Candy Berry Pink |
| Accessories | Soft cover, needle set (No. 11 x 1, No. 14 x 2), bobbins (3 pcs), brush, screwdriver, seam ripper, overcasting foot, zipper foot, buttonhole foot, zigzag foot, spool cap, power cord. |
9. Warranty and Support
For warranty information, please refer to the warranty card included with your product or visit the official SINGER website. Keep your proof of purchase for warranty claims.
For technical support, spare parts, or service, please contact your local SINGER authorized dealer or customer service center. Contact details can typically be found on the SINGER official website or in your product packaging.


