Introduction
This manual provides detailed instructions for the setup, operation, and maintenance of your Mebus Digital Radio Alarm Clock Model 51460. Please read these instructions carefully to ensure proper use and to fully utilize all features of your device.

Front view of the Mebus Digital Radio Alarm Clock Model 51460, displaying the time, date, day of the week, and indoor temperature.
Package Contents
Please check that all items are present in the package:
- Mebus Digital Radio Alarm Clock Model 51460
- User Manual (this document)
Note: 2 x AAA batteries are required for operation and are not included in the box contents.

The Mebus Digital Radio Alarm Clock Model 51460 packaging.
Setup
1. Battery Installation
- Locate the battery compartment cover on the back of the alarm clock.
- Remove the cover by sliding it down or pressing the latch.
- Insert 2 new AAA batteries, ensuring the correct polarity (+ and -) as indicated inside the compartment.
- Replace the battery compartment cover.
2. Initial Setup and Radio Control (DCF 77)
Upon battery insertion, the alarm clock will automatically attempt to synchronize with the DCF 77 radio signal. This process ensures the time, date, and day are set accurately, including automatic adjustment for daylight saving time.
- Place the alarm clock near a window for optimal signal reception.
- The radio signal icon (often a tower with waves) on the display will flash during synchronization.
- Once synchronized, the icon will become solid, and the correct time and date will be displayed. This process may take several minutes.

The radio control (DCF77) feature automatically sets the correct time and adjusts for seasonal changes.
3. Time Zone Setting
If you are in a different time zone than the DCF 77 signal (Central European Time), you can adjust the time zone offset:
- Refer to the buttons on the back or side of the clock. Typically, a button labeled 'TIME ZONE' or similar is used.
- Press this button to cycle through time zone offsets (e.g., +1, -1 hour).
- The display will show the adjusted time.
4. Manual Time Setting (If Radio Signal Unavailable)
In areas without a radio signal, the time can be set manually:
- Press and hold the 'SET' or 'MODE' button until the time digits begin to flash.
- Use the '+' or '-' buttons (often labeled 'UP' and 'DOWN' or arrow keys) to adjust the hours.
- Press 'SET' or 'MODE' again to move to minutes, then adjust.
- Continue pressing 'SET' or 'MODE' to set the year, month, and day if necessary.
- Press 'SET' or 'MODE' one last time to confirm and exit manual setting mode.
Operating Instructions
1. Setting Alarms (Alarm 1 and Alarm 2)
Your alarm clock features two independent alarm times:
- Press the 'ALARM 1' or 'ALARM 2' button once to display the current alarm time.
- Press and hold the respective alarm button until the alarm time digits flash.
- Use the '+' or '-' buttons to adjust the hour.
- Press the alarm button again to move to minutes, then adjust.
- Press the alarm button one last time to confirm the setting.
- To activate/deactivate an alarm, press the 'ALARM 1 ON/OFF' or 'ALARM 2 ON/OFF' button (or the respective alarm button briefly) until the alarm icon appears/disappears on the display.
2. Snooze Function
When an alarm sounds:
- Press the large 'SNOOZE/LIGHT' button on the top of the alarm clock.
- The alarm will pause for approximately 5 minutes and then sound again.
- You can repeat the snooze function multiple times.
- To stop the alarm completely, press any other button (e.g., 'ALARM 1', 'ALARM 2', or 'MODE').

The 'Snooze/Light' button located on the top of the alarm clock.
3. Backlight Operation
The display features a blue backlight for easy reading in low light conditions:
- Press the 'SNOOZE/LIGHT' button on the top of the alarm clock.
- The display will illuminate for a few seconds.
- The blue color of the backlight is designed to be gentle on the eyes.

The alarm clock display with its blue backlight, suitable for both day and night viewing.
4. Temperature Display (°C/°F)
The alarm clock displays the indoor temperature:
- To switch between Celsius (°C) and Fahrenheit (°F), locate the '°C/°F' button (often on the back or side).
- Press this button to toggle between the two units.
5. Moon Calendar Display
The display includes a moon calendar feature, showing the current moon phase:
- The moon phase icon is permanently displayed on the screen.
- No manual adjustment is required for this feature as it is linked to the calendar function.
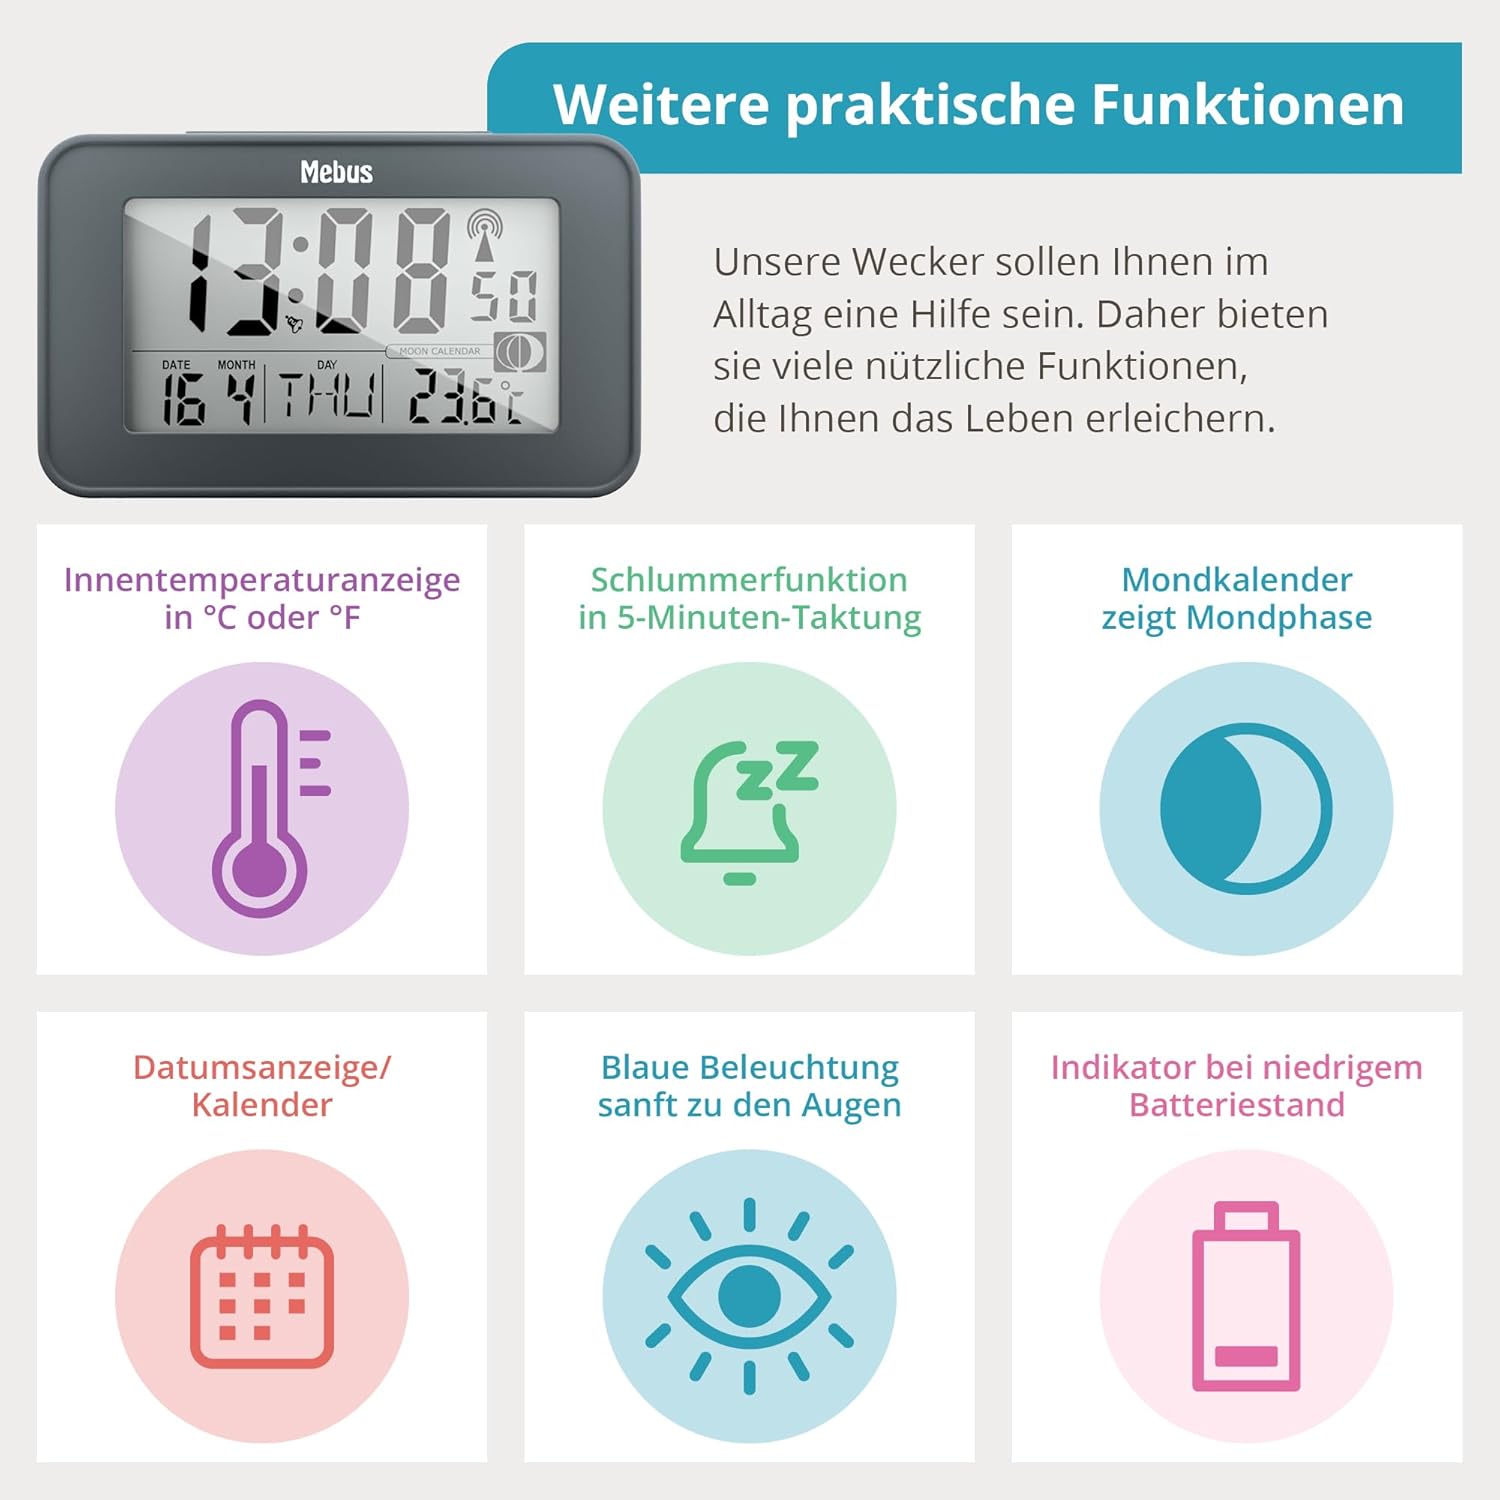
Overview of additional practical functions displayed on the alarm clock, including indoor temperature, snooze, moon calendar, date, blue backlight, and low battery indicator.
6. 12/24 Hour Display
You can switch between 12-hour (AM/PM) and 24-hour time formats:
- Press the '12/24H' button (often the left arrow key) to toggle between the formats.
Maintenance
1. Cleaning
- Wipe the alarm clock with a soft, dry cloth.
- Do not use abrasive cleaners or solvents, as these may damage the casing or display.
2. Battery Replacement
- When the display dims or functions become erratic, it is time to replace the batteries.
- Follow the battery installation steps outlined in the 'Setup' section.
- Always replace both AAA batteries at the same time with new ones.
- Dispose of old batteries according to local regulations.
Troubleshooting
- No Display / Dim Display: Check battery installation and replace with fresh AAA batteries.
- Incorrect Time / No Radio Signal: Ensure the alarm clock is placed in an area with good radio signal reception (e.g., near a window, away from electronic interference). Allow several minutes for synchronization. If the issue persists, try manual time setting.
- Alarm Not Sounding: Verify that the alarm is activated (alarm icon visible on display) and that the alarm time is set correctly.
- Buttons Not Responding: Remove and reinsert batteries to perform a soft reset. If the issue continues, contact customer support.
Specifications
| Feature | Description |
|---|---|
| Model | 51460 |
| Dimensions (L x W x H) | 11.5 x 4.8 x 6.8 cm (approx. 12 x 4.8 x 7.1 cm product dimensions) |
| Weight | 160 Grams |
| Power Source | 2 x AAA Batteries (not included) |
| Display Type | Digital LCD |
| Special Features | Radio-controlled (DCF 77), 2 Alarm Times, Snooze Function, Backlight, Indoor Thermometer (°C/°F), Moon Calendar, 12/24 Hour Display, Date Display, Time Zone Setting |

Physical dimensions and weight of the Mebus Digital Radio Alarm Clock.
Safety Information
- Do not expose the device to extreme temperatures, direct sunlight, or high humidity.
- Avoid dropping the device or subjecting it to strong impacts.
- Keep out of reach of children.
- Do not mix old and new batteries, or different types of batteries.
- Remove batteries if the device will not be used for an extended period to prevent leakage.
Warranty and Support
For warranty information or technical support, please refer to the documentation provided with your purchase or contact the retailer/manufacturer directly. Keep your proof of purchase for warranty claims.


