JBL Control 16C/T-BK 6.5-inch Ceiling Speaker
Instruction Manual
1. Product Overview
The JBL Control 16C/T-BK is a premium two-way, co-axial ceiling loudspeaker designed for a wide range of commercial applications, including background music and paging systems. It features a 6.5-inch (165 mm) low-frequency driver and a 0.75-inch (19 mm) high-frequency driver, delivering clear and consistent sound reproduction. This model incorporates a multi-tap transformer for use in 70V or 100V distributed speaker systems, as well as an 8-ohm direct mode for conventional low-impedance amplifier connections.

Image: Two JBL Control 16C/T-BK ceiling speakers with grilles installed, showcasing their compact design suitable for ceiling integration.
2. What's in the Box
Each JBL Control 16C/T-BK speaker package typically includes the following components:
- One (1) JBL Control 16C/T-BK Ceiling Speaker
- Two (2) Tile Rail Supports
- One (1) C-Ring Support Backing Plate
- One (1) Cutout Template
- One (1) Paint Shield
- One (1) Grille

Image: The product packaging box for the JBL Control 16C/T-BK, indicating the model and brand.
3. Installation and Setup
Proper installation is crucial for optimal performance and safety. It is recommended that installation be performed by qualified personnel.
3.1 Preparing the Ceiling Opening
- Determine Location: Select a suitable location in the ceiling, ensuring adequate clearance behind the speaker for wiring and mounting hardware.
- Use Template: Place the provided cutout template at the desired location and trace the opening onto the ceiling material.
- Cut Opening: Carefully cut the opening using an appropriate tool. The recommended cutout diameter is 8.3 inches (210 mm). Ensure the edges are clean and smooth.
3.2 Installing Support Hardware
For secure installation, especially in suspended ceilings, use the C-ring and tile rail supports.
- Insert C-Ring: Feed the C-ring support backing plate through the cutout opening. Position it so the tabs align with the speaker mounting points.
- Attach Tile Rails: If installing in a suspended ceiling, attach the tile rail supports to the C-ring and extend them to rest on the ceiling grid rails.
3.3 Wiring Connections
The speaker features a removable locking terminal block for audio input. Ensure the amplifier is turned off before making any connections.

Image: Detailed view of the speaker's 4-pin removable locking terminal block for audio input and loop-thru connections.
- Identify Terminals: The terminal block is labeled for positive (+) and negative (-) input, and loop-thru connections.
- Connect Speaker Wire: Strip approximately 6mm (0.25 inches) of insulation from the speaker wires. Insert the positive wire into the '+' terminal and the negative wire into the '-' terminal. Secure the wires by tightening the screws on the terminal block.
- Loop-Thru (Optional): If connecting multiple speakers in a distributed system, use the 'Loop Thru' terminals to pass the audio signal to the next speaker.
- Re-insert Terminal Block: Once wired, firmly insert the terminal block back into its receptacle on the speaker.
3.4 Setting Transformer Taps / Impedance
The Control 16C/T-BK includes a multi-tap transformer for 70V/100V distributed systems and an 8-ohm direct mode. Select the appropriate setting using the rotary switch located on the front baffle, accessible by removing the grille.

Image: Rotary switch for selecting 70V/100V transformer taps or 8-ohm direct impedance, located on the speaker baffle.
- 70V System: Choose the desired wattage tap (e.g., 3.8W, 7.5W, 15W, 30W) for 70V systems.
- 100V System: Choose the desired wattage tap (e.g., 7.5W, 15W, 30W) for 100V systems.
- 8 Ohm Direct: Select the '8Ω' position for direct connection to a low-impedance amplifier.
Ensure the amplifier is off before changing tap settings.
3.5 Mounting the Speaker

Image: Side view of the speaker illustrating the mounting tabs that secure it to the ceiling.
- Insert Speaker: Carefully insert the speaker into the prepared ceiling opening.
- Secure Tabs: Tighten the mounting screws on the front baffle. This will rotate the mounting tabs outwards, clamping the speaker firmly to the ceiling material. Do not overtighten.
- Attach Grille: Once the speaker is securely mounted, attach the grille by aligning it with the speaker baffle and pressing firmly until the magnets engage.
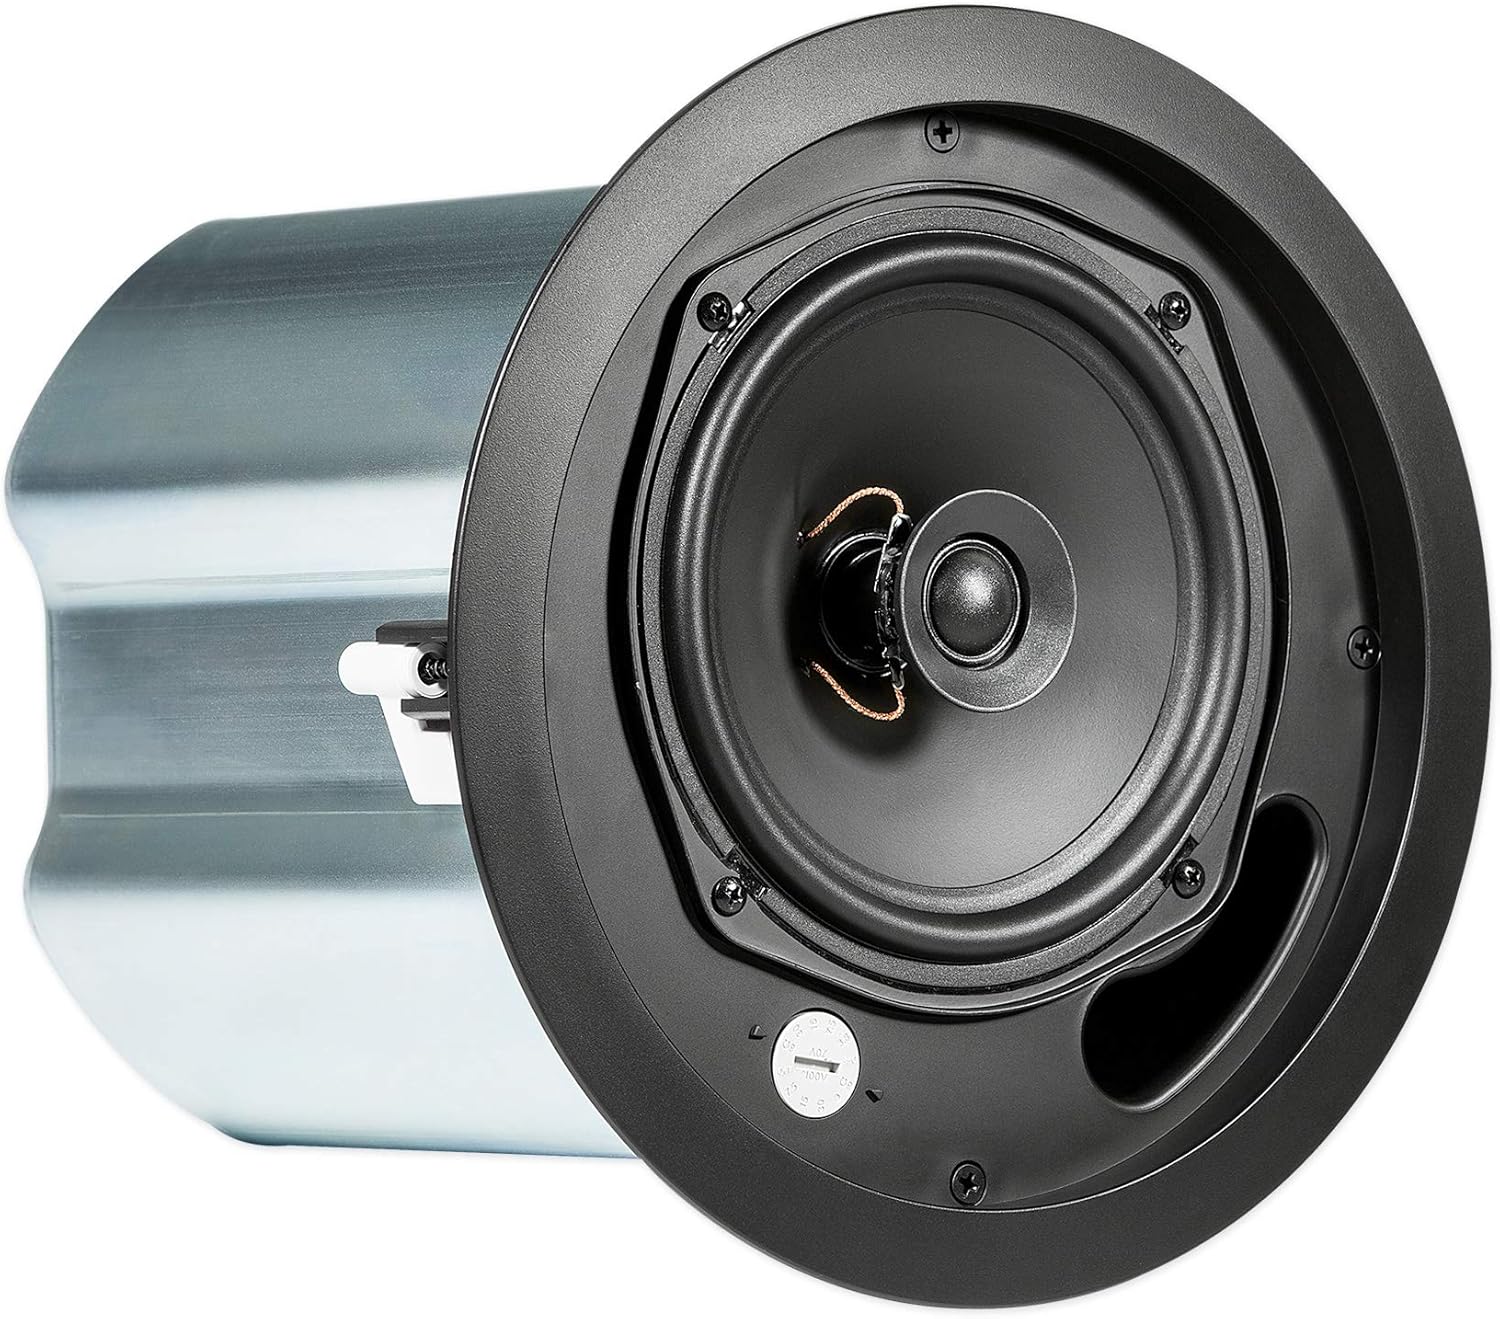
Image: The JBL Control 16C/T-BK speaker with its grille removed, revealing the internal components including the woofer and tweeter.
4. Operating Instructions
Once installed and wired, operating the JBL Control 16C/T-BK is straightforward.
- Power On: Turn on your audio amplifier or receiver.
- Audio Source: Select your desired audio source (e.g., music player, microphone).
- Adjust Volume: Gradually increase the volume on your amplifier to the desired listening level.
- System Check: Verify that sound is being produced clearly from all connected speakers.
Avoid operating the speakers at excessively high volumes for prolonged periods, as this can cause damage.
5. Maintenance
The JBL Control 16C/T-BK speakers are designed for long-term, reliable operation with minimal maintenance.
- Cleaning: To clean the speaker grille and baffle, use a soft, dry cloth. For stubborn dirt, a slightly damp cloth can be used, but ensure no moisture enters the speaker components. Do not use abrasive cleaners, solvents, or harsh chemicals.
- Grille Removal: The grille can be carefully removed for cleaning or to access the transformer tap switch. Use a small, flat tool to gently pry the edge of the grille.
- No User-Serviceable Parts: There are no user-serviceable parts inside the speaker enclosure. Refer all servicing to qualified JBL service personnel.
6. Troubleshooting
If you encounter issues with your JBL Control 16C/T-BK speaker, refer to the following common troubleshooting steps:
| Problem | Possible Cause | Solution |
|---|---|---|
| No sound from speaker |
|
|
| Distorted or unclear sound |
|
|
| Intermittent sound |
|
|
7. Specifications
| Brand | JBL |
| Model Number | CONTROL 16C/T-BK |
| Speaker Type | 2-way Coaxial Ceiling Loudspeaker |
| Low-Frequency Driver | 6.5 inches (165 mm) |
| High-Frequency Driver | 0.75 inches (19 mm) |
| Power Handling (8Ω Direct) | 100 Watts (Program Power) |
| Impedance | 8 Ohms (Direct Mode) |
| Transformer Taps (70V) | 30W, 15W, 7.5W, 3.8W |
| Transformer Taps (100V) | 30W, 15W, 7.5W |
| Frequency Response | Not fully specified (up to 20 KHz) |
| Input Voltage | 70V / 100V (Transformer) or Low Impedance |
| Mounting Type | Ceiling Mount |
| Connectivity Technology | Wired (Terminal Block) |
| Color | Black |
| Outer Diameter | 9.1 inches (232 mm) |
| Cutout Diameter | 8.3 inches (210 mm) |
| Mounting Depth | 8.5 inches (216 mm) |
| Item Weight | Approximately 8.2 lbs (3.7 kg) per speaker |
| Indoor/Outdoor Usage | Indoor |
| Specific Uses | Commercial and Public Spaces (Background Music, Announcements) |
Note: Specifications are subject to change without notice. For the most accurate and up-to-date information, please refer to the official JBL product documentation.
8. Warranty and Support
JBL products are manufactured to high standards and are backed by a limited warranty.
- Warranty Type: Limited Warranty. Specific terms and duration may vary by region and product. Please refer to the warranty card included with your product or visit the official JBL website for detailed warranty information.
- Customer Support: For technical assistance, service, or warranty claims, please contact JBL customer support through their official website or authorized service centers.
- Online Resources: Additional support documents, FAQs, and product registration may be available on the JBL official website.


