
1. Introduction
This manual provides essential information for the proper installation, operation, and maintenance of your new Gladiator 12V Heavy Duty Solenoid. Designed for reliability and performance, this solenoid is a direct replacement for various Mercury Marine and Mercruiser applications. Please read this manual thoroughly before proceeding with installation or use to ensure safe and effective operation.
2. Product Overview
The Gladiator 12V Heavy Duty Solenoid is a robust electrical component designed to manage the high current flow required to activate a starter motor. It features a 4-terminal design and is built for intermittent duty cycle applications, ensuring reliable performance in marine environments. This solenoid meets or exceeds OEM specifications for the listed Mercury Marine part numbers.

Figure 2.1: Gladiator 12V Heavy Duty Solenoid with included mounting hardware.
Key features include:
- 12 Volt operating voltage.
- 4-Terminal configuration for straightforward wiring.
- Intermittent Duty Cycle for starter applications.
- Constructed to meet or exceed OEM specifications.
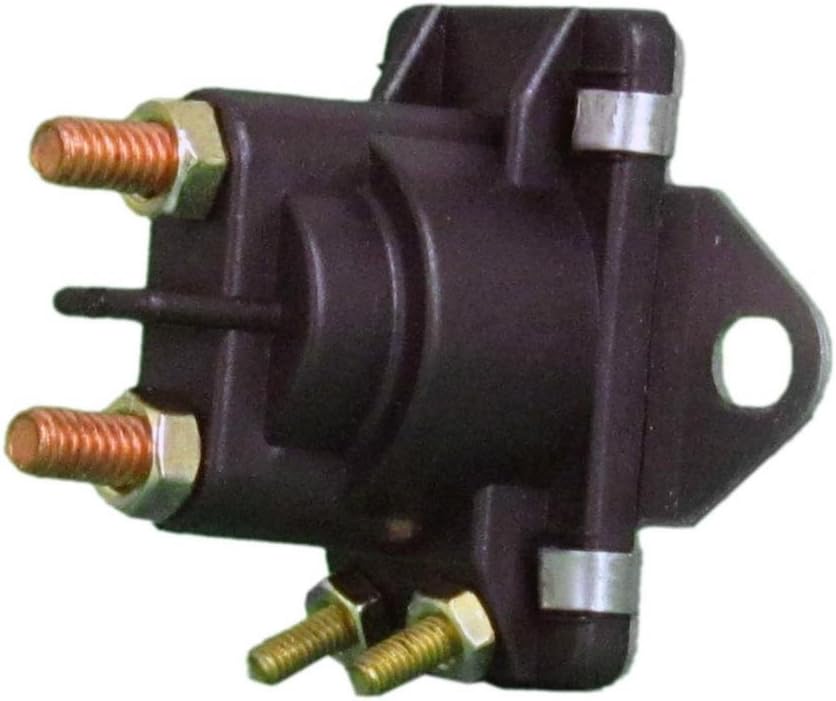
Figure 2.2: Side view of the solenoid, showing terminal posts.

Figure 2.3: Bottom view of the solenoid, showing mounting bracket.
3. Specifications
| Attribute | Value |
|---|---|
| Brand | Gladiator |
| Model Number | 7-1088 |
| Voltage | 12 Volts |
| Duty Cycle | Intermittent |
| Terminals | 4-Terminal |
| Item Weight | 2 pounds |
| OEM Part Numbers Replaced | 89-850189, 89-850189T, 89-91975, 89-96054, 89-96054T |
| Manufacturer | URQS |
4. Setup and Installation
Safety First: Before beginning any electrical work, ensure the battery's negative terminal is disconnected to prevent accidental short circuits or electrical shock. Wear appropriate personal protective equipment (PPE), including safety glasses.
- Identify the Old Solenoid: Locate the existing starter solenoid on your Mercruiser application. Note its mounting position and the routing of all connected wires.
- Disconnect Wiring: Carefully disconnect all wires from the old solenoid. Label each wire (e.g., battery positive, starter motor, ignition switch, ground) to ensure correct re-connection. Take photos if necessary for reference.
- Remove Old Solenoid: Unbolt and remove the old solenoid from its mounting bracket.
- Mount New Solenoid: Position the new Gladiator solenoid in the same location as the old one. Secure it using appropriate fasteners. Ensure a solid, clean mounting surface for proper grounding if applicable.
- Connect Wiring: Re-connect the wires to the new solenoid's terminals according to your labels and the wiring diagram below. Ensure all connections are clean, tight, and free from corrosion. The large terminals typically connect to the battery positive and the starter motor, while the smaller terminals connect to the ignition switch and ground.

Figure 4.1: Typical 4-Terminal Solenoid Wiring Diagram. MTR = Motor, BAT = Battery, GRD = Ground, SW = Switch.
- Verify Connections: Double-check all wiring connections for correctness and tightness.
- Reconnect Battery: Reconnect the battery's negative terminal.
- Test Operation: Attempt to start the engine to verify proper solenoid function.
5. Operating Instructions
The solenoid operates automatically as part of your vehicle's starting system. When the ignition key is turned to the 'start' position, a low-current signal from the ignition switch activates the solenoid. This activation closes an internal high-current switch, allowing a large surge of current to flow directly from the battery to the starter motor, engaging the engine's flywheel and initiating the cranking process. Once the engine starts and the ignition key is released from the 'start' position, the solenoid deactivates, cutting off power to the starter motor.
6. Maintenance
The Gladiator 12V Heavy Duty Solenoid is designed for minimal maintenance. However, periodic inspection can help ensure its longevity and reliable performance:
- Terminal Inspection: Annually inspect all electrical connections to the solenoid. Ensure they are clean, tight, and free from corrosion. Loose or corroded connections can lead to poor performance or premature failure.
- Casing Inspection: Check the solenoid's casing for any signs of physical damage, cracks, or excessive heat discoloration.
- Environmental Protection: While designed for marine use, minimize exposure to excessive moisture or corrosive agents where possible.
7. Troubleshooting
If you experience issues with your starter system after installing the new solenoid, consider the following common problems and solutions:
- Engine Does Not Crank (No Click):
- Check Battery: Ensure the battery is fully charged and its terminals are clean and tight.
- Check Ignition Switch: Verify the ignition switch is sending a signal to the solenoid's activation terminal when turned to 'start'.
- Check Wiring: Inspect all wires connected to the solenoid for breaks, loose connections, or corrosion.
- Engine Does Not Crank (Solenoid Clicks):
- This often indicates the solenoid is activating but not passing sufficient current to the starter.
- Check Large Terminals: Ensure the large battery and starter motor cables are securely connected and free of corrosion.
- Check Starter Motor: The issue might be with the starter motor itself, not the solenoid.
- Solenoid Stays Engaged After Engine Starts:
- This is a critical issue. Immediately disconnect the battery.
- Check Ignition Switch: The ignition switch may not be returning to the 'run' position, continuously sending a signal to the solenoid.
- Internal Solenoid Fault: The solenoid may be faulty and require replacement.
If troubleshooting steps do not resolve the issue, it is recommended to consult a qualified marine mechanic or automotive electrician.
8. Warranty and Support
The Gladiator 12V Heavy Duty Solenoid comes with a One Year Warranty from the date of purchase. This warranty covers defects in materials and workmanship under normal use and service.
For warranty claims, technical support, or further assistance, please contact Gladiator customer service through the retailer where the product was purchased or refer to the contact information provided with your product packaging.