
1. Introduction
Thank you for choosing the Lifegard Aquatics PG4500 Pond and Fountain Submersible Pump. This pump is designed for reliable and efficient water circulation in ponds, fountains, waterfalls, hydroponic systems, irrigation systems, and other water features. Its oil-free design ensures safety for freshwater environments, while the pre-filter screen minimizes maintenance by handling large particles effectively. This manual provides essential information for the safe installation, operation, and maintenance of your pump.
Key Features:
- High Performance: Delivers up to 4500 Gallons Per Hour (GPH).
- Versatile Installation: Suitable for both wet (submersible) and dry (external) applications.
- Energy Efficient: Engineered for low energy consumption.
- Pre-Filter Screen: Handles large debris, reducing maintenance frequency.
- Oil-Free Design: Safe for freshwater aquatic life.
- Convenient Handle: Integrated handle for easy placement and removal.
- Quiet Operation: Designed for minimal noise output.

Image 1.1: Lifegard Aquatics PG Pump highlighting its features and applications.
2. Safety Instructions
Please read and understand all safety instructions before installing or operating this pump. Failure to follow these instructions may result in electric shock, fire, serious injury, or property damage.
- Electrical Safety: Always disconnect the pump from the power supply before performing any maintenance or installation. Ensure the power outlet is a grounded, GFCI (Ground Fault Circuit Interrupter) protected receptacle. Do not operate the pump if the power cord is damaged.
- Water Safety: This pump is designed for freshwater use only. Do not use with flammable liquids or in environments where flammable vapors are present. Ensure the pump is fully submerged when used in submersible applications to prevent overheating.
- Installation: Do not lift the pump by its power cord. Use the integrated handle or the pump body. Ensure all connections are secure and watertight to prevent leaks.
- Children and Pets: Keep children and pets away from the pump and water features during operation and maintenance.
- Temperature: Do not operate the pump in freezing temperatures. Remove the pump from the water and store it in a frost-free location during winter months.
3. Package Contents
Verify that all components are present and undamaged before proceeding with installation.
- Lifegard Aquatics PG4500 Pump Unit
- Pre-filter Screen (removable)
- Hose Adapter (multi-step)

Image 3.1: Pump unit with pre-filter detached.

Image 3.2: Detachable pre-filter screen.
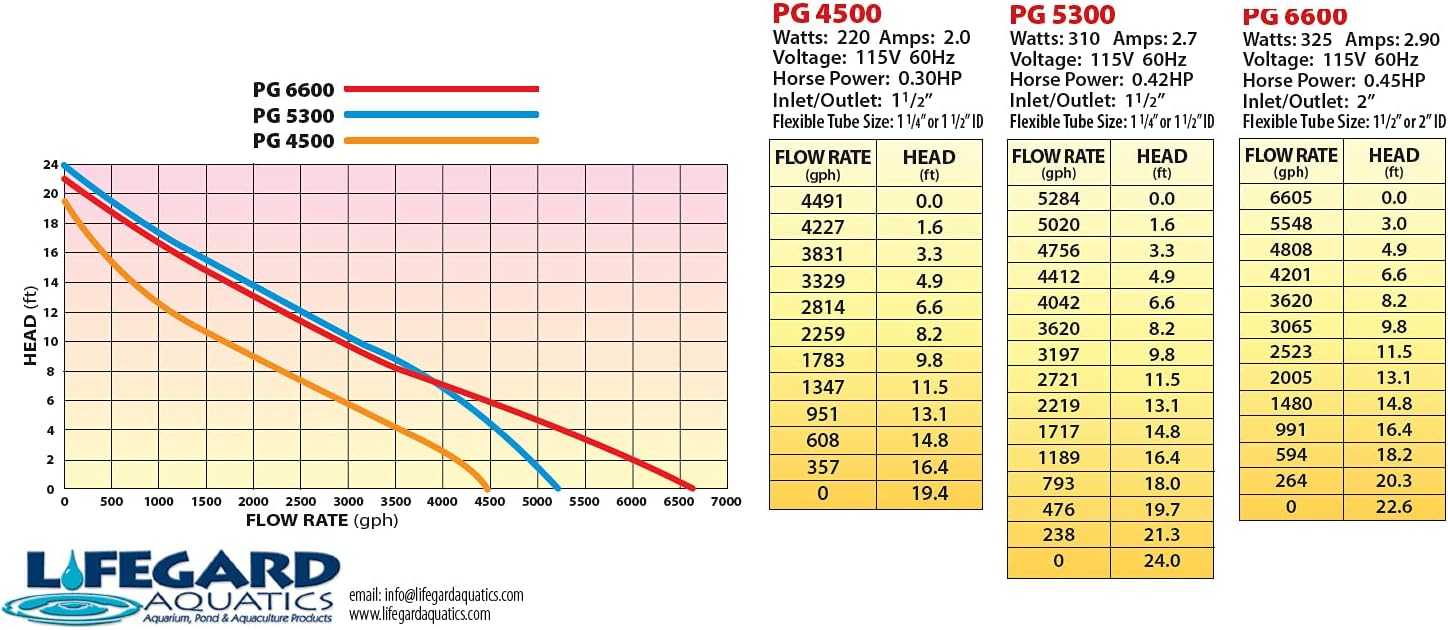
Image 3.3: Multi-step hose adapter.
4. Setup and Installation
The Lifegard Aquatics PG4500 pump can be installed either submerged in water (wet installation) or outside the water (dry installation).
4.1. Connecting Tubing
- Identify the appropriate size on the multi-step hose adapter for your tubing. Cut off any smaller sections of the adapter that are not needed to maximize flow.
- Thread the hose adapter onto the pump's outlet port. Ensure it is hand-tightened securely.
- Attach your flexible tubing to the hose adapter. Use a hose clamp (not included) to secure the tubing to prevent leaks and ensure a tight fit.
- For dry installations, connect an inlet hose to the pump's inlet port. Ensure this connection is also secure and watertight.

Image 4.1: Pump with the hose adapter connected to the outlet.
4.2. Wet (Submersible) Installation
- Place the pump in the desired location within your pond or fountain. Ensure it rests on a stable, level surface. The pump is equipped with suction cups on its base for added stability.
- Ensure the pump is fully submerged in water before connecting to power. The water level should always be above the pump's intake.
- Route the power cord safely, avoiding kinks or damage. Do not bury the cord.
4.3. Dry (External) Installation
When installing externally, the pump must be placed below the water level of the pond or fountain to ensure proper priming and operation. The pump is not self-priming.
- Position the pump on a stable, level surface outside the water, ensuring it is below the water level of the source.
- Connect the inlet hose from the water source to the pump's inlet port. Ensure this connection is airtight to prevent air leaks, which can affect pump performance.
- Connect the outlet hose to the pump's outlet port as described in Section 4.1.
- Route the power cord safely, avoiding kinks or damage.
4.4. Electrical Connection
- Ensure your power supply matches the pump's requirements (115V, 60Hz).
- Plug the pump into a properly grounded, GFCI-protected electrical outlet.
- Avoid using extension cords if possible. If an extension cord is necessary, ensure it is rated for outdoor use, is properly grounded, and has a sufficient gauge for the pump's power requirements.
5. Operating Instructions
Once installed, operating the Lifegard Aquatics PG4500 pump is straightforward.
- Initial Startup: After ensuring all connections are secure and the pump is properly positioned (and submerged if wet installed), plug the pump into the GFCI-protected outlet. The pump should start immediately.
- Monitoring: Observe the water flow to ensure it is consistent and free of air bubbles (which may indicate an air leak in dry installations).
- Continuous Operation: This pump is designed for continuous operation. However, regular checks for debris accumulation and proper function are recommended.
- Shutting Down: To turn off the pump, simply unplug it from the power outlet.
6. Maintenance
Regular maintenance will ensure the longevity and optimal performance of your Lifegard Aquatics PG4500 pump.
6.1. Cleaning the Pre-filter Screen
The pre-filter screen prevents large debris from entering the pump, but it can become clogged over time, reducing flow.
- Disconnect the pump from the power supply.
- Remove the pump from the water or disconnect it from the external plumbing.
- Carefully detach the pre-filter screen from the pump body.
- Rinse the screen thoroughly under clean water to remove any accumulated debris. Use a soft brush if necessary.
- Reattach the clean pre-filter screen to the pump.
6.2. Impeller Cleaning
If flow remains low after cleaning the pre-filter, the impeller may be obstructed or dirty.
- Disconnect the pump from the power supply.
- Remove the pre-filter screen.
- Locate and carefully remove the impeller cover (usually held by clips or screws).
- Gently remove the impeller assembly. Inspect for any debris (hair, string, mineral deposits) and clean thoroughly.
- Reassemble the impeller, impeller cover, and pre-filter screen, ensuring all parts are correctly seated.
6.3. Winterization
In regions with freezing temperatures, the pump must be removed from the water and stored properly to prevent damage.
- Disconnect the pump from the power supply.
- Remove the pump from the pond or fountain.
- Clean the pump thoroughly, including the pre-filter and impeller area.
- Store the pump in a frost-free location, ideally submerged in a bucket of water to keep seals moist, or ensure it is completely dry.
7. Troubleshooting
If you encounter issues with your pump, refer to the following troubleshooting guide before contacting customer support.
| Problem | Possible Cause | Solution |
|---|---|---|
| Pump does not start. |
|
|
| Low or no water flow. |
|
|
| Pump is noisy or vibrating excessively. |
|
|
| Water leaking from pump body. |
|
|
8. Specifications
Detailed technical specifications for the Lifegard Aquatics PG4500 pump.
| Specification | Value |
|---|---|
| Model Number | PG4500 (883134) |
| Maximum Flow Rate | 4500 Gallons Per Hour (GPH) |
| Voltage | 115 Volts |
| Frequency | 60 Hz |
| Power Source | Corded Electric |
| Material | Stainless Steel (internal components), Durable Plastic (housing) |
| Item Weight | 8.1 Pounds |
| Style | Submersible / External |

Image 8.1: Dimensional drawing for PG4500, PG5300, and PG6600 pump models.

Image 8.2: Performance curve illustrating flow rate (GPH) against head (feet) for various PG pump models, including PG4500.
9. Warranty and Support
Lifegard Aquatics products are manufactured to high-quality standards. For specific warranty details, please refer to the warranty card included with your purchase or visit the official Lifegard Aquatics website. Keep your proof of purchase for warranty claims.
If you require technical assistance or have questions not covered in this manual, please contact Lifegard Aquatics customer support:
- Website: www.lifegardaquatics.com
- Email: info@lifegardaquatics.com
Please have your pump model number (PG4500 or 883134) and purchase date available when contacting support.

