
1. Introduction
This manual provides essential instructions for the safe and effective use of your Sony HDR-CX405 Handycam. The HDR-CX405 is a compact Full HD 1080/60p camcorder designed for capturing high-quality video and 9.2MP still images. It features a 29.8mm wide-angle Carl Zeiss zoom lens, offering 27x optical zoom and 54x Clear Image Zoom, along with a 2.7-inch Clear Photo LCD display and SteadyShot Image Stabilization for smooth footage.

Figure 1.1: Sony HDR-CX405 Handycam. This image shows the camcorder from the front-right, with its LCD screen open, displaying a vibrant landscape. The lens and various controls are visible.
2. Package Contents
Verify that all items listed below are included in your package. If any items are missing or damaged, please contact your retailer.
- Sony HDR-CX405 Handycam Camcorder
- Rechargeable Battery Pack (NP-BX1 type)
- AC Adapter / USB Connection Support Cable
- Carrying Case
- 32GB MicroSD Memory Card
- USB Memory Card Reader
- Mini Tripod
- Wrist Strap
- Cleaning Kit (includes cleaning cloth, brush, and liquid)
- LCD Screen Protectors
- Additional Battery Charger (for NP-BX1)
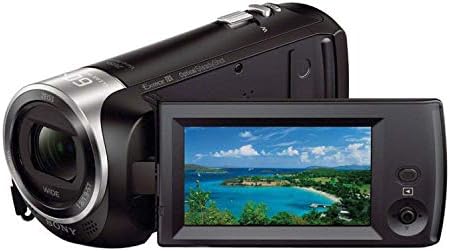
Figure 2.1: Included Accessories. This image displays the Sony HDR-CX405 camcorder along with all the accessories provided in the bundle, such as the memory card, batteries, charger, carrying case, and cleaning supplies.
3. Setup
3.1 Charging the Battery
- Insert the battery pack (NP-BX1) into the supplied battery charger.
- Connect the AC adapter to the battery charger, then plug the AC adapter into a wall outlet.
- The charge indicator light on the charger will illuminate during charging and turn off when charging is complete. A full charge typically takes approximately 2-3 hours.
3.2 Inserting the Memory Card
- Open the memory card slot cover on the camcorder.
- Insert the 32GB MicroSD card with the metal terminals facing the camcorder and the notched corner oriented correctly. Push the card in until it clicks into place.
- Close the memory card slot cover securely.
3.3 Attaching the Wrist Strap
Thread the wrist strap through the strap attachment point on the side of the camcorder. Secure it firmly to prevent accidental drops.
3.4 Initial Power On
- Open the LCD panel. The camcorder will power on automatically.
- Follow the on-screen prompts to set the date, time, and language.

Figure 3.1: Front View of the Camcorder. This image highlights the lens, microphone, and other front-facing features of the Sony HDR-CX405.
4. Operating Instructions
4.1 Recording Videos
- Power On: Open the LCD panel or press the POWER button.
- Select Mode: Use the MODE button to switch between video recording and still image capture.
- Start Recording: Press the START/STOP button (usually a large red button) to begin recording. The recording indicator light will illuminate.
- Stop Recording: Press the START/STOP button again to stop recording. The indicator light will turn off.
4.2 Zoom Operation
Use the zoom lever located on the top of the camcorder to adjust the zoom. Push the lever towards W (Wide) to zoom out and towards T (Telephoto) to zoom in. The camcorder offers 27x optical zoom and 54x Clear Image Zoom.
4.3 Taking Still Images
- Ensure the camcorder is in still image mode (indicated on the LCD screen).
- Frame your shot using the LCD screen.
- Press the PHOTO button (usually a small button near the zoom lever) to capture a 9.2MP still image.
4.4 Playback
- Press the PLAYBACK button (often indicated by a triangle icon) to enter playback mode.
- Use the control buttons (e.g., joystick or directional pad) to navigate through your recorded videos and photos.
- Press the center button to play a selected video or view a photo.
4.5 Connecting to a TV/Computer
The HDR-CX405 supports USB connectivity for transferring files to a computer. Connect the camcorder to your computer using the supplied USB cable. The camcorder will appear as a removable drive, allowing you to copy video and photo files. For TV playback, use an HDMI cable (sold separately) to connect the camcorder's HDMI output to your TV's HDMI input.

Figure 4.1: Top View and Controls. This image illustrates the top of the camcorder, highlighting the zoom lever, record button, and other accessible controls during operation.
5. Maintenance
5.1 Cleaning the Camcorder
- Lens: Use a soft, dry lens cleaning cloth to gently wipe the lens. For stubborn smudges, use a lens cleaning solution specifically designed for optical lenses.
- Body: Wipe the camcorder body with a soft, dry cloth. For dirt, slightly dampen the cloth with water and then wipe dry. Avoid using harsh chemicals or solvents.
- LCD Screen: Use a soft, lint-free cloth. Do not press hard on the screen.
5.2 Battery Care
- Store batteries in a cool, dry place when not in use.
- Avoid fully discharging the battery frequently to prolong its lifespan.
- If storing for an extended period, charge the battery to about 50% capacity.
5.3 Storage
When not in use, store the camcorder in its carrying case in a dry, dust-free environment away from direct sunlight and extreme temperatures.
6. Troubleshooting
If you encounter issues with your camcorder, refer to the following common problems and solutions:
| Problem | Solution |
|---|---|
| Camcorder does not power on. | Ensure the battery is fully charged and correctly inserted. Try connecting the AC adapter directly. |
| Cannot record video/take photos. | Check if a memory card is inserted and has sufficient free space. Ensure the camcorder is in the correct recording mode. |
| Poor image or video quality. | Clean the lens. Check lighting conditions. Ensure SteadyShot is enabled for video stability. |
| No sound during playback. | Check the volume settings on the camcorder or connected TV. Ensure the microphone was not obstructed during recording. |
| Camcorder freezes or becomes unresponsive. | Remove the battery, wait a few seconds, then reinsert it and power on the camcorder. |
7. Specifications
| Feature | Specification |
|---|---|
| Model Number | HDR-CX405 |
| Video Capture Resolution | 1080p Full HD (60p) |
| Still Image Resolution | 9.2 Megapixels |
| Lens | Carl Zeiss Vario-Tessar (29.8mm Wide-Angle) |
| Optical Zoom | 27x |
| Clear Image Zoom | 54x |
| Image Stabilization | SteadyShot (Optical) |
| LCD Screen | 2.7 Inches Clear Photo LCD |
| Photo Sensor Technology | CMOS |
| Flash Memory Type | MicroSDHC, SD |
| Video Capture Format | XAVC-S, H.264, MPEG-4 |
| Supported Audio Format | AAC, MP3 |
| Connectivity Technology | USB |
| Power Source | 1 Lithium Ion battery (NP-BX1, included) |
| Product Dimensions | 5 x 2.1 x 2.3 inches |
| Item Weight | 1 pound |
8. Warranty and Support
Your Sony HDR-CX405 Handycam is covered by a standard manufacturer's warranty. Please refer to the warranty card included in your package for specific terms and conditions, including warranty period and coverage details. For technical support, service, or further inquiries, please visit the official Sony support website or contact Sony customer service in your region. Keep your proof of purchase for warranty claims.