
1. Introduction
This manual provides essential information for the safe and efficient operation, maintenance, and troubleshooting of your ORIGINAL FENGDA AS-189 Airbrush Compressor. Please read these instructions carefully before using the compressor to ensure proper function and to prevent damage or injury. Keep this manual for future reference.
2. Safety Instructions
Always observe the following safety precautions to reduce the risk of electric shock, fire, or serious injury.
- Ensure the power supply voltage matches the compressor's requirements (220 Volt).
- Do not operate the compressor in wet or damp conditions.
- Always disconnect the power plug from the outlet before performing any maintenance or when the compressor is not in use.
- Keep children and unauthorized persons away from the operating compressor.
- Do not modify the compressor or its components. Use only original replacement parts.
- Ensure adequate ventilation when operating the compressor.
- Never direct the air stream at people or animals.
- Wear appropriate personal protective equipment, such as eye protection, when airbrushing.
- Regularly check the power cord for damage. Do not use if damaged.
3. Product Overview
The ORIGINAL FENGDA AS-189 is an oil-less piston type airbrush compressor featuring a 3-liter pressure tank. It is designed for airbrushing applications, providing a consistent and pulsation-free air supply. The integrated pressure regulator with a moisture trap ensures clean and dry air output.
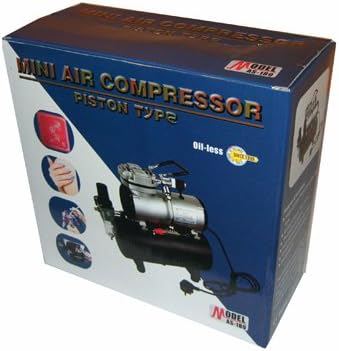
Figure 3.1: The ORIGINAL FENGDA AS-189 Airbrush Compressor as packaged in its retail box.
Components
- Compressor Unit
- 3-Liter Pressure Tank
- Pressure Regulator with Moisture Trap
- Pressure Gauge
- Air Outlet Valve
- Power Cord and Plug
- On/Off Switch
4. Setup
4.1 Unpacking
Carefully remove the compressor from its packaging. Inspect all components for any signs of damage during transit. Retain the packaging for future storage or transport.

Figure 4.1: The compressor unit protected by plastic wrapping and foam inserts during unpacking.
4.2 Initial Assembly
Place the compressor on a stable, level surface. Ensure there is sufficient space around the unit for ventilation. No complex assembly is typically required as the unit comes largely pre-assembled.

Figure 4.2: Top-front view of the assembled compressor, showing the main unit and tank.
4.3 Connecting to Power
Plug the power cord into a grounded 220 Volt electrical outlet. Ensure the On/Off switch is in the 'Off' position before plugging in.

Figure 4.3: Rear view showing the power cord connection and the red On/Off switch.
4.4 Connecting Your Airbrush
Connect your airbrush hose to the air outlet valve on the pressure regulator. Ensure the connection is secure to prevent air leaks.

Figure 4.4: Side view highlighting the pressure regulator, moisture trap, and pressure gauge.
5. Operating Instructions
5.1 Powering On/Off
- To turn on the compressor, flip the red On/Off switch to the 'On' position. The compressor will start to fill the pressure tank.
- The compressor will automatically shut off once the tank reaches its maximum pressure and restart when the pressure drops below a set threshold.
- To turn off the compressor, flip the On/Off switch to the 'Off' position.
5.2 Adjusting Air Pressure
- The pressure regulator allows you to adjust the working air pressure for your airbrush.
- Turn the knob on the pressure regulator clockwise to increase pressure and counter-clockwise to decrease pressure.
- Monitor the pressure gauge to set the desired working pressure for your airbrushing task.
5.3 Airbrushing Techniques
Refer to your airbrush's specific instructions for detailed techniques. Generally, ensure your paint is properly thinned for optimal flow. Practice on scrap material to achieve desired results before working on your final project.
6. Maintenance
6.1 General Cleaning
Wipe down the exterior of the compressor with a damp cloth. Do not use harsh chemicals or abrasive cleaners. Ensure the compressor is unplugged before cleaning.
6.2 Moisture Trap Drainage
The moisture trap collects condensation from the air. Regularly check the moisture trap bowl and drain any accumulated water by opening the drain valve at the bottom of the trap. This prevents moisture from reaching your airbrush and paint.
6.3 Storage
When not in use, store the compressor in a clean, dry, and dust-free environment. Disconnect the airbrush hose and power cord. It is recommended to drain any remaining air from the tank before long-term storage.
7. Troubleshooting
This section addresses common issues you might encounter with your airbrush compressor.
| Problem | Possible Cause | Solution |
|---|---|---|
| Compressor does not turn on. | No power supply; On/Off switch is off. | Check power cord connection and outlet; ensure switch is 'On'. |
| Compressor runs continuously. | Air leak in hose or connections; pressure switch malfunction. | Check all connections for leaks; contact support if pressure switch is faulty. |
| Low air pressure output. | Regulator set too low; air leak; clogged airbrush. | Adjust pressure regulator; check for leaks; clean airbrush. |
| Moisture in air output. | Moisture trap full. | Drain the moisture trap. |
| Compressor overheats. | Poor ventilation; prolonged use. | Ensure adequate airflow around the unit; allow for cool-down periods. |
8. Technical Specifications
| Specification | Value |
|---|---|
| Brand | ORIGINAL FENGDA |
| Model Name | fen-AS189 |
| Voltage | 220 Volt |
| Power Source | Corded Electric |
| Tank Volume | 3 Liters |
| Recommended Use | Airbrushing |
| Included Components | Valve |
| Manufacturer | ORIGINAL FENGDA |
| ASIN | B00HZ2MQ3A |
| GTIN/UPC | 734872114809 |
9. Warranty and Support
For warranty information, technical support, or service inquiries, please contact the manufacturer, ORIGINAL FENGDA, or your authorized dealer. Keep your purchase receipt as proof of purchase for warranty claims.