
1. Introduction
This manual provides detailed instructions for the installation, operation, and maintenance of your GIGABYTE GB-BXi7-4770R Mini PC Barebones. The GB-BXi7-4770R is an ultra-compact PC design featuring Intel 4th generation Core i7-4770R processors with Intel Iris Pro graphics 5200. It supports 2.5-inch hard drives, mSATA SSDs, and DDR3L SO-DIMM memory, offering a powerful computing solution in a small form factor.
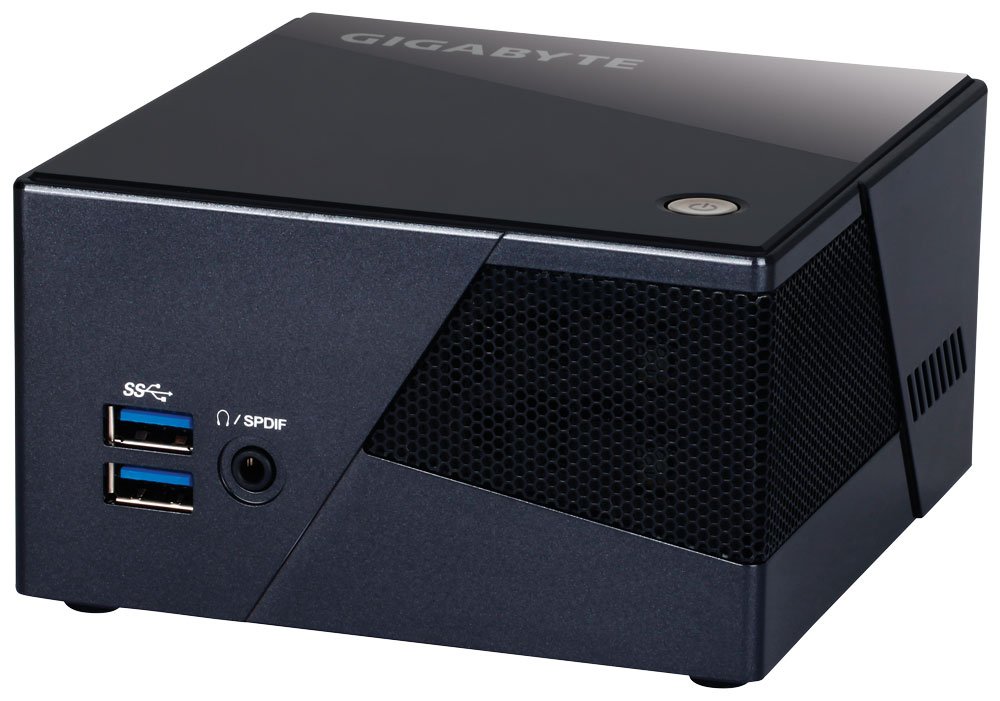
Image 1.1: GIGABYTE GB-BXi7-4770R Mini PC Barebones unit. This image shows the compact size and general appearance of the device.
2. Safety Information
Please read all safety instructions carefully before using this product. Failure to follow these instructions may result in electric shock, fire, or damage to the device.
- Always disconnect the power cord from the electrical outlet before cleaning or performing any maintenance.
- Do not expose the device to moisture, rain, or extreme temperatures.
- Ensure proper ventilation. Do not block any ventilation openings.
- Use only GIGABYTE-approved accessories and power adapters.
- Avoid placing the device on unstable surfaces.
- Refer all servicing to qualified service personnel.
3. Package Contents
Verify that all items are present in your package:
- GIGABYTE GB-BXi7-4770R Mini PC Barebones unit
- Power Adapter
- VESA Mounting Bracket (75 x 75mm + 100 x 100mm)
- Screws for VESA mount and internal drives
- Quick Start Guide (this document)
Note: Memory, storage drives (HDD/SSD), and operating system are not included and must be purchased separately.
4. Setup
4.1. Hardware Installation
Before proceeding, ensure the device is unplugged from the power source.
4.1.1. Installing SO-DIMM DDR3L Memory
- Carefully remove the bottom cover of the BRIX unit.
- Locate the two SO-DIMM DDR3L slots.
- Align the notch on the memory module with the notch in the slot.
- Insert the module at a 45-degree angle and push down until the clips on both sides snap into place.
- Repeat for the second module if installing dual channel memory.
4.1.2. Installing 2.5-inch SATA HDD/SSD
- Locate the 2.5-inch drive bay and SATA connector.
- Mount your 2.5-inch drive (7.0mm or 9.5mm thickness supported) into the bracket using the provided screws.
- Connect the SATA data and power cables to the drive and the motherboard.
- Secure the drive assembly within the chassis.
4.1.3. Installing mSATA SSD
- Locate the mSATA slot on the motherboard.
- Insert the mSATA SSD into the slot at an angle.
- Gently push down and secure the SSD with the small screw provided.
4.2. Connecting Peripherals
- Display: Connect your monitor(s) to the HDMI or Mini DisplayPort outputs. The unit supports dual displays and 4K resolution (4096 x 2304 via HDMI).
- USB Devices: Connect your keyboard, mouse, and other USB devices to the available USB 3.0 ports (4 total).
- Network: Connect an Ethernet cable to the Gigabit LAN port for wired network access.
- Audio: Connect headphones or speakers to the headphone jack, which also supports S/PDIF output.
- Power: Connect the power adapter to the DC-in jack on the BRIX unit, then plug the power cord into an electrical outlet.
4.3. Initial Power On and OS Installation
- Press the power button located on the unit.
- The system will boot. You may need to press a key (e.g., DEL or F2) during startup to enter the BIOS/UEFI settings. Consult your motherboard manual for specific key presses.
- Install your preferred operating system (e.g., Windows, Linux) from a USB drive or network source. Ensure all necessary drivers are installed after OS setup for optimal performance.
5. Operation
5.1. Power On/Off
- Power On: Press the power button once.
- Power Off: Initiate a shutdown from your operating system. Alternatively, press and hold the power button for 5 seconds to force a shutdown (use only when necessary).
5.2. VESA Mounting
The included VESA mounting bracket allows you to attach the BRIX unit to the back of a VESA-compatible monitor or TV (75x75mm or 100x100mm). This helps save desk space and creates a clean setup.
- Attach the VESA bracket to the back of your monitor using the appropriate screws.
- Slide the BRIX unit onto the bracket until it clicks securely into place.
6. Maintenance
6.1. Cleaning
- Ensure the device is powered off and unplugged before cleaning.
- Use a soft, dry cloth to wipe the exterior of the unit.
- For stubborn stains, lightly dampen the cloth with water or a mild, non-abrasive cleaner.
- Periodically clean the ventilation openings with compressed air to prevent dust buildup, which can affect cooling performance.
6.2. Software and Firmware Updates
Regularly check the GIGABYTE official website for the latest BIOS firmware and driver updates for your GB-BXi7-4770R. Keeping your system updated ensures optimal performance, stability, and security.
7. Troubleshooting
| Problem | Possible Solution |
|---|---|
| No power/System does not turn on | Check power adapter connection to the unit and the wall outlet. Ensure the power button is pressed firmly. |
| No display output | Verify monitor is powered on and input source is correct. Check display cable connections (HDMI/Mini DisplayPort). Try a different display cable or monitor. |
| System is noisy / Fan runs constantly | Ensure ventilation openings are clear of obstructions. Clean dust from the fan and heatsink. High CPU load will increase fan speed; monitor CPU usage. |
| System performance is slow / Overheating | Check for dust buildup in cooling vents. Ensure proper airflow around the unit. Verify that the correct low-voltage (1.35V) DDR3L RAM is installed. Update BIOS and drivers. |
| Wi-Fi/Bluetooth not working | Ensure the Mini-PCIe Wi-Fi/Bluetooth card is properly seated. Install or update wireless drivers from the GIGABYTE website. |
8. Specifications
- Brand: GIGABYTE
- Model Number: GB-BXi7-4770R
- CPU: Intel Core i7-4770R (4th generation, 3.90 GHz)
- Graphics: Intel Iris Pro Graphics 5200 (Integrated)
- Memory Support: 2 x SO-DIMM DDR3L slots (1.35V), 1333 / 1600 MHz, Max. 16GB
- Storage: 1 x 2.5" SATA3 HDD/SSD bay (7.0/9.5mm thickness), 1 x mSATA SSD Slot
- Wireless Connectivity: IEEE 802.11 a/b/g/n/ac Wi-Fi, Bluetooth 4.0 (Mini-PCIe card)
- Video Outputs: 1 x HDMI (Max. 4096 x 2160 @24Hz), 1 x Mini DisplayPort (Max. 3840 x 2160 @24Hz) - Supports dual displays
- USB Ports: 4 x USB 3.0
- LAN: Gigabit LAN
- Audio: Headphone jack with S/PDIF
- Dimensions: 62 x 111.4 x 114.4 mm (0.79L)
- VESA Mount: 75 x 75mm, 100 x 100mm compatible
- Item Weight: 3.1 pounds
9. Warranty and Support
GIGABYTE products are covered by a limited warranty. For detailed warranty terms and conditions, please refer to the warranty card included with your product or visit the official GIGABYTE website. For technical support, driver downloads, and further assistance, please visit the GIGABYTE support page or contact your local GIGABYTE service center.
Online Support: www.gigabyte.com/support