
1. Introduction
This manual provides essential information for the safe and efficient operation, maintenance, and troubleshooting of your A-iPower SUA4500 portable generator. Please read and understand all instructions before operating the generator. Proper use and maintenance will ensure optimal performance and extend the life of your unit.

Figure 1.1: A-iPower SUA4500 Portable Generator, front-right view.
2. Safety Information
Operating a generator can be hazardous. Always follow these safety precautions to prevent serious injury or property damage.
- Carbon Monoxide Hazard: Generators produce carbon monoxide, an odorless, colorless, poisonous gas. Operate the generator outdoors in a well-ventilated area, far away from windows, doors, and vents. Never operate indoors or in partially enclosed spaces.
- Electrical Shock Hazard: Do not operate the generator in wet conditions. Ensure all electrical connections are dry and properly grounded. Never touch the generator with wet hands.
- Fire Hazard: Gasoline is highly flammable. Refuel in a well-ventilated area with the engine off and cool. Do not smoke or allow open flames near the generator. Store fuel in an approved container away from heat sources.
- Hot Surfaces: The generator engine and muffler become very hot during operation and remain hot for a period after shutdown. Avoid touching hot surfaces to prevent burns.
- Children and Pets: Keep children and pets away from the generator at all times.
3. Package Contents
Verify that all items are present upon unpacking. If any components are missing or damaged, contact customer support immediately.
- A-iPower SUA4500 Portable Generator Unit
- Wheel Kit (Wheels, Axles, Cotter Pins)
- Handle Kit (Handle, Mounting Hardware)
- Spark Plug Wrench
- Oil Funnel
- Owner's Manual
4. Components Overview
Familiarize yourself with the main components of your SUA4500 generator.

Figure 4.1: Side view of the A-iPower SUA4500 generator, showing the engine and frame.
4.1 Control Panel
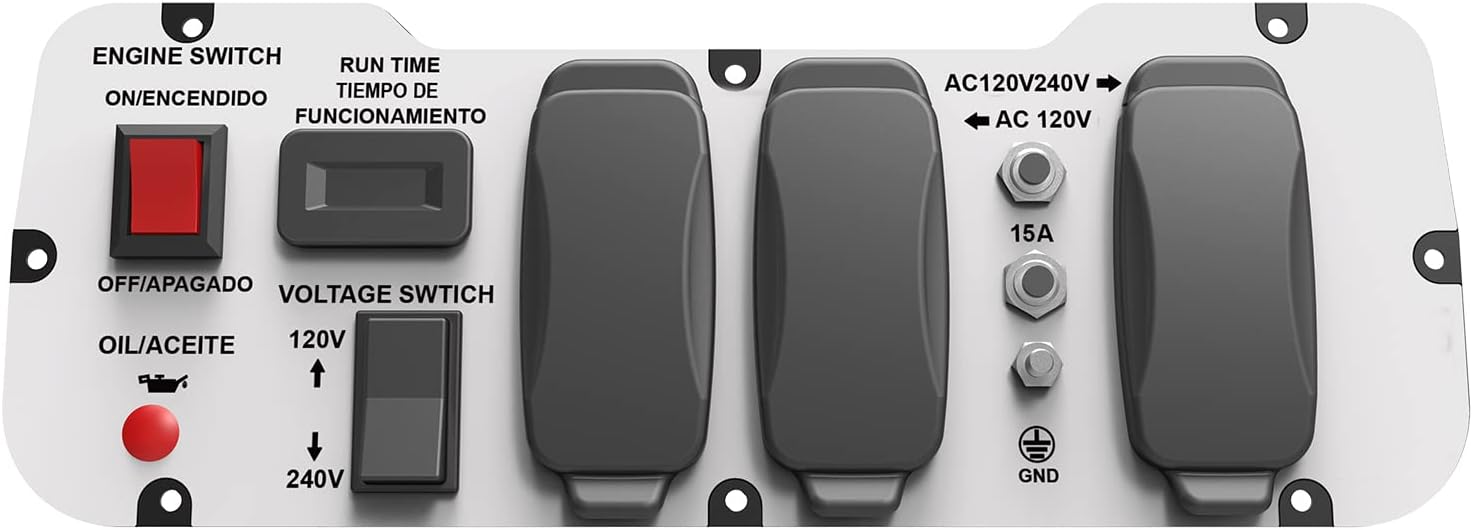
Figure 4.2: Close-up of the control panel.
- Engine Switch (ON/OFF): Controls engine ignition.
- Run Time Display: Shows accumulated operating hours.
- Voltage Switch (120V/240V): Selects output voltage.
- Oil/Aceite (Low Oil Indicator): Illuminates when engine oil is low.
- AC 120V 20A Outlets (NEMA 5-20R): Four standard 120V outlets.
- AC 120V/240V 30A Outlet (NEMA L14-30R): One twist-lock outlet for higher power demands.
- Ground Terminal: For connecting an external ground wire.
4.2 Engine Assembly

Figure 4.3: View of the engine assembly, including the recoil starter.
- Recoil Starter: Used for manual engine starting.
- Fuel Tank: Holds up to 4 gallons of gasoline.
- Air Filter: Protects the engine from dust and debris.
- Oil Fill Cap/Dipstick: For adding and checking engine oil.
- Muffler: Reduces engine noise and directs exhaust.
5. Setup
Before first use, the generator requires some assembly and preparation.
5.1 Wheel and Handle Assembly
- Attach the wheels to the axle using the provided hardware.
- Secure the handle to the generator frame.
5.2 Adding Engine Oil
The engine is shipped without oil. Failure to add oil will prevent the engine from starting due to the low oil shutdown feature.
- Place the generator on a level surface.
- Remove the oil fill cap/dipstick.
- Using the provided funnel, slowly add SAE 10W-30 engine oil until it reaches the upper mark on the dipstick. The engine requires approximately 0.6 quarts (0.57 liters) of oil.
- Replace the oil fill cap/dipstick securely.
5.3 Adding Fuel
Use only fresh, unleaded gasoline with an octane rating of 87 or higher.
- Ensure the generator engine is off and cool.
- Remove the fuel cap.
- Carefully pour gasoline into the fuel tank, avoiding overfilling. The tank capacity is 4 gallons.
- Replace the fuel cap and wipe up any spilled fuel immediately.
6. Operating Instructions
Follow these steps to safely start and operate your generator.
6.1 Pre-Start Checks
- Check engine oil level.
- Check fuel level.
- Ensure all electrical loads are disconnected from the generator outlets.
- Verify the generator is on a level, outdoor surface, away from combustible materials.
6.2 Starting the Engine
- Turn the engine switch to the ON position.
- Move the choke lever to the FULL CHOKE position (if engine is cold).
- Pull the recoil starter handle slowly until resistance is felt, then pull quickly and firmly.
- Once the engine starts, gradually move the choke lever to the RUN position.
- Allow the engine to warm up for a few minutes before connecting electrical loads.
6.3 Connecting Electrical Loads
- Ensure the generator is running smoothly.
- Select the desired voltage (120V or 240V) using the voltage switch on the control panel.
- Plug in your appliances or extension cords. Do not overload the generator.
6.4 Stopping the Engine
- Disconnect all electrical loads from the generator outlets.
- Allow the engine to run for a few minutes without load to cool down.
- Turn the engine switch to the OFF position.
7. Maintenance
Regular maintenance is crucial for the longevity and reliable operation of your generator.
| Service Item | Every Use | Every 25 Hrs / Monthly | Every 100 Hrs / Annually |
|---|---|---|---|
| Check Engine Oil Level | ✓ | ||
| Change Engine Oil | ✓ (First 25 hrs) | ✓ | |
| Clean Air Filter | ✓ | ||
| Inspect Spark Plug | ✓ | ||
| Inspect Fuel Filter | ✓ |
7.1 Storage
For extended storage, prepare your generator as follows:
- Drain the fuel tank and carburetor, or add a fuel stabilizer.
- Change the engine oil.
- Remove the spark plug and pour a small amount of engine oil into the cylinder. Pull the recoil starter a few times to distribute the oil, then reinstall the spark plug.
- Clean the exterior of the generator.
- Store in a clean, dry, well-ventilated area.
8. Troubleshooting
Refer to this section for common issues and their solutions.
| Problem | Possible Cause | Solution |
|---|---|---|
| Engine will not start | No fuel Low oil level Engine switch OFF Choke not set correctly Spark plug issue | Add fresh fuel Add engine oil Turn engine switch ON Adjust choke lever Inspect/clean/replace spark plug |
| Generator produces no power | Circuit breaker tripped Overload Voltage switch incorrect | Reset circuit breaker Reduce connected load Set voltage switch to desired output (120V/240V) |
| Engine runs rough | Stale fuel Dirty air filter Spark plug issue | Drain and refill with fresh fuel Clean/replace air filter Inspect/clean/replace spark plug |
9. Specifications
Detailed technical specifications for the A-iPower SUA4500 generator.

Figure 9.1: Dimensions of the A-iPower SUA4500 generator.
- Model: SUA4500
- Brand: A-iPower
- Starting Wattage: 4500 Watts
- Running Wattage: 3500 Watts
- Engine Type: 223 cc OHV 4-Stroke
- Fuel Type: Unleaded Gasoline
- Fuel Tank Capacity: 4 Gallons
- Run Time (at 50% load): Approximately 11 hours
- Voltage: 120V / 240V
- Outlets: 4 x 120V 20A (NEMA 5-20R), 1 x 120V/240V 30A (NEMA L14-30R)
- Ignition System: Recoil Start
- Special Features: Automatic Idle Control, Automatic Voltage Regulation, Low Oil Shutdown, Overload Protection
- Product Dimensions (L x W x H): 23.4" x 23" x 21.3"
- Item Weight: 111 Pounds
10. Warranty and Support
The A-iPower SUA4500 generator comes with a 2-year manufacturer's warranty. For warranty claims, technical assistance, or to order replacement parts, please contact A-iPower customer support. Keep your purchase receipt as proof of purchase.
For further assistance, please refer to the contact information provided with your product documentation or visit the official A-iPower website.