
Fluke Fluke 925
Fluke 925 Anemometer Wind Speed Air Flow Velocity Temperature Meter User Manual
Model: Fluke 925
1. Introduction
The Fluke 925 Anemometer is a precision instrument designed for accurate measurement of wind speed, air flow, and temperature. This device is ideal for professionals in HVAC, environmental monitoring, and other fields requiring reliable air velocity and temperature data. Its robust design and intuitive interface ensure ease of use and consistent performance.
2. Safety Information
Please read and understand all safety information before operating the Fluke 925 Anemometer. Failure to follow these instructions may result in injury or damage to the device.
- Do not operate the device in environments with explosive gas, vapor, or dust.
- Ensure the battery compartment is securely closed before use.
- Avoid exposing the device to extreme temperatures, high humidity, or direct sunlight for prolonged periods.
- Do not attempt to disassemble or modify the device. Refer all servicing to qualified personnel.
- Keep the device away from strong electromagnetic fields.
- Dispose of batteries according to local regulations.
3. Package Contents
Upon opening the package, verify that all items listed below are present and in good condition:
- Fluke 925 Anemometer Unit
- Remote Vane Probe
- Carrying Case
- 9V Battery (may be pre-installed or included separately)
- User Manual (this document)

Figure 3.1: The Fluke 925 Anemometer, its remote vane probe, and the user manual neatly organized within its protective carrying case. This image illustrates the complete set of components typically included with the product, ready for transport and storage.
4. Product Features and Components
The Fluke 925 Anemometer consists of a main display unit and a remote vane probe connected via a coiled cable.
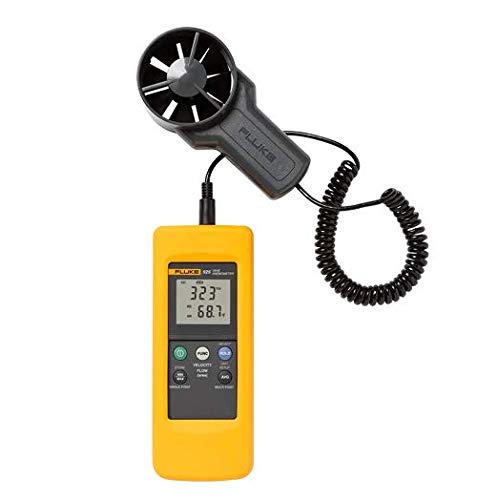
Figure 4.1: The Fluke 925 Anemometer main unit connected to its remote vane probe. The main unit features a digital display and control buttons, while the probe contains the rotating vane for air velocity measurement and a temperature sensor. The coiled cable allows for flexible positioning of the probe.
4.1 Main Unit
- LCD Display: Shows measurement readings, units, and various indicators.
- Power Button: Turns the device on/off.
- Unit Button: Cycles through measurement units (e.g., m/s, ft/m, °C, °F).
- HOLD/MIN/MAX Button: Freezes the current reading, displays minimum, or maximum values.
- AVG Button: Calculates and displays the average reading.
- FLOW/AREA Button: Used for air flow measurements and setting area.
- Battery Compartment: Located at the rear, holds one 9V battery.
4.2 Remote Vane Probe
- Vane: Rotates with air movement to measure velocity.
- Temperature Sensor: Integrated within the probe for ambient temperature measurement.
- Coiled Cable: Connects the probe to the main unit.
5. Setup
5.1 Battery Installation
- Locate the battery compartment cover on the back of the main unit.
- Slide or unclip the cover to open.
- Insert one 9V battery, observing the correct polarity (+/-).
- Replace the battery compartment cover and ensure it is securely latched.
5.2 Connecting the Probe
Plug the coiled cable connector from the remote vane probe into the corresponding port on the top of the main unit. Ensure a firm connection.
6. Operating Instructions
6.1 Power On/Off
Press the POWER button to turn the device on. Press and hold the POWER button for approximately 2 seconds to turn it off.
6.2 Wind Speed Measurement
- Turn on the anemometer.
- Ensure the display shows wind speed units (e.g., m/s, ft/m). If not, press the UNIT button to cycle through available units until the desired wind speed unit is displayed.
- Position the remote vane probe in the airflow, ensuring the vane rotates freely and is facing the direction of the flow.
- Read the wind speed value directly from the LCD display.
6.3 Air Flow Measurement (Volume)
To measure air flow (volume), you must first input the area of the duct or opening.
- Turn on the anemometer.
- Press the FLOW/AREA button. The display will show "AREA" and a numerical value.
- Use the arrow buttons (if available, or refer to specific model instructions for area input) to adjust the area value. The unit for area is typically m² or ft².
- Once the area is set, press FLOW/AREA again to switch to air flow measurement mode (e.g., m³/s, ft³/m).
- Position the remote vane probe in the airflow. The display will show the calculated air flow volume.
6.4 Temperature Measurement
The Fluke 925 measures temperature simultaneously with air velocity.
- The temperature reading is typically displayed on the lower part of the LCD screen.
- Press the UNIT button to toggle between Celsius (°C) and Fahrenheit (°F) if desired.
6.5 Data Hold, Minimum, and Maximum
- HOLD: Briefly press the HOLD/MIN/MAX button to freeze the current reading on the display. Press again to release.
- MIN/MAX: Press and hold the HOLD/MIN/MAX button to cycle through minimum (MIN) and maximum (MAX) recorded values since the device was powered on or the function was reset.
6.6 Average Reading
Press the AVG button to display the average reading over a period of time. Refer to the on-screen indicators for the averaging mode. Press again to exit averaging mode.
7. Maintenance
7.1 Cleaning
- Wipe the main unit and probe with a soft, damp cloth. Do not use abrasive cleaners or solvents.
- Ensure the vane on the probe is free from dust and debris to maintain accuracy. Use a soft brush or compressed air if necessary, being careful not to damage the vane.
7.2 Battery Replacement
When the low battery indicator appears on the display, replace the 9V battery as described in Section 5.1. Remove the battery if the device will not be used for an extended period to prevent leakage.
7.3 Storage
Store the anemometer in its carrying case in a cool, dry place, away from direct sunlight and extreme temperatures.
8. Troubleshooting
| Problem | Possible Cause | Solution |
|---|---|---|
| Device does not power on. | Dead or incorrectly installed battery. | Replace the 9V battery, ensuring correct polarity. |
| Inaccurate readings. | Dirty vane, obstructed airflow, or damaged probe. | Clean the vane. Ensure clear airflow. Inspect probe for damage; if damaged, contact support. |
| Display shows "OL" or "---". | Measurement range exceeded or no signal. | Ensure the probe is correctly connected and within the measurement range. |
| No temperature reading. | Probe not connected or damaged. | Check probe connection. If problem persists, the probe may be faulty. |
9. Specifications
| Parameter | Range | Resolution | Accuracy |
|---|---|---|---|
| Wind Speed (m/s) | 0.40 to 25.00 m/s | 0.01 m/s | ±2 % of full scale |
| Wind Speed (ft/m) | 80 to 4900 ft/m | 1 ft/m | ±2 % of full scale |
| Air Flow (CMS) | 0.01 to 99.99 m³/s | 0.01 m³/s | (Calculated from speed & area) |
| Air Flow (CFM) | 1 to 9999 ft³/m | 1 ft³/m | (Calculated from speed & area) |
| Wind Temperature (°C) | 0 °C to 50 °C | 0.1 °C | ±0.8 °C |
General Specifications:
- Model Number: Fluke 925
- Power Supply: 1 x 9V Battery
- Product Dimensions: 14.02 x 10 x 4.02 inches (main unit and probe combined, approximate)
- Item Weight: 10.58 ounces (approx. 300 Grams)
- Material: Plastic
- UPC: 520361366961
10. Warranty and Support
Fluke products are known for their quality and reliability. For specific warranty terms and conditions, please refer to the warranty card included with your purchase or visit the official Fluke website. Keep your purchase receipt as proof of purchase for warranty claims.
For technical support, service, or calibration, please contact Fluke customer service directly. Contact information can typically be found on the Fluke website or in the documentation provided with your product.
Note: This manual provides general guidance. Specific features and operations may vary slightly. Always refer to the latest official documentation from Fluke for the most accurate and up-to-date information.
Related documentsFluke 925


Ask a question about this manual
Ask about setup, troubleshooting, compatibility, parts, safety, or missing instructions. Manuals+ will review the question and use this page’s manual context to help answer it.