
1. Introduction
This manual provides essential information for the safe and efficient operation of your InFocus IN2126a WXGA Network Projector. Please read this manual thoroughly before using the projector and retain it for future reference. The InFocus IN2126a is designed for versatile use in various environments, offering high brightness and network capabilities.
2. Safety Information
Observe the following safety precautions to prevent damage to the projector and ensure user safety:
- Do not block ventilation openings. Ensure adequate airflow around the projector.
- Do not look directly into the projector lens when the lamp is on. The bright light can cause eye damage.
- Avoid placing the projector in direct sunlight, near heat sources, or in environments with high humidity or excessive dust.
- Use only the power cord supplied with the projector.
- Refer all servicing to qualified service personnel. Do not attempt to open or repair the projector yourself.
3. Product Overview
Familiarize yourself with the components and features of your InFocus IN2126a projector.
3.1 Projector Components
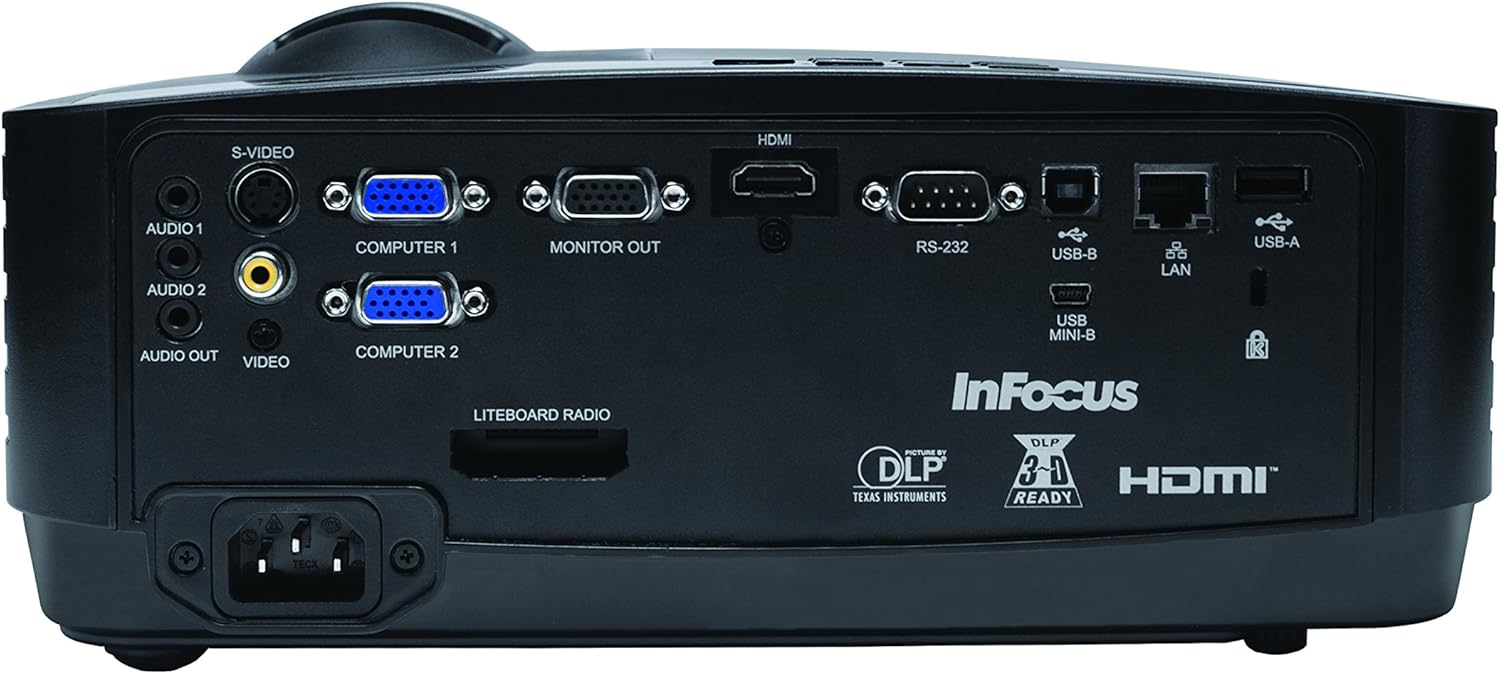
Figure 1: Front-side view of the InFocus IN2126a projector, showing the lens and ventilation.

Figure 2: Side view of the InFocus IN2126a projector, highlighting the ventilation grilles.
3.2 Rear Panel Connections
The rear panel provides various input and output ports for connecting external devices.
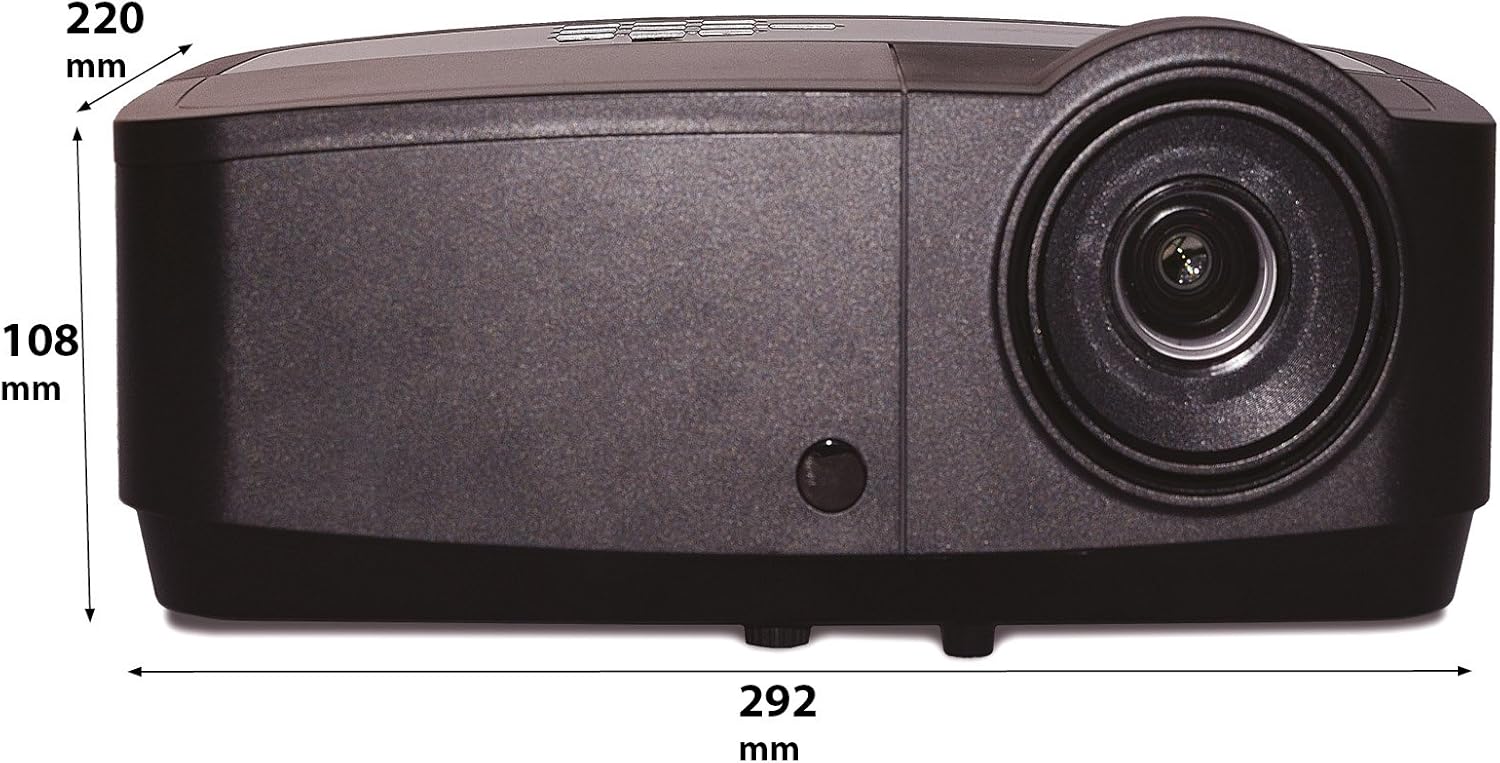
Figure 3: Rear panel of the InFocus IN2126a projector, displaying various connectivity ports including HDMI, VGA, USB, and LAN.
- HDMI: For digital video and audio input.
- COMPUTER 1 / COMPUTER 2 (VGA): For analog video input from computers.
- MONITOR OUT (VGA): For connecting an external monitor.
- USB-B / USB Mini-B: For service or specific USB functions.
- USB-A: For connecting USB devices, such as a wireless adapter.
- LAN (RJ45): For network connectivity.
- RS-232: For serial control.
- AUDIO 1 / AUDIO 2 (RCA): For audio input.
- AUDIO OUT: For connecting external audio systems.
- VIDEO (RCA): For composite video input.
- S-VIDEO: For S-Video input.
- Power Inlet: For connecting the power cord.
3.3 Top Panel Controls
The top panel features controls for basic projector functions and image adjustments.

Figure 4: Top panel of the InFocus IN2126a projector, showing the control buttons and focus/zoom rings.
- Power Button: Turns the projector on or off.
- Menu/Exit Button: Accesses or exits the on-screen display (OSD) menu.
- Navigation Buttons (Up, Down, Left, Right): Navigates through menu options.
- Enter Button: Confirms selections in the menu.
- Source Button: Selects input sources.
- Blank Button: Temporarily blanks the screen.
- Auto Button: Automatically adjusts image settings.
- Focus Ring: Adjusts image sharpness.
- Zoom Ring: Adjusts image size.
3.4 Dimensions
Understanding the physical dimensions is important for installation and placement.

Figure 5: Diagram illustrating the dimensions of the InFocus IN2126a projector (292mm length, 220mm width, 108mm height).
4. Setup
4.1 Projector Placement
Place the projector on a stable, flat surface or mount it securely. Ensure the projector is positioned at an appropriate distance from the screen to achieve the desired image size. Maintain sufficient space around the projector for proper ventilation.
4.2 Connecting Devices
- Power Connection: Connect the power cord to the projector's power inlet and then to a grounded electrical outlet.
- Video Source:
- For digital sources (e.g., Blu-ray player, laptop), use an HDMI cable to connect to the HDMI port.
- For analog computer sources, use a VGA cable to connect to the COMPUTER 1 or COMPUTER 2 port.
- For other video sources, use the appropriate S-VIDEO or VIDEO (RCA) connections.
- Audio Source: If your video source does not transmit audio via HDMI, connect audio cables to the AUDIO 1 or AUDIO 2 ports.
- Network Connection: For wired network access, connect an Ethernet cable to the LAN port.
- Wireless Connectivity: If using a compatible wireless adapter (sold separately), insert it into the USB-A port.
4.3 Powering On/Off
- To Power On: Press the Power button on the projector's top panel or the remote control. The power indicator light will illuminate.
- To Power Off: Press the Power button again. The projector will enter a cooling cycle before shutting down completely. Do not unplug the projector during the cooling cycle.
5. Operating the Projector
5.1 Source Selection
After powering on, the projector may automatically detect an active input source. If not, or to switch sources:
- Press the Source button on the projector or remote control.
- Use the navigation buttons to highlight the desired input source (e.g., HDMI, Computer 1, Video).
- Press Enter to select the source.
5.2 Image Adjustment
- Focus: Rotate the Focus ring on the projector lens until the image appears sharp and clear.
- Zoom: Rotate the Zoom ring on the projector lens to adjust the image size to fit your screen.
- Keystone Correction: If the image appears trapezoidal, use the keystone correction feature in the OSD menu to square the image.
5.3 On-Screen Display (OSD) Menu
The OSD menu allows you to configure various projector settings.
- Press the Menu button to open the OSD menu.
- Use the Up/Down navigation buttons to select a menu category.
- Use the Left/Right navigation buttons to adjust settings or enter sub-menus.
- Press Enter to confirm changes.
- Press Exit to close the OSD menu.
5.4 Wireless Connectivity
The IN2126a is wireless-ready. To enable wireless display, a compatible InFocus wireless adapter (sold separately) must be connected to the USB-A port. Refer to the wireless adapter's specific instructions for setup and connection procedures.
5.5 3D Functionality
The projector supports 3D content. To view 3D content, you will need a compatible 3D source, 3D glasses, and appropriate 3D content. Refer to the projector's OSD menu for 3D settings and ensure your source device is configured for 3D output.
6. Maintenance
Regular maintenance ensures optimal performance and extends the life of your projector.
6.1 Lamp Replacement
The projector lamp has a limited lifespan (approximately 4000 hours). When the lamp indicator illuminates or the image brightness significantly decreases, the lamp needs replacement. Always use an authorized InFocus replacement lamp. Refer to the full service manual for detailed lamp replacement instructions or contact customer support.
6.2 Filter Cleaning
Dust accumulation on the air filter can impede airflow and cause overheating. Regularly clean the air filter to maintain proper ventilation. Turn off and unplug the projector before cleaning. Use a soft brush or vacuum cleaner to remove dust from the filter cover.
6.3 General Cleaning
- Projector Casing: Use a soft, lint-free cloth dampened with a mild, non-abrasive cleaner. Do not use harsh chemicals.
- Lens: Use a lens cleaning cloth and specialized lens cleaning solution. Avoid touching the lens surface with your fingers.
7. Troubleshooting
If you encounter issues with your projector, refer to the following common problems and solutions:
| Problem | Possible Cause | Solution |
|---|---|---|
| No image on screen | Incorrect input source selected; Loose cable connection; Projector in standby mode. | Verify input source; Check all cable connections; Press power button to wake from standby. |
| Image is blurry | Focus not adjusted; Projector too close/far from screen. | Adjust the focus ring; Reposition the projector and adjust zoom. |
| Image is trapezoidal | Projector not perpendicular to screen. | Use keystone correction in the OSD menu. |
| No audio | Audio cables not connected; Volume too low; Muted. | Check audio cable connections; Adjust volume; Unmute projector. |
| Projector overheats and shuts down | Blocked ventilation; Dirty air filter. | Ensure clear airflow around projector; Clean the air filter. |
For more detailed troubleshooting, consult the complete user manual or contact InFocus customer support.
8. Specifications
Key technical specifications for the InFocus IN2126a WXGA Network Projector:
- Model Name: IN2126a
- Display Type: DLP
- Native Resolution: 1280 x 800 (WXGA)
- Brightness: 3500 Lumens
- Contrast Ratio: 15000:1
- Color Reproduction: 1.07 Billion Colors (30-bit)
- Light Source Operating Life: 4000 Hours
- Connectivity Technology: Wireless-ready, HDMI 1.4, VGA (x2), USB (Type-A, Mini-B, Type-B), LAN (RJ45), RS-232, Audio In (x2), Audio Out, Video (RCA), S-Video
- Special Features: 3D-Ready, Network Projector
- Form Factor: Portable
- Mounting Type: Tabletop Mount
- Item Weight: 7.1 Pounds
9. Warranty and Support
For information regarding your product's warranty, please refer to the warranty card included with your purchase or visit the official InFocus website. For technical support, service, or to purchase accessories, please contact InFocus customer service through their official channels.


