
NETGEAR EX6200-100NAS
Contents
NETGEAR WiFi AC1200 Range Extender (EX6200) User Manual
Model: EX6200-100NAS
1. Product Overview
The NETGEAR AC1200 High Power Dual Band Wi-Fi Range Extender (EX6200) is designed to extend the range of your existing Wi-Fi network, eliminating dead zones and providing reliable connectivity throughout your home or office. It features high-power amplifiers and high-gain antennas to maximize Wi-Fi coverage and includes Gigabit Ethernet ports for wired device connections.

Figure 1: Front view of the NETGEAR EX6200 WiFi Range Extender in its vertical stand configuration. The device is black with red accents and features status indicator lights on the front panel.
2. Package Contents
Verify that all items are present in your product package:
- NETGEAR AC1200 Dual-Band Wireless-AC Range Extender (EX6200)
- Power Adapter
- Stand (for vertical placement)
- Two (2) 5dBi Dual-Band Antennas
- Owner's Manual (this document)
3. Physical Features and Components
Familiarize yourself with the various ports, buttons, and indicators on your EX6200 extender.
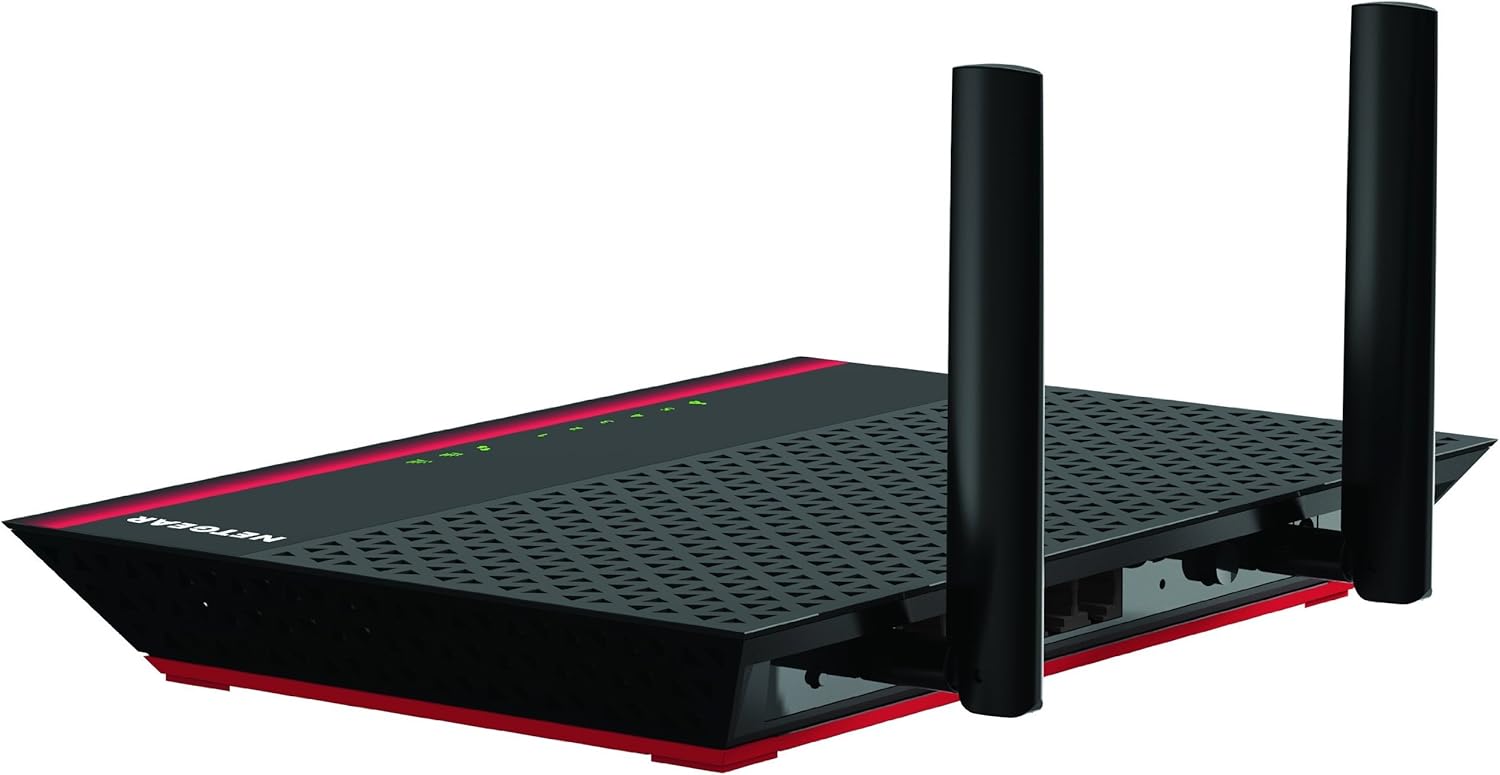
Figure 2: Top-down view of the EX6200, highlighting the five Gigabit Ethernet ports and the two external antennas. This view also shows the power input and power button.
- A. Antennas: Two detachable 5dBi dual-band antennas for enhanced Wi-Fi signal transmission and reception.
- B. Gigabit Ethernet Ports (5): Connect wired devices such as smart TVs, gaming consoles, desktop computers, or network-attached storage (NAS) for high-speed wired connectivity.
- C. USB 3.0 Port: Located on the side of the device, this port can be used for ReadySHARE USB storage access.
- D. Power Button: Turns the extender on or off.
- E. Power Input: Connects to the provided power adapter.
- F. LED Indicators: Front-panel lights indicate power status, Wi-Fi signal strength, and Ethernet port activity.
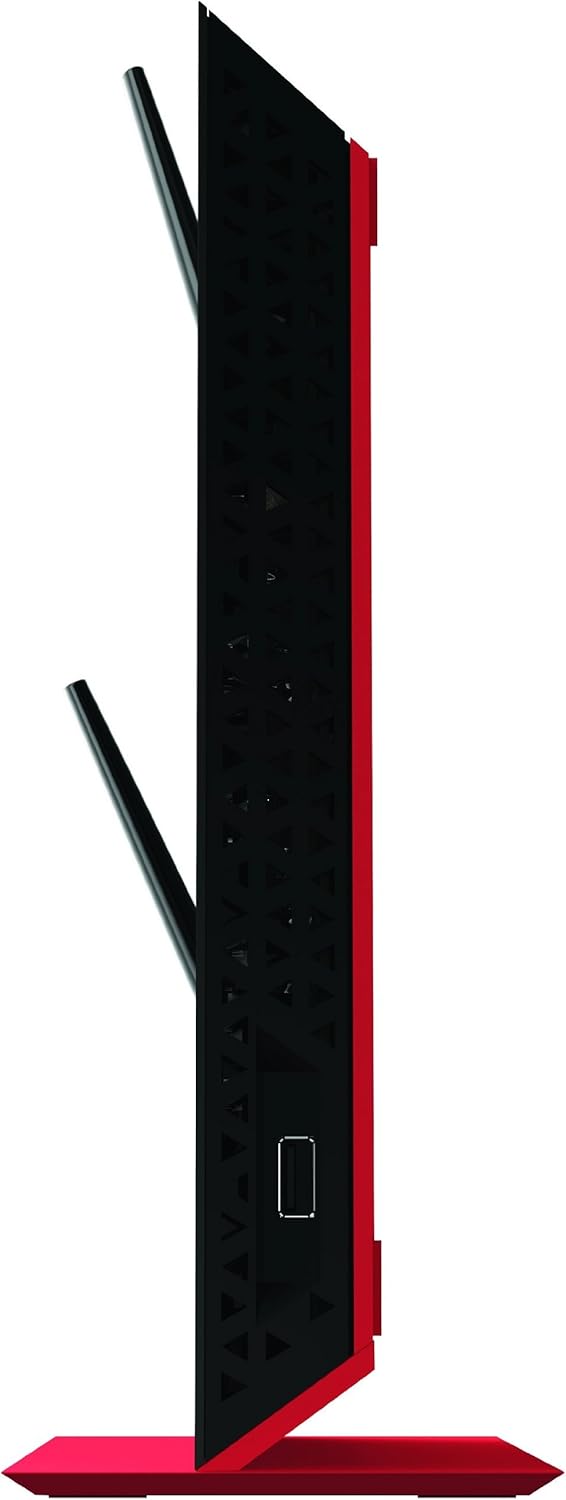
Figure 3: Side view of the EX6200, illustrating the placement of the USB 3.0 port.
4. Setup and Installation
The EX6200 can be set up using either the WPS (Wi-Fi Protected Setup) method or through a web browser.
4.1. WPS Setup (Recommended for quick setup)
- Power On: Plug the extender into an electrical outlet. Wait for the Power LED to turn solid green.
- Positioning: Place the extender approximately halfway between your Wi-Fi router and the area with a weak Wi-Fi signal. Ensure it is within range of your router's Wi-Fi signal.
- Activate WPS on Extender: Press the WPS button on the side of your EX6200 extender. The WPS LED will blink.
- Activate WPS on Router: Within two minutes, press the WPS button on your Wi-Fi router.
- Connect: The Extender LED will turn solid green when a successful connection is established. Your extender is now extending your Wi-Fi network.
Note: If your router does not have a WPS button, or if WPS setup fails, proceed with the web browser setup method.
4.2. Web Browser Setup
- Connect to Extender:
- Wireless: On a computer or mobile device, connect to the extender's default Wi-Fi network (e.g., "NETGEAR_EXT" or "NETGEAR_EXT_5G").
- Wired: Connect an Ethernet cable from your computer to one of the Gigabit Ethernet ports on the extender.
- Access Setup Page: Open a web browser and type www.mywifiext.net or 192.168.1.250 into the address bar.
- Follow Prompts: The NETGEAR Genie setup wizard will appear. Follow the on-screen instructions to select your existing Wi-Fi network(s) and enter the network password(s).
- Apply Settings: Once configured, the extender will restart. The Extender LED will turn solid green, indicating a successful connection to your router.
5. Operating Modes and Features
The EX6200 offers flexible operating modes to suit your networking needs.
5.1. Wi-Fi Range Extender Mode
In this mode, the EX6200 extends the coverage of your existing Wi-Fi network. It receives the Wi-Fi signal from your router and re-broadcasts it, creating a larger Wi-Fi coverage area. This is the primary function of the device.

Figure 4: Illustrates how the EX6200 extends the Wi-Fi signal from a main router to cover a larger area within a home, reaching previously weak signal zones.
5.2. Access Point (AP) Mode
The EX6200 can also function as a Wi-Fi access point. When connected to your router via an Ethernet cable, it can create a new Wi-Fi network, converting a wired connection into a wireless one. This is useful for adding Wi-Fi capability to a wired-only network or creating a separate Wi-Fi network.
5.3. FastLane Technology
FastLane Technology allows the extender to utilize both the 2.4 GHz and 5 GHz Wi-Fi bands to establish a single, super high-speed connection. This is ideal for demanding applications such as HD video streaming and online gaming, as it optimizes bandwidth usage between the extender and your router, and between the extender and your devices.

Figure 5: Depicts the rear of the EX6200, emphasizing its five Gigabit Ethernet ports, which allow for high-speed wired connections to various devices.
6. Maintenance and Care
To ensure optimal performance and longevity of your NETGEAR EX6200 extender:
- Placement: Position the extender in a well-ventilated area, away from direct sunlight, heat sources, and obstructions that could block Wi-Fi signals.
- Cleaning: Use a soft, dry cloth to clean the exterior of the device. Do not use liquid cleaners or aerosols.
- Firmware Updates: Periodically check for and install firmware updates from the NETGEAR support website. Firmware updates can improve performance, add new features, and address security vulnerabilities. You can typically access firmware update options through the web browser interface (www.mywifiext.net).
- Power Cycle: If you experience connectivity issues, try power cycling the extender by unplugging it from the power outlet for 10 seconds and then plugging it back in.
7. Troubleshooting
This section addresses common issues you might encounter with your EX6200 extender.
7.1. No Internet Connection After Setup
- Check Router Connection: Ensure your main Wi-Fi router is working correctly and has an active internet connection.
- Extender Placement: The extender might be too far from your router. Relocate it closer to the router, ensuring the Extender LED is solid green.
- Re-run Setup: Access www.mywifiext.net and re-run the setup wizard to ensure the correct Wi-Fi network and password were entered.
- IP Address Conflict: In rare cases, an IP address conflict might occur. Try restarting both your router and the extender.
7.2. Weak Signal from Extender
- Optimal Placement: The extender should be placed roughly halfway between your router and the area needing coverage. Avoid placing it behind large metal objects, thick walls, or near interference sources (e.g., microwaves, cordless phones).
- Antenna Orientation: Adjust the position of the external antennas for better signal reception.
- Interference: Other electronic devices can cause interference. Try moving the extender or other devices.
7.3. Cannot Access www.mywifiext.net
- Direct Connection: Ensure your device is connected directly to the extender's Wi-Fi network (e.g., "NETGEAR_EXT") or via an Ethernet cable to the extender.
- Browser Cache: Clear your web browser's cache and cookies, or try a different browser.
- IP Address: Try accessing the setup page using the IP address 192.168.1.250 instead of the domain name.
- Firewall/Antivirus: Temporarily disable any firewall or antivirus software on your computer that might be blocking access.
7.4. Forgotten Admin Password
If you forget your extender's administration password, you will need to perform a factory reset. Locate the Reset button (usually a small pinhole) on the extender, press and hold it for about 7-10 seconds using a paperclip until the Power LED blinks. This will restore the extender to its factory default settings, and you will need to reconfigure it.
8. Technical Specifications
| Feature | Specification |
|---|---|
| Model Number | EX6200-100NAS |
| Wireless Technology | 802.11ac, 802.11n, 802.11g, 802.11b |
| Wi-Fi Performance | AC1200 (300 Mbps 2.4GHz + 900 Mbps 5GHz) |
| Wi-Fi Band | Dual Band (2.4 GHz & 5 GHz) |
| Ethernet Ports | 5 x 10/100/1000 Mbps Gigabit Ethernet ports |
| USB Port | 1 x USB 3.0 port (for ReadySHARE USB storage) |
| Antennas | 2 x External 5dBi Dual-Band Antennas |
| Processor | Dual Core Processor |
| Amplifiers | 700 mW high-power amplifiers |
| Dimensions (LxWxH) | 12.01 x 10.12 x 3.19 inches |
| Weight | 2.29 pounds |
| Voltage | 100-240 Volts |
| Security | WPA/WPA2-PSK and WEP |
9. Warranty and Support
For warranty information and technical support, please refer to the official NETGEAR support resources.
- Online Support: Visit the NETGEAR support website for FAQs, troubleshooting guides, and software downloads.
- Product Registration: Register your product to receive the latest updates and support.
- Contact Support: Information on how to contact NETGEAR technical support can be found on their official website.
Note: As per legal disclaimer, FOB Shipping buyer accepts terms of agreements; no returns. This does not affect your manufacturer's warranty.
Ask a question about this manual
Ask about setup, troubleshooting, compatibility, parts, safety, or missing instructions. Manuals+ will review the question and use this page’s manual context to help answer it.