
1. Introduction
This manual provides detailed instructions for the installation, operation, and maintenance of your Sagemcom DSI83 HD tivùsat satellite receiver. Please read this manual thoroughly before using the device to ensure proper setup and functionality. The Sagemcom DSI83 HD is a high-definition satellite receiver designed to access tivùsat satellite platform channels and other free-to-air satellite broadcasts.
2. Product Overview
The Sagemcom DSI83 HD receiver is a compact and versatile device. Familiarize yourself with its components before proceeding with installation.
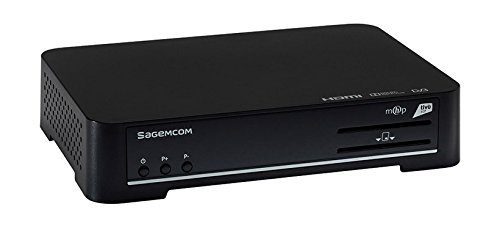
Figure 1: Sagemcom DSI83 HD Front Panel. This image displays the front panel of the Sagemcom DSI83 HD tivùsat receiver. Visible features include the Sagemcom logo, power button, channel up/down buttons, and slots for smart cards.
Front Panel Features:
- Power Button: To switch the receiver on or off (standby).
- Channel Up/Down Buttons: To navigate through channels.
- Smart Card Slot: For inserting the tivùsat smart card.
Rear Panel Features (Typical):
- LNB IN: Connection for the satellite dish cable.
- HDMI Output: Connects to your television for high-definition video and audio.
- Ethernet Port: For network connection and advanced features.
- Power Input: Connects to the power adapter.
- USB Port (if present): For potential software updates or external storage.
3. Setup
3.1 Unpacking
Carefully remove all components from the packaging. Ensure the following items are present:
- Sagemcom DSI83 HD Receiver
- Remote Control
- Power Adapter
- tivùsat Smart Card
- User Manual (this document)
3.2 Connecting to Your Television
- Ensure both your television and the receiver are powered off.
- Connect one end of an HDMI cable (not included) to the HDMI output port on the rear of the DSI83 HD receiver.
- Connect the other end of the HDMI cable to an available HDMI input port on your television. Note the HDMI input number (e.g., HDMI 1, HDMI 2).
3.3 Connecting to the Satellite Dish
- Connect the coaxial cable from your satellite dish (LNB) to the 'LNB IN' port on the rear of the DSI83 HD receiver.
- The DSI83 HD supports single cable distribution systems for simplified installation.
3.4 Inserting the tivùsat Smart Card
- Locate the smart card slot on the front panel of the receiver.
- Insert the tivùsat smart card with the chip facing downwards and towards the receiver, until it clicks into place.
- Follow the activation instructions provided with your tivùsat smart card.
3.5 Power Connection
- Connect the power adapter to the 'Power Input' port on the receiver.
- Plug the power adapter into a suitable electrical outlet.
3.6 Initial Setup Wizard
- Turn on your television and select the correct HDMI input source.
- Press the power button on the receiver or remote control to turn it on.
- The receiver will display an initial setup wizard. Follow the on-screen prompts to:
- Select your preferred language.
- Configure satellite settings (if prompted).
- Perform an automatic channel scan. The receiver features automatic channel sorting (LCN) for tivùsat channels.
4. Operating Instructions
4.1 Basic Functions
- Power On/Off: Press the POWER button on the remote control.
- Channel Selection: Use the CH+/CH- buttons to change channels sequentially, or enter the channel number directly using the numeric keypad.
- Volume Control: Use the VOL+/VOL- buttons to adjust the volume.
- Mute: Press the MUTE button to temporarily silence the audio.
4.2 Electronic Program Guide (EPG)
Press the EPG button on your remote control to access the Electronic Program Guide. This feature displays program schedules for current and upcoming broadcasts, allowing you to plan your viewing.
4.3 Channel Management
- Favorite Channels: You can create a list of your favorite channels for quick access. Refer to the on-screen menu for instructions on adding and managing favorite channels.
- Manual Channel Search: If needed, you can perform a manual channel search through the receiver's menu.
4.4 Parental Control
The receiver includes a parental control feature to restrict access to certain channels or programs. This function is typically protected by a PIN code. Access the parental control settings via the main menu to set up and manage restrictions.
4.5 Software Updates (OTA)
The Sagemcom DSI83 HD supports Over-The-Air (OTA) software updates. The receiver can automatically detect and install new software versions to improve performance and add new features. Ensure your receiver is connected to the satellite signal for OTA updates.
4.6 Ethernet Connection
Connect an Ethernet cable to the receiver's Ethernet port and your home network for access to interactive services and additional functionalities, as supported by the tivùsat platform.
5. Maintenance
5.1 Cleaning
To clean the receiver, disconnect it from the power supply. Use a soft, dry cloth to wipe the exterior surfaces. Do not use liquid cleaners, abrasive materials, or solvents, as these can damage the finish or internal components.
5.2 Storage
If storing the receiver for an extended period, ensure it is disconnected from power and all cables. Store it in a cool, dry place, away from direct sunlight and extreme temperatures.
6. Troubleshooting
If you encounter issues with your Sagemcom DSI83 HD receiver, refer to the following common troubleshooting steps:
- No Power: Check if the power adapter is securely connected to both the receiver and the electrical outlet. Ensure the outlet is functional.
- No Picture/Sound:
- Verify that your TV is set to the correct HDMI input source.
- Check the HDMI cable connection between the receiver and the TV.
- Ensure the receiver is powered on and not in standby mode.
- No Satellite Signal:
- Check the satellite cable connection to the 'LNB IN' port.
- Ensure your satellite dish is correctly aligned. Severe weather can sometimes affect signal reception.
- 'Coded Signal' Message:
- Verify that the tivùsat smart card is correctly inserted into the slot.
- Ensure your smart card is activated and valid.
- Some channels may require specific subscriptions or may not be part of the tivùsat package.
- Remote Control Not Working:
- Replace the batteries in the remote control.
- Ensure there are no obstructions between the remote control and the receiver's front panel.
If the problem persists after attempting these steps, please contact Sagemcom customer support for further assistance.
7. Specifications
| Model Number | DSI83HD |
| Dimensions (WxHxD) | 216 mm x 40 mm x 150 mm |
| Weight | Approximately 2.2 lbs (1 kg) |
| Satellite Tuner | DVB-S2 / DVB-S |
| Video Decoding | MPEG2 MP@HL (50Hz, max 15 Mbit/s), MPEG4 AVC HP@L4 (HD, 50Hz, max 20 Mbit/s), MPEG-4 AVC HP@L3 (SD, max 10 Mbit/s) |
| Audio Decoding | MPEG-1 Layer I & II, MPEG2 Layer II, DOLBY DIGITAL (passthrough/downmixed), DOLBY DIGITAL PLUS (passthrough/transcoded/downmixed) |
| Video Definition | HD (High Definition) |
| Connectivity | 1x HDMI, Ethernet |
| Control Method | Remote Control |
| Features | Interactive Decoder (MHP), Radio Reception, Software Update (OTA), Automatic Channel Sorting (LCN), Automatic/Manual Channel Search, Timer, Parental Control, EPG, Favorite Channel List, Teletext/Subtitles, PIN Code, LNB/Motor Commands |
8. Warranty and Support
For information regarding the product warranty, please refer to the warranty card included with your purchase or visit the official Sagemcom website. For technical support, troubleshooting assistance beyond this manual, or service inquiries, please contact Sagemcom customer support through their official channels.

