Introduction
This manual provides essential instructions for the safe and efficient operation, maintenance, and care of your Quest 35200 Stainless Steel Cordless Electric Coffee Percolator. Please read all instructions carefully before first use and retain this manual for future reference.

Image: The Quest 35200 Stainless Steel Cordless Electric Coffee Percolator, featuring a polished stainless steel body, black handle, and a black base with a power button.
Important Safety Instructions
When using electrical appliances, basic safety precautions should always be followed to reduce the risk of fire, electric shock, and/or injury to persons, including the following:
- Read all instructions.
- Do not touch hot surfaces. Use handles or knobs.
- To protect against fire, electric shock, and injury to persons, do not immerse cord, plugs, or the percolator base in water or other liquid.
- Close supervision is necessary when any appliance is used by or near children.
- Unplug from outlet when not in use and before cleaning. Allow to cool before putting on or taking off parts, and before cleaning the appliance.
- Do not operate any appliance with a damaged cord or plug, or after the appliance malfunctions or has been damaged in any manner. Return appliance to the nearest authorized service facility for examination, repair, or adjustment.
- The use of accessory attachments not recommended by the appliance manufacturer may result in fire, electric shock, or injury to persons.
- Do not use outdoors.
- Do not let cord hang over edge of table or counter, or touch hot surfaces.
- Do not place on or near a hot gas or electric burner, or in a heated oven.
- Always attach plug to appliance first, then plug cord into the wall outlet. To disconnect, turn any control to “off,” then remove plug from wall outlet.
- Do not use appliance for other than intended use.
- Scalding may occur if the lid is removed during the brewing cycle.
- This appliance is for household use only.
Product Overview and Features
The Quest 35200 Electric Coffee Percolator is designed for convenient coffee brewing. Key features include:
- Cordless Design: Allows for easy pouring and serving.
- Stainless Steel Construction: Durable and easy to clean.
- Built-in Filter: Eliminates the need for disposable paper filters.
- 1.5 Liter Capacity: Brews multiple cups of coffee.
- 1100W Power: Ensures quick brewing.
- Keep Warm Functionality: Maintains coffee temperature for 30-45 minutes.
- Auto Shut-Off: Enhances safety and energy efficiency.
- 360° Detachable Base: For flexible placement and easy lifting.
- Power Indicator Light: Indicates operational status.
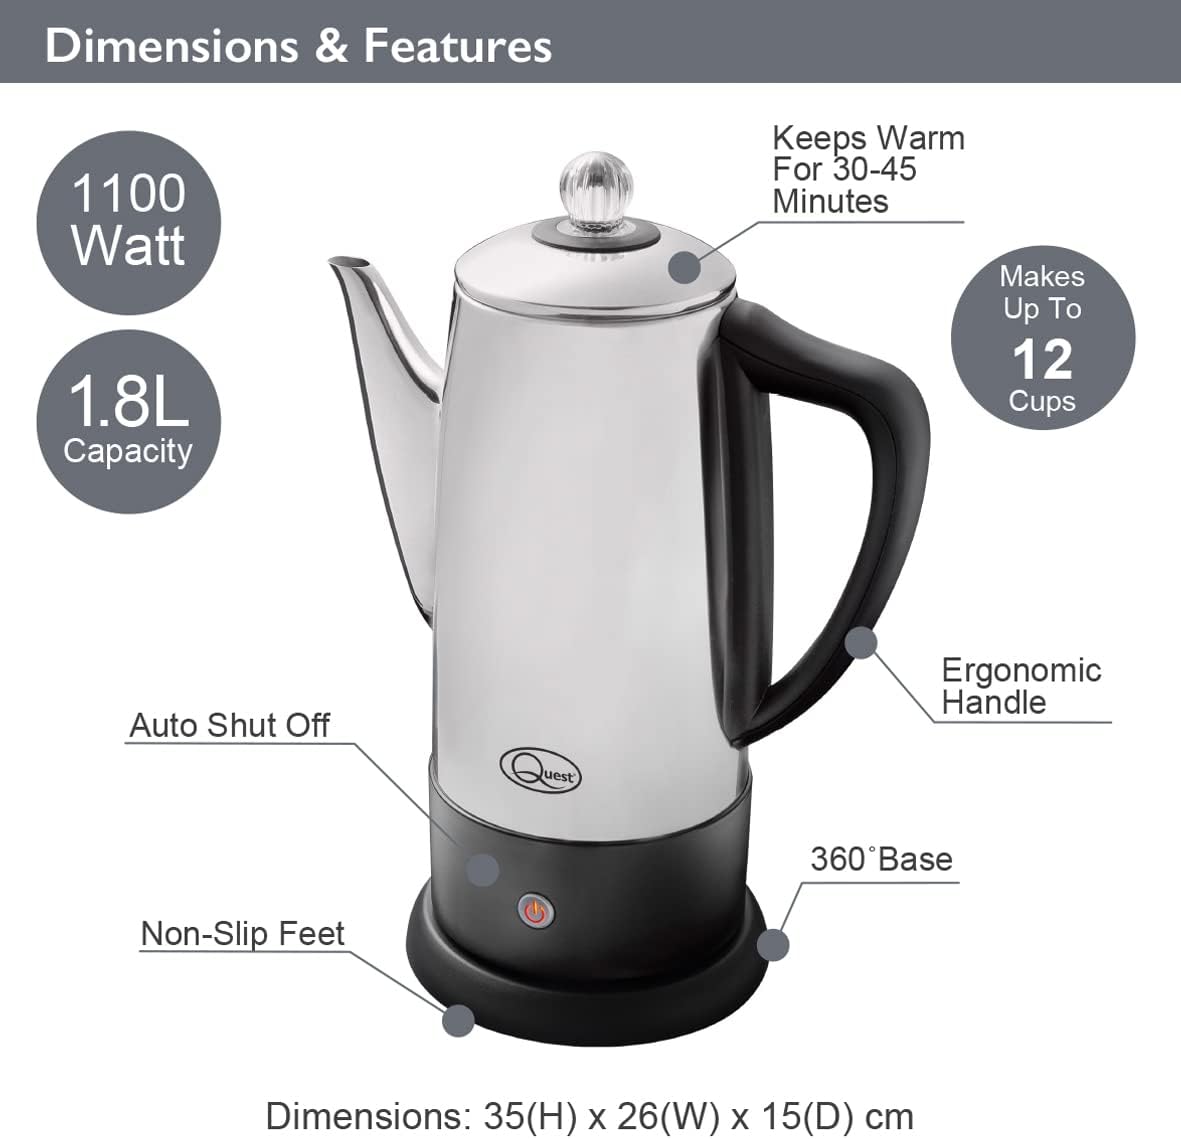
Image: Diagram illustrating the Quest 35200 percolator with callouts for its features: 1100 Watt power, 1.8L capacity (note: product title states 1.5L, using 1.8L from image), auto shut-off, non-slip feet, 360° base, ergonomic handle, keeps warm for 30-45 minutes, and makes up to 12 cups. Dimensions are 35(H) x 26(W) x 15(D) cm.

Image: A collage of four close-up views of the percolator: the interior with water level markings up to 12 cups, the removable filter basket filled with ground coffee, the illuminated power indicator light on the base, and the transparent lid knob.
Setup
- Unpack: Carefully remove all packaging materials and inspect the percolator for any damage.
- Initial Cleaning: Before first use, wash the interior of the percolator, the filter basket, and the stem in warm, soapy water. Rinse thoroughly and dry. Wipe the exterior with a damp cloth.
- Placement: Place the percolator base on a stable, flat, heat-resistant surface, away from the edge of the counter.
- Power Connection: Ensure the power cord is easily accessible and not obstructed.
Operating Instructions
Follow these steps to brew coffee with your Quest 35200 percolator:
- Add Water: Fill the percolator with cold, fresh water to your desired level, observing the internal markings. Do not exceed the maximum fill line.
- Insert Stem and Basket: Place the percolator stem into the center well of the percolator. Then, place the filter basket onto the stem.
- Add Coffee Grounds: Add your preferred amount of coarse-ground coffee into the filter basket. Do not use fine-ground coffee as it may seep through the filter.
- Secure Lid: Place the lid firmly on the percolator.
- Connect Power: Place the percolator onto its 360° detachable power base. Plug the power cord into a suitable electrical outlet.
- Start Brewing: Press the power button on the base. The indicator light will illuminate, signifying that brewing has begun.
- Percolation Cycle: The water will heat and begin to percolate through the coffee grounds. The brewing process typically takes several minutes, depending on the amount of water.
- Keep Warm: Once the brewing cycle is complete, the percolator will automatically switch to a keep-warm mode, indicated by the power light changing color or remaining illuminated. This function keeps coffee warm for approximately 30-45 minutes.
- Serve: Carefully remove the percolator from its base and pour coffee into cups. Be cautious of hot surfaces and steam.
- Disconnect: After serving, unplug the percolator from the wall outlet.

Image: A visual guide showing four steps for using the percolator: 1. Adding cold water to the pot. 2. Adding ground coffee to the filter basket. 3. Pressing the power switch on the base. 4. Pouring the brewed coffee into a cup.

Image: A diagram highlighting the percolator's keep warm functionality, stating it keeps coffee warm for up to 45 minutes, has a 1.8L capacity, and makes up to 12 cups.

Image: A close-up view of the percolator's 360° detachable base, showing the central electrical connector.
Maintenance and Cleaning
Regular cleaning ensures optimal performance and longevity of your percolator.
- Always Unplug: Before cleaning, ensure the percolator is unplugged from the power outlet and has cooled down completely.
- Disassemble: Remove the lid, filter basket, and stem.
- Wash Components: Wash the lid, filter basket, and stem in warm, soapy water. Rinse thoroughly and dry.
- Clean Interior: Wash the interior of the percolator with warm, soapy water and a soft sponge or brush. Rinse thoroughly to remove all soap residue.
- Clean Exterior: Wipe the exterior of the percolator with a damp cloth. Do not use abrasive cleaners or scouring pads, as these can damage the stainless steel finish.
- Base Cleaning: Wipe the power base with a damp cloth. Never immerse the power base in water or any other liquid.
- Drying: Ensure all parts are completely dry before reassembling or storing the percolator.
- Descaling: Over time, mineral deposits may build up. To descale, fill the percolator with a mixture of equal parts water and white vinegar. Bring to a boil and let it sit for an hour before emptying and rinsing thoroughly. Repeat if necessary.
- Dishwasher Safety: The percolator is NOT dishwasher safe. Hand wash all components.
Troubleshooting
If you encounter issues with your percolator, refer to the following common problems and solutions:
| Problem | Possible Cause | Solution |
|---|---|---|
| Percolator does not turn on. | Not plugged in; power button not pressed; no power at outlet. | Ensure unit is plugged in and power button is pressed. Check outlet with another appliance. |
| Coffee is too weak. | Not enough coffee grounds; coffee grounds too coarse; water level too high. | Increase coffee grounds. Use medium-coarse grounds. Reduce water level. |
| Coffee is too strong. | Too many coffee grounds; coffee grounds too fine; water level too low. | Reduce coffee grounds. Use coarser grounds. Increase water level. |
| Coffee grounds in brewed coffee. | Coffee grounds too fine; filter basket not seated correctly. | Use coarser grounds. Ensure filter basket is properly seated on the stem. |
| Percolator leaks. | Overfilled; lid not seated correctly. | Do not fill above the maximum line. Ensure lid is firmly and correctly placed. |
If the problem persists after attempting these solutions, please contact customer support.
Specifications
| Feature | Detail |
|---|---|
| Model Number | 35200 |
| Brand | QUEST |
| Color | Silver |
| Capacity | 1.5 Liters (approx. 12 cups) |
| Power | 1100W |
| Voltage | 240V |
| Special Feature | Cordless, Built-in Filter, Keep Warm Function |
| Dimensions (L x W x H) | 13.19 x 9.25 x 6.1 inches (33.5 x 23.5 x 15.5 cm) |
| Item Weight | 2.2 pounds (1 kg) |
| Dishwasher Safe | No |
Warranty and Support
For warranty information and customer support, please refer to the documentation provided at the time of purchase or contact your retailer. Keep your proof of purchase for any warranty claims.


