1. Introduction
This manual provides comprehensive instructions for the installation, operation, maintenance, and troubleshooting of the NUUO NVRmini2 NE-4160 Network Video Recorder. The NE-4160 is a 16-channel NVR designed for robust surveillance systems, featuring 4 drive bays and a 4TB storage capacity, compatible with various IP cameras.
Please read this manual thoroughly before operating the device to ensure proper setup and optimal performance.
2. Safety Precautions
- Ensure the device is placed on a stable, level surface to prevent accidental falls.
- Do not expose the NVR to water or excessive humidity.
- Use only the power adapter supplied with the device.
- Avoid blocking ventilation openings to prevent overheating.
- Disconnect power before performing any maintenance or installation procedures.
- Refer all servicing to qualified service personnel.
3. Package Contents
Verify that all items are present in the package:
- NUUO NVRmini2 NE-4160 Unit
- Power Adapter
- Ethernet Cable
- Quick Installation Guide
- Software CD (if applicable)
- Screws for HDD installation
4. Product Overview
The NUUO NVRmini2 NE-4160 is a robust network video recorder designed for professional surveillance applications. It supports up to 16 IP camera channels and features four hot-swappable drive bays for extensive storage, pre-installed with 4TB capacity.
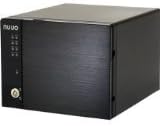
Figure 4.1: Front view of the NUUO NVRmini2 NE-4160 NVR unit. This image shows the compact black chassis with the NUUO logo on the left side, status indicator lights, and a lockable front panel for drive bay access.
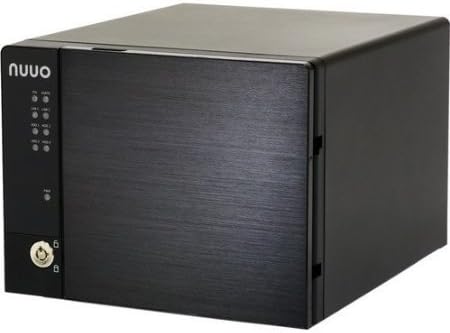
Figure 4.2: Angled view of the NUUO NVRmini2 NE-4160 NVR unit. This perspective highlights the sleek design and the textured finish of the front panel, providing a better sense of the unit's dimensions.
Front Panel Indicators:
- Power LED: Indicates power status.
- HDD LEDs: Indicate hard drive activity for each bay.
- Network LED: Indicates network connectivity.
- Alarm LED: Indicates system alarms or errors.
5. Setup and Installation
5.1 Hardware Installation
- Unpacking: Carefully remove the NVR from its packaging.
- Hard Drive Installation (if not pre-installed):
- Unlock the front panel and open the drive bay door.
- Slide the hard drive trays out.
- Secure 3.5-inch SATA hard drives into the trays using the provided screws.
- Slide the trays back into the bays until they click into place.
- Close and lock the front panel.
- Network Connection: Connect one end of the Ethernet cable to the NVR's LAN port and the other end to your network router or switch.
- Power Connection: Connect the power adapter to the NVR's power input and then plug it into a power outlet. The NVR will power on automatically.
5.2 Initial Software Configuration
Upon first boot, the NVR will acquire an IP address via DHCP (if available). You can access the NVR's web interface using its IP address or by using the NUUO Finder utility.
- Discovering the NVR:
- Install the NUUO Finder utility from the provided CD or NUUO website on a computer connected to the same network.
- Run NUUO Finder to scan for the NVRmini2 NE-4160 on your network.
- Note down the NVR's IP address.
- Accessing Web Interface:
- Open a web browser (e.g., Chrome, Firefox) and enter the NVR's IP address in the address bar.
- Log in using the default username (e.g., "admin") and password (e.g., "admin"). It is highly recommended to change the default password immediately after the first login.
- System Initialization: Follow the on-screen wizard for initial setup, which typically includes:
- Setting Date and Time
- Network Settings (Static IP configuration, if desired)
- Hard Drive Formatting (if required)
- Adding IP Cameras
6. Operating the NVR
6.1 Live View
The Live View interface allows you to monitor all connected cameras in real-time. You can customize the layout, view multiple cameras simultaneously, and access various controls.
- Layout Selection: Choose from various grid layouts (e.g., 1x1, 2x2, 3x3, 4x4) to display cameras.
- PTZ Control: If your cameras support Pan/Tilt/Zoom, use the on-screen controls to adjust camera angles and zoom levels.
- Instant Playback: Quickly review recent recordings from the live view.
6.2 Recording Management
The NVRmini2 NE-4160 supports various recording modes:
- Continuous Recording: Records 24/7.
- Motion Detection Recording: Records only when motion is detected by the camera.
- Schedule Recording: Records based on a predefined schedule.
- Alarm Recording: Records when an external alarm input is triggered.
Configure recording settings for each camera in the "Recording" section of the web interface.
6.3 Playback and Export
To review recorded footage:
- Navigate to the "Playback" section.
- Select the desired camera(s) and date/time range.
- Use the timeline to navigate through recordings.
- To export footage, select the desired segment and choose the export format (e.g., AVI, MP4).
7. Maintenance
7.1 Regular Checks
- System Status: Periodically check the NVR's system status via the web interface to ensure all components are functioning correctly.
- Hard Drive Health: Monitor hard drive health and capacity. Replace drives showing signs of failure promptly.
- Firmware Updates: Check the NUUO website regularly for firmware updates. Applying updates can improve performance, add features, and fix bugs.
- Physical Cleaning: Keep the NVR unit clean and free of dust. Use a soft, dry cloth. Do not use liquid cleaners.
7.2 Data Backup
While the NVR records continuously, it is advisable to back up critical footage regularly to external storage or a network location.
8. Troubleshooting
| Problem | Possible Cause | Solution |
|---|---|---|
| NVR not powering on | No power, faulty power adapter | Check power cable connection; try a different power outlet; test power adapter. |
| Cannot access web interface | Incorrect IP address, network issue, firewall | Verify NVR's IP address using NUUO Finder; check network cable; temporarily disable firewall on PC. |
| No video from cameras | Camera not connected, incorrect camera settings, network issue | Ensure cameras are powered and connected; verify camera IP addresses and credentials in NVR settings; check network connectivity. |
| Hard drive not detected | Improper installation, faulty drive, incorrect format | Re-seat the hard drive; try a different drive bay; ensure drive is compatible and formatted correctly. |
If the problem persists after attempting the above solutions, please contact NUUO technical support.
9. Specifications
| Feature | Detail |
|---|---|
| Model Number | NE-4160-US |
| Brand | NUUO |
| Channels Supported | 16 |
| Drive Bays | 4 |
| Pre-installed Storage | 4 TB (4000 GB) |
| Connectivity | Ethernet |
| Compatible Devices | IP Cameras |
| First Available Date | 9 Dec. 2013 |
10. Warranty Information
NUUO products typically come with a limited manufacturer's warranty. Please refer to the warranty card included with your product or visit the official NUUO website for detailed warranty terms and conditions specific to the NE-4160-US model. Keep your proof of purchase for warranty claims.
11. Technical Support
For technical assistance, software updates, or further inquiries, please contact NUUO technical support through their official channels:
- Website: Visit the official NUUO website for support resources, FAQs, and downloads.
- Email: Refer to the NUUO website for regional support email addresses.
- Phone: Refer to the NUUO website for regional support phone numbers.
When contacting support, please have your product model number (NE-4160-US) and serial number ready.