
Introduction
This manual provides detailed instructions for the proper use, maintenance, and troubleshooting of your Viper 5806V 2-Way Security System. This system is designed to enhance the security of your vehicle and offer convenient remote start capabilities. Please read this manual thoroughly before operating the system to ensure optimal performance and safety.

This image displays the Viper 5806V 2-Way Security System, featuring two black remote controls with multiple buttons and an orange LED indicator. The product box, yellow and black, is visible in the background, highlighting the model number and key features.
Key Features
- 2-Way Keyless Entry Car Alarm: Provides real-time feedback from your vehicle to the remote control.
- Remote Start System: Allows you to start your vehicle remotely.
- Security Monitoring: Detects unauthorized entry and impacts.
- Auxiliary Outputs: Customizable functions for additional vehicle accessories.
System Components
The Viper 5806V system typically includes the following main components:
- Main Control Unit: The central processing unit of the security system.
- Two-Way Remote Controls: Handheld devices for controlling and receiving feedback from the system.
- Siren: Emits audible alerts during alarm events.
- Wiring Harnesses: Connects the system components to the vehicle's electrical system.
- Shock Sensor: Detects impacts to the vehicle.
- Valet Switch: Used for system programming and overriding the alarm.

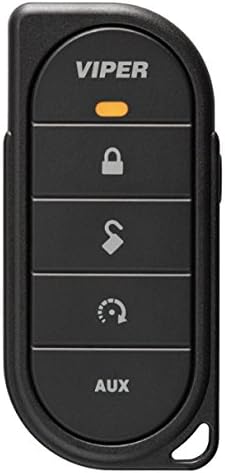
A close-up view of the Viper 2-Way remote control, showing its five buttons for lock, unlock, remote start, and auxiliary functions, along with an orange LED indicator.

This image shows the Viper 2-Way remote control from a different angle, highlighting its ergonomic design and the metal keychain attachment ring. The buttons for system control are clearly visible.
Setup and Installation
Installation of the Viper 5806V security system is complex and requires specialized knowledge of vehicle electrical systems. It is strongly recommended that this system be installed by a certified professional installer. Improper installation can lead to vehicle damage, system malfunction, or safety hazards.
The system includes various wiring harnesses and modules that must be correctly integrated with your vehicle's specific make and model. Consult the detailed wiring diagrams and installation guides provided with the product for professional reference.
An open product box revealing the internal components of the Viper security system. Visible items include the 'Directed Electronics' instruction manual, various wiring harnesses, and a warning label, indicating parts for installation.

A detailed view of the installed wiring for the Viper security system within a vehicle's footwell, showing connections to the brake pedal and other components. This illustrates the complexity of the installation process.
Operating Your System
Remote Control Functions
Your 2-way remote control provides visual and audible confirmation of commands and vehicle status.
- Lock Button (Closed Padlock Icon): Press to arm the security system and lock the vehicle doors. The remote will confirm with a chirp and visual feedback.
- Unlock Button (Open Padlock Icon): Press to disarm the security system and unlock the vehicle doors. The remote will confirm with two chirps and visual feedback.
- Remote Start Button (Curved Arrow Icon): Press and hold for approximately 3 seconds to remotely start your vehicle. The remote will confirm the engine start.
- Auxiliary Button (AUX): This button can be programmed for various functions, such as trunk release or controlling other accessories. Refer to your installer for specific programming.
Arming the Security System
- Ensure all doors, hood, and trunk are closed.
- Press the Lock button on your remote control.
- The vehicle lights will flash once, and the siren will chirp once, indicating the system is armed. The remote will provide confirmation.
Disarming the Security System
- Press the Unlock button on your remote control.
- The vehicle lights will flash twice, and the siren will chirp twice, indicating the system is disarmed. The remote will provide confirmation.
Remote Starting Your Vehicle
- Ensure the vehicle is in park (automatic transmission) or properly prepared for remote start (manual transmission, if configured).
- Press and hold the Remote Start button on your remote control for approximately 3 seconds.
- The vehicle's engine will start, and the parking lights will turn on. The remote will confirm the engine status.
- To turn off the engine remotely, press and hold the Remote Start button again for 3 seconds.
Maintenance
Remote Battery Replacement
When the remote control's battery is low, the remote may indicate this with a specific icon or reduced range. To replace the battery:
- Carefully open the remote control casing.
- Note the type and orientation of the existing battery (e.g., CR2032 coin cell).
- Remove the old battery and insert a new one, ensuring correct polarity.
- Close the remote control casing securely.
System Care
- Keep remote controls away from extreme temperatures and moisture.
- Avoid dropping the remote control.
- Do not attempt to modify or repair the system components yourself. Contact a professional installer for service.
Troubleshooting
| Problem | Possible Cause | Solution |
|---|---|---|
| Remote control not responding. | Low or dead remote battery. Out of range. System in Valet Mode. | Replace remote battery. Move closer to the vehicle. Exit Valet Mode (refer to installer). |
| Vehicle does not remote start. | Hood open. Vehicle not in Park. Low fuel. System error. | Ensure hood is closed. Confirm vehicle is in Park. Check fuel level. Consult installer for diagnostics. |
| Alarm triggers unexpectedly. | Sensitive shock sensor. Faulty door/hood pin switch. | Adjust shock sensor sensitivity (professional adjustment recommended). Inspect and repair pin switches. |
| No confirmation from remote. | Out of range. Remote battery low. Interference. | Move closer to vehicle. Replace remote battery. Move away from sources of radio interference. |
For persistent issues or complex problems, contact your authorized Viper dealer or a professional installer for assistance.
Technical Specifications
- Model Number: 5806V
- Product Dimensions: 7 x 7 x 6 inches
- Item Weight: 2.7 pounds
- Maximum Range: Up to 1 Mile (approximate, varies with environment)
- Compatible Devices: Cars
- Remote Control Included: Yes (2-Way)
- Manufacturer: Viper
- Date First Available: February 12, 2014
Warranty and Support
Your Viper 5806V Security System is covered by a manufacturer's warranty. For specific warranty terms, conditions, and duration, please refer to the warranty card included with your product or contact your authorized Viper dealer. For technical support, service, or to locate a certified installer, please visit the official Viper website or contact their customer service department.
Note: Any unauthorized modification or improper installation may void the product warranty.


