1. Introduction and Safety Information
This manual provides essential information for the safe and effective operation of your Hantek DSO5202P Digital Oscilloscope. Please read it thoroughly before use and retain it for future reference.
1.1 Safety Precautions
- Power Supply: Ensure the oscilloscope is connected to a power source with the correct voltage and frequency as specified on the device. Use only the provided power cord or an approved replacement.
- Grounding: The oscilloscope must be properly grounded to prevent electric shock. Do not defeat the grounding feature of the power plug.
- Environment: Operate the device in a well-ventilated area, away from excessive dust, moisture, direct sunlight, or extreme temperatures.
- Probes: Use only probes designed for this oscilloscope. Ensure probes are properly connected and rated for the voltage being measured.
- Servicing: Do not attempt to service the oscilloscope yourself. Refer all servicing to qualified personnel.
2. Product Overview
The Hantek DSO5202P is a 200 MHz, 2-channel digital storage oscilloscope designed for accurate and reliable waveform analysis. It features a large 7.0-inch color display and a 1GSa/s real-time sample rate, making it suitable for various electronic testing and measurement applications.
2.1 Key Features
- 200MHz Bandwidth
- 1GSa/s Real-time Sample Rate
- Large 7.0-inch Color Display (WVGA 800x480)
- Record Length up to 40K
- Multiple Trigger Modes: Edge, Pulse Width, Line Selectable Video, Slope, Overtime
- USB Host and Device Connectivity
- Multiple Automatic Measurements
- Four Math Functions, including FFT

Front view of the Hantek DSO5202P Digital Oscilloscope displaying a waveform and key features like 200MHz bandwidth and 1GSa/s real-time sampling rate.

Angled view of the Hantek DSO5202P Digital Oscilloscope, highlighting its compact design and the 7-inch color display showing a square wave.
3. Package Contents
Upon unpacking your Hantek DSO5202P Digital Oscilloscope, verify that all items listed below are present and in good condition. If any items are missing or damaged, please contact your vendor.
- Hantek DSO5202P Digital Oscilloscope Unit
- Two (2) Oscilloscope Probes
- Power Cord (may vary by region, US plug shown)
- USB Cable
- Software CD
- User Manual / Documentation
- Probe Adjustment Tool (non-metallic screwdriver)
- Color Rings for Probes
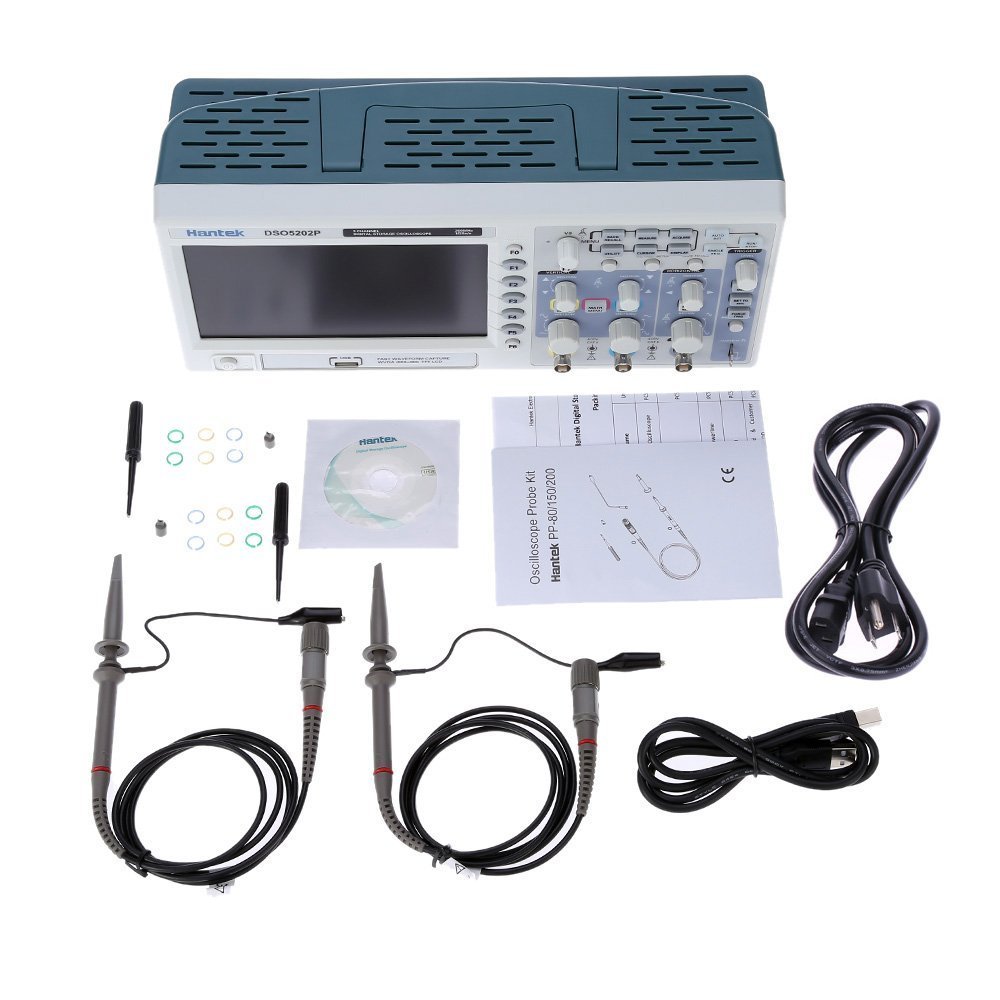
Hantek DSO5202P Digital Oscilloscope and included accessories, laid out on a white surface. Accessories include two probes, power cord, USB cable, software CD, and documentation.
Video: Unboxing the Hantek DSO5202P Digital Oscilloscope, demonstrating the contents of the package and initial presentation of the device.
4. Setup
4.1 Power Connection
- Connect the provided power cord to the AC input on the rear panel of the oscilloscope.
- Plug the other end of the power cord into a grounded AC power outlet.
- Press the power button on the front panel to turn on the oscilloscope.

Hantek DSO5202P Digital Oscilloscope shown with both EU and US power plugs, indicating power cord compatibility options.
4.2 Probe Connection and Compensation
- Connect the oscilloscope probes to the CH1 and CH2 input BNC connectors on the front panel.
- Attach the probe ground clip to the oscilloscope's ground terminal.
- Connect the probe tip to the probe compensation output (usually a square wave signal on the front panel).
- Adjust the compensation screw on the probe until a flat-top square wave is displayed on the screen. This ensures accurate measurements.
4.3 USB Connection (Optional)
To connect the oscilloscope to a PC for real-time analysis or data transfer:
- Install the PC software from the provided CD or Hantek's official website.
- Connect the oscilloscope to your PC using the supplied USB cable.
- Follow the software instructions for driver installation and connection.
5. Operating Instructions
This section covers the basic operation of the Hantek DSO5202P, including control functions and measurement capabilities.
5.1 Front Panel Controls
The front panel is organized into several functional areas:
- Vertical Controls: Adjust voltage per division (Volts/Div) and vertical position for each channel (CH1, CH2).
- Horizontal Controls: Adjust time per division (Sec/Div) and horizontal position.
- Trigger Controls: Set trigger level, mode (Edge, Pulse, Video, Slope, Overtime), and source (CH1, CH2, EXT, AC Line).
- Function Buttons (F1-F6): Context-sensitive buttons for menu navigation and specific functions.
- Menu Buttons: Access various settings for vertical, horizontal, trigger, display, and measurement functions.
- Utility Button: Access system settings and save/recall functions.

Close-up of the Hantek DSO5202P Digital Oscilloscope screen showing a complex waveform with multiple channels and measurement readouts, alongside control knobs and buttons.
5.2 Basic Measurements
- Automatic Measurements: Press the 'MEASURE' button to display a menu of automatic measurements such as Frequency, Period, Mean, Peak-to-Peak, RMS, Min, Max, Rise Time, Fall Time, Pulse Width, Duty Cycle, and more.
- Cursor Measurements: Use the 'CURSOR' button to activate voltage (ΔV) and time (ΔT) cursors. Rotate the multi-function knob to position the cursors and read the difference values.
5.3 Math Functions
The oscilloscope includes several math functions to analyze waveforms:
- Addition (+), Subtraction (-), Multiplication (x), Division (÷) between channels.
- FFT (Fast Fourier Transform): Converts a time-domain signal into its frequency components, useful for spectral analysis. Access via the 'MATH MENU' button.

Multiple screenshots from the Hantek DSO5202P Digital Oscilloscope demonstrating various waveform displays, including FFT analysis and multi-channel measurements.
5.4 Saving and Recalling Waveforms
The oscilloscope supports saving screen captures and waveform data to a USB flash drive. Insert a USB stick into the front panel USB host port and use the 'SAVE/RECALL' menu to manage data.
6. Maintenance
6.1 Cleaning
To clean the oscilloscope, use a soft cloth dampened with a mild detergent solution. Do not use abrasive cleaners or solvents that could damage the casing or screen. Ensure the device is powered off and unplugged before cleaning.
6.2 Probe Calibration
Regularly check and compensate your probes as described in Section 4.2 to maintain measurement accuracy.
6.3 Firmware Updates
Periodically check the Hantek official website for available firmware updates. Updating the firmware can improve performance, add features, and resolve known issues. Follow the instructions provided with the firmware update package carefully.
7. Troubleshooting
This section addresses common issues you might encounter with your Hantek DSO5202P. If the problem persists, contact Hantek customer support.
- No Display/Power: Ensure the power cord is securely connected and the power outlet is functional. Check the power button.
- No Waveform Display: Verify probes are correctly connected to the input channels and the signal source. Check trigger settings and vertical/horizontal scales.
- Unstable Waveform: Adjust the trigger level and trigger mode. Ensure the signal is within the oscilloscope's bandwidth and voltage range.
- Controls Unresponsive: Try restarting the oscilloscope. If the issue persists, a firmware update might be necessary.
- Saved Waveforms Appear Flat or Incorrect: Ensure the USB drive is functioning correctly. Consider updating the firmware as this can sometimes resolve data saving issues.
- PC Software Connection Issues: Verify USB cable connection and driver installation. Ensure the PC software is compatible with your operating system.
8. Specifications
Detailed technical specifications for the Hantek DSO5202P Digital Oscilloscope:
| Feature | Specification |
|---|---|
| Model | DSO5202P |
| Bandwidth | 200MHz |
| Channels | 2 |
| Real-time Sample Rate | 1GSa/s |
| Equivalent Sample Rate | 25GSa/s |
| Memory Depth | 40K |
| Rise Time | 1.7ns |
| Time Base Accuracy | ±50ppm |
| Time Base Range | 2ns/div - 40s/Div |
| Input Impedance | 1MΩ |
| Volts/Div Range | 2mV/div - 5V/Div |
| A/D Converter | 8 bit |
| DC Gain Accuracy | ±3% (5V/Div to 10mV/Div), ±4% (5mV/Div to 2mV/Div) |
| Bandwidth Limit | 20MHz |
| Trigger Types | Edge, Video, Pulse, Slope, Over Time, Alternative |
| Trigger Source | CH1, CH2, EXT, EXT/5, AC Line |
| Math Functions | +, -, x, ÷, FFT |
| Cursor Measurement | ΔV, ΔT, 1/ΔT |
| Auto Measurement | Frequency, Period, Mean, Pk-Pk, Cyclic RMS, Min, Max, Rise Time, Fall Time, +Pulse Width, -Pulse Width, Delay, +Duty, -Duty, Base, Vtop, Vmid, Vamp, Overshoot, Preshoot, Pre I OD Mean, Pre I OD RMS, Fovshoot, Rpreshoot, Bwidth, Frf |
| Display | 7-inch TFT 16K Color LCD, 800x480 dots |
| Product Dimensions | 12.32 x 4.25 x 5.59 inches |
| Weight | 4.59 Pounds |
9. Warranty and Support
Hantek products are designed for reliability and performance. For warranty information, technical support, or service inquiries, please refer to the documentation included with your product or visit the official Hantek website. Keep your purchase receipt as proof of purchase for warranty claims.


