Introduction
This manual provides essential instructions for the safe and efficient operation, maintenance, and care of your Vintage Chrome Sunbeam Mixmaster 12-speed stand mixer. Please read all instructions carefully before using the appliance to ensure proper function and longevity.
Safety Precautions
- Always unplug the mixer from the electrical outlet before cleaning, assembling, or disassembling parts.
- Do not immerse the motor base in water or other liquids.
- Keep hands, hair, clothing, and utensils away from moving parts during operation to prevent injury.
- Supervise children closely when the appliance is in use.
- Do not operate the mixer with a damaged cord or plug, or after the appliance malfunctions or has been dropped or damaged in any manner.
- Use only attachments recommended or sold by the manufacturer.
Setup and Assembly
1. Unpacking
Carefully remove all components from the packaging. Retain packaging materials for future storage or transport if needed. Verify all parts are present: mixer head, base, two stainless steel mixing bowls, and two beaters.
2. Component Identification

Image 1: The Sunbeam Mixmaster 12-speed stand mixer, showcasing its chrome finish, motor head, base, and a single stainless steel mixing bowl with beaters inserted.
- Mixer Head: Contains the motor and beater shafts.
- Speed Control Knob: Located on the side of the mixer head, used to select desired speed.
- Beater Ejector Button: Releases the beaters.
- Mixer Base: Provides stability and holds the mixing bowls.
- Stainless Steel Mixing Bowls: Two sizes provided for various mixing needs.
- Beaters: Two standard beaters for general mixing tasks.
3. Assembly
- Place the mixer base on a stable, flat, and dry surface.
- Select the appropriate size stainless steel mixing bowl for your recipe and place it securely onto the turntable on the mixer base.
- Insert the beaters into the openings on the underside of the mixer head. Push firmly until they click into place. Ensure they are fully seated.
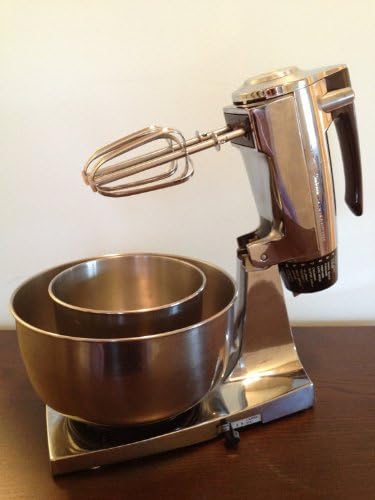
Image 2: The Sunbeam Mixmaster 12-speed stand mixer, shown with both stainless steel mixing bowls nested on the base, and the beaters securely attached to the mixer head.
Operating Instructions
- Prepare Ingredients: Add your ingredients to the mixing bowl.
- Position Mixer Head: Ensure the mixer head is lowered and locked into position over the bowl.
- Connect Power: Plug the mixer into a standard electrical outlet.
- Select Speed: Turn the speed control knob to the desired setting. The Sunbeam Mixmaster features 12 distinct speeds, allowing for precise control from gentle stirring to high-speed whipping. Start at a lower speed and gradually increase as needed to prevent splashing.
- Mixing: Allow the mixer to operate until ingredients are thoroughly combined or reach the desired consistency. The turntable on the base will rotate the bowl automatically, ensuring even mixing.
- Stop Operation: Turn the speed control knob to the "OFF" position.
- Eject Beaters: Unplug the mixer. Press the beater ejector button to release the beaters.
Recommended Speed Settings:
- Speeds 1-3: Stirring, combining dry ingredients, mashing potatoes.
- Speeds 4-6: Mixing batters, creaming butter and sugar.
- Speeds 7-9: Whipping cream, egg whites, light batters.
- Speeds 10-12: Heavy whipping, kneading dough (if applicable with specific attachments, though standard beaters are for general mixing).
Maintenance and Care
1. Cleaning
- Always unplug the mixer before cleaning.
- Beaters and Bowls: The stainless steel mixing bowls and beaters are dishwasher safe. Alternatively, wash them in warm, soapy water, rinse thoroughly, and dry immediately.
- Mixer Head and Base: Wipe the exterior surfaces of the mixer head and base with a damp cloth. For stubborn stains, use a mild detergent. Never immerse the mixer head or base in water or any other liquid.
- Ensure all parts are completely dry before storing or next use.
2. Storage
Store the mixer and its accessories in a clean, dry place. Ensure the power cord is neatly wrapped and not kinked.
Troubleshooting
| Problem | Possible Cause | Solution |
|---|---|---|
| Mixer does not turn on. | Not plugged in; power outlet not active; speed control knob not set. | Ensure the mixer is securely plugged into a working outlet. Check the speed control knob is set to a speed other than "OFF". |
| Beaters do not engage or spin. | Beaters not fully inserted. | Unplug the mixer and re-insert beaters firmly until they click into place. |
| Mixer makes unusual noise or vibrates excessively. | Overloaded; improper assembly; worn parts. | Reduce the amount of ingredients. Ensure beaters and bowl are correctly assembled. If the issue persists, discontinue use and seek professional service. |
Specifications
- Brand: Sunbeam
- Model Name: Mixmaster 12-speed
- Controls Type: Knob
- Special Feature: Manual operation
- Is Dishwasher Safe: Yes (for bowls and beaters)
- Item Weight: Approximately 14 pounds
- Color: Chrome/brown
Warranty and Support
As this is a vintage model, specific manufacturer warranty information may no longer be applicable or available. For support regarding vintage appliance repair or parts, it is recommended to consult with specialized vintage appliance service centers or refer to online communities dedicated to vintage Sunbeam appliances.
For general inquiries about Sunbeam products, you may visit the official Sunbeam website (external link) or contact their customer service if available for older models.


