
Outsunny 01-0151
Outsunny 6' Drop Arm Manual Retractable Window Awning
Model: 01-0151 | Brand: Outsunny
1. Introduction
This manual provides essential information for the safe and effective installation, operation, and maintenance of your Outsunny 6' Drop Arm Manual Retractable Window Awning. Please read all instructions carefully before beginning installation or use to ensure proper function and longevity of the product.

Figure 1.1: Outsunny 6' Drop Arm Manual Retractable Window Awning (Cream White)
The Outsunny 6' Drop Arm Manual Retractable Window Awning is designed to provide shade and reduce sun exposure for windows, patios, and balconies. Its manual operation ensures ease of use without requiring electrical power. The durable polyester fabric offers UV and water resistance, contributing to a cooler indoor environment and protecting interior furnishings from sun damage.
2. Safety Information
Important Safety Precautions:
- Proper Wall Anchoring: The wall where the awning is attached must be capable of holding at least 11.4 lbs. Use heavy-duty hardware for superior strength and ensure all anchors are securely fastened into a solid structure.
- Professional Installation: If you are unsure about the installation process or the structural integrity of your mounting surface, consult a qualified professional.
- Weather Conditions: Always retract the awning during strong winds, heavy rain, snow, or other severe weather conditions to prevent damage to the awning and potential injury.
- Clearance: Ensure there is adequate clearance around the awning's path of extension and retraction. Keep children and pets away from the awning during operation.
- Tools: Use appropriate tools for installation and wear safety glasses to protect your eyes.
- Maintenance: Regularly inspect the awning for any signs of wear, damage, or loose components. Address any issues promptly.
3. Product Components
Before beginning installation, verify that all components are present and undamaged. The main components of your awning include:
- Awning Housing with Fabric Roller
- Support Arms (Drop Arms)
- Wall Mounting Brackets
- Front Support Bar
- Manual Retraction Cord and Cord Keeper
- Installation Hardware (screws, anchors)

Figure 3.1: Key Awning Components
The awning features a solid aluminum roller for smooth operation and a durable 280g/m² polyester fabric with PU coating for enhanced UV and water resistance.
4. Setup and Installation
Installation requires careful measurement and secure mounting. It is recommended to have two people for certain steps.
4.1 Tools Required (Not Included)
- Drill
- Measuring Tape
- Level
- Pencil/Marker
- Screwdriver
- Safety Glasses
4.2 Mounting Bracket Installation
- Determine Mounting Location: Choose a sturdy wall surface above the window or area you wish to shade. Ensure the surface can support the awning's weight (minimum 11.4 lbs) and the forces applied during operation.
- Mark Bracket Positions: The distance between the center of the screw holes for the mounting brackets should be approximately 69 inches. Mark the precise locations for drilling pilot holes, ensuring they are level.
- Install Brackets: Drill pilot holes at the marked locations. Securely attach the wall mounting brackets using the provided hardware. For wood surfaces, consider using appropriate wood screws. For masonry or other surfaces, use suitable anchors.

Figure 4.1: Awning Installed on a House
4.3 Awning Housing Attachment
- Prepare Awning: Ensure the awning fabric is fully rolled up and secured with the provided strap or tie to prevent unrolling during attachment.
- Attach Awning to Brackets: With assistance, lift the awning housing and align it with the installed wall mounting brackets. Clip the top lip of the awning housing onto the brackets, then press the front of the unit until the bottom legs of the brackets snap into place.
4.4 Arm Installation and Adjustment
- Release Arms: Carefully remove the secure strap holding the arms. Allow the arms to hang down naturally.
- Check Arm Orientation: Verify that the arms are oriented correctly. The arm mounts should be in a position that allows them to be screwed into the wall when extended. If necessary, remove the nuts holding the arms to the awning housing and flip them around. Do not fully tighten these nuts yet.
- Position Lower Arm Brackets: Extend the awning partially to determine the optimal vertical position for the lower arm brackets on the wall. The arms should be at a right angle to the wall when the awning is fully extended but not yet slack. Position the arms at least two inches in from the edge of the fabric on both sides.
- Install Lower Arm Brackets: Mark and drill pilot holes for the lower arm brackets. Securely attach them to the wall.
- Tighten Arm Nuts: Once the lower arm brackets are installed, fully extend the awning and then tighten the nuts holding the top of the arms to the awning housing. This prevents the arms from sliding.
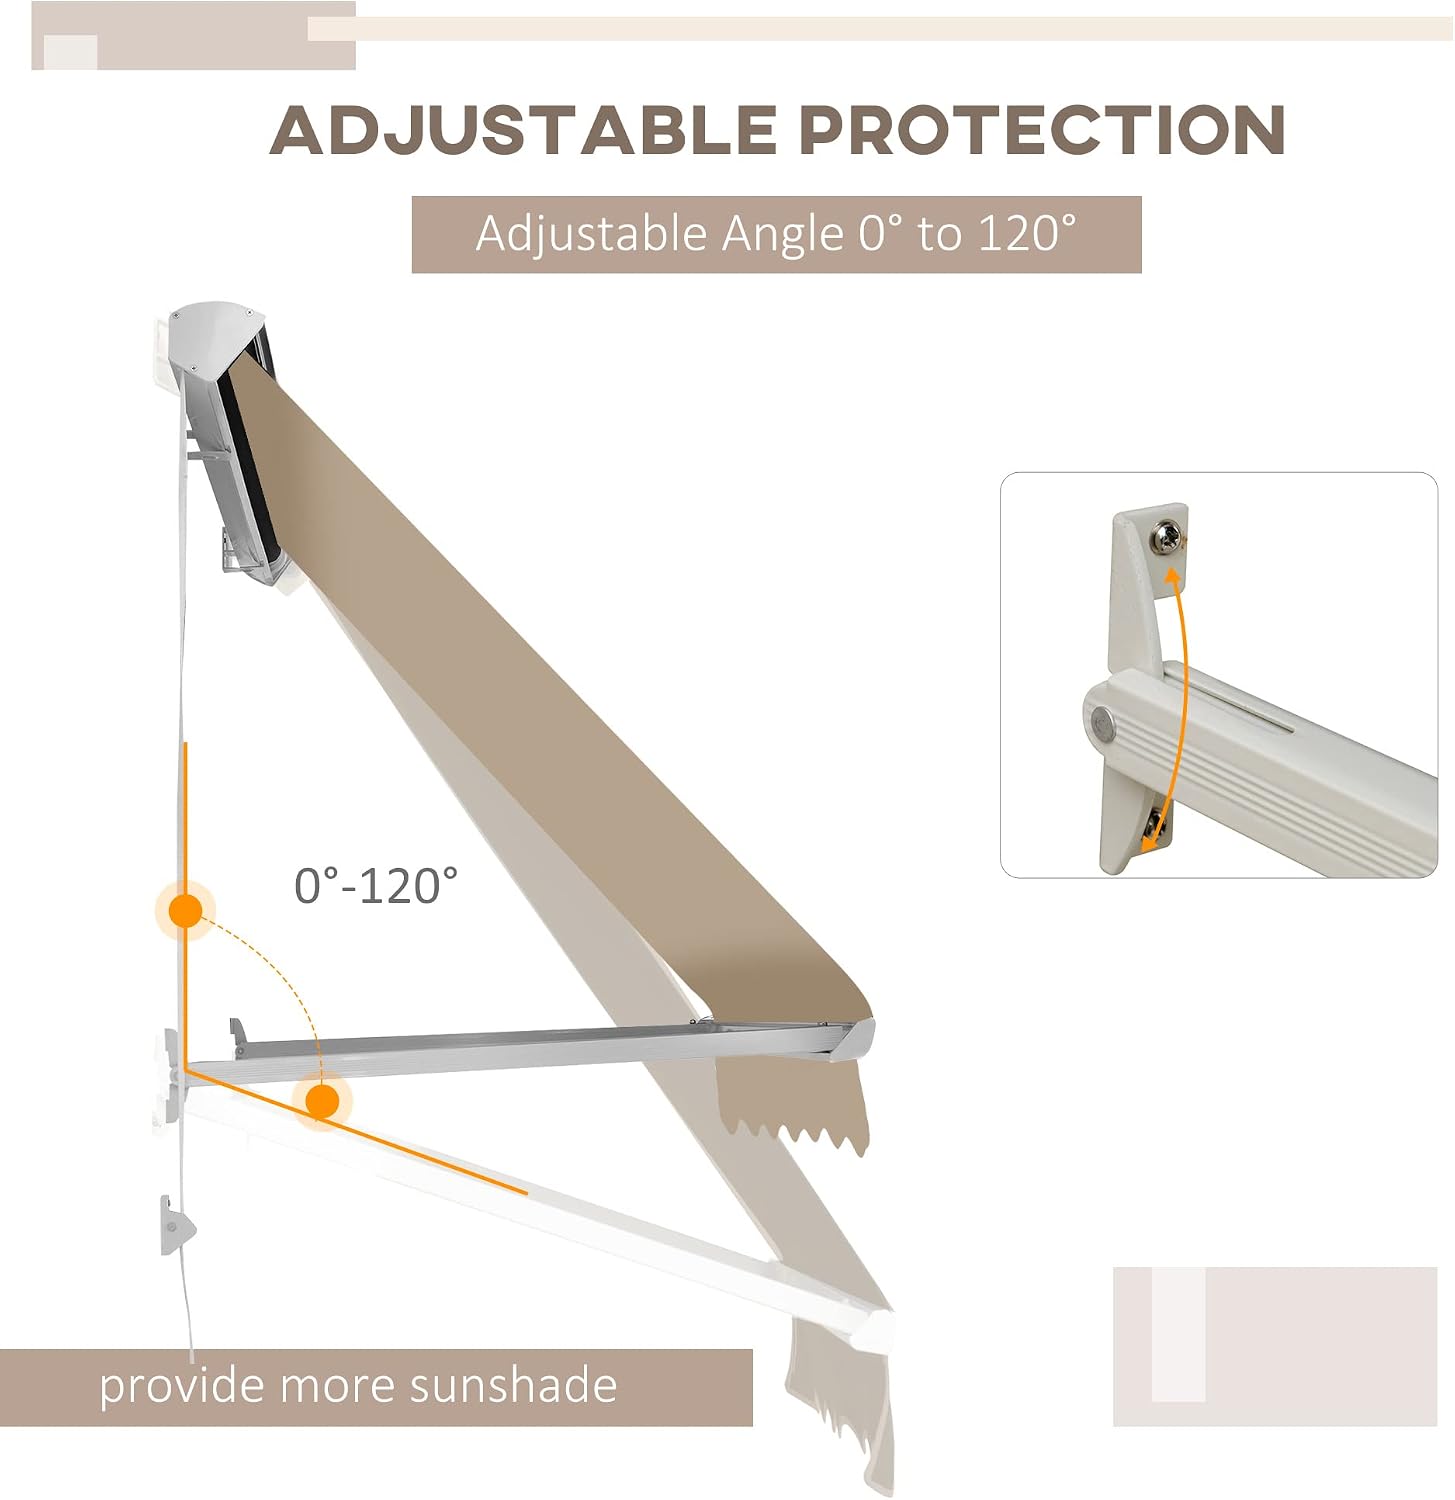
Figure 4.2: Adjustable Protection Angle (0-120 degrees)
4.5 Cord Keeper Installation
- Position Cord Keeper: Extend the awning fully. Find a suitable location on the wall for the cord keeper bracket where the cord hangs straight and is easily accessible. Ensure there is enough cord hanging below the keeper for easy grabbing.
- Install Cord Keeper: Secure the cord keeper bracket to the wall using the provided hardware. Ensure the cord is properly threaded through the keeper mechanism.
5. Operating Instructions
The Outsunny awning operates manually using a simple cord mechanism.
5.1 Extending the Awning
- To extend the awning, gently pull the cord downwards. The awning will smoothly unroll and the support arms will extend.
- Continue pulling until the awning reaches your desired extension or is fully extended.
5.2 Retracting the Awning
- To retract the awning, gently pull the cord upwards. The awning will smoothly roll back into its housing.
- Ensure the awning is fully retracted when not in use or during adverse weather conditions.

Figure 5.1: Manual Retraction Cord Mechanism
6. Maintenance
Regular maintenance will help prolong the life and appearance of your awning.
- Cleaning the Fabric: Clean the awning fabric periodically with mild soap and water. Use a soft brush or sponge to remove dirt and debris. Rinse thoroughly with clean water and allow the fabric to air dry completely before retracting. Do not use harsh chemicals or abrasive cleaners.
- Frame Inspection: Periodically check the aluminum frame and all fasteners for any signs of corrosion, damage, or looseness. Tighten any loose screws or bolts.
- Weather Protection: Always retract the awning during high winds, heavy rain, snow, or when not in use for extended periods. This prevents unnecessary stress and potential damage to the fabric and frame.
- Storage: If storing the awning for the off-season, ensure it is clean and completely dry to prevent mold or mildew growth.

Figure 6.1: Awning Fabric Material Properties
7. Troubleshooting
If you encounter issues with your awning, refer to the following common problems and solutions:
| Problem | Possible Cause | Solution |
|---|---|---|
| Awning does not extend/retract smoothly. | Cord tangled or obstructed; mechanism dirty; arms misaligned. | Check cord for tangles. Clean any debris from the roller and arm mechanisms. Verify arm alignment and tighten connections. |
| Awning arms appear to be backwards after unboxing. | Arms may be factory-mounted in reverse for shipping. | Remove nuts holding arms to housing, flip arms to correct orientation (so they can be screwed into the wall when extended), and re-tighten nuts. |
| Awning feels unstable after installation. | Improper wall anchoring; loose fasteners. | Ensure wall can support weight. Re-check all mounting screws and bolts for tightness. Use appropriate heavy-duty anchors for your wall type. |
| Fabric is sagging or uneven. | Arms not extended evenly; fabric stretched. | Ensure both arms are fully extended and locked into position. If fabric is stretched, it may be due to prolonged exposure to strong winds or improper retraction. |
8. Specifications
Detailed specifications for the Outsunny 6' Drop Arm Manual Retractable Window Awning:
| Feature | Specification |
|---|---|
| Model Number | 01-0151 |
| Color | Cream White |
| Material | 280g/m² Polyester fabric with PU coating (Canopy), Aluminum (Frame) |
| Overall Dimensions (Extended) | 71" L x 27.5" W x 86.5" H (approx.) |
| Projection Distance | 27.5 Inches |
| Angle Between Support Arm and Wall | 0-120° (Adjustable) |
| Rope Length | 7.2 ft |
| Roller Size | 1.75" diameter |
| Distance from wall with drop arm | 28" |
| Item Weight | 11.5 Pounds |
| Operation Mode | Manual |
| Assembly Required | Yes |

Figure 8.1: Awning Dimensions
9. Warranty and Support
For specific warranty information regarding your Outsunny 6' Drop Arm Manual Retractable Window Awning, please refer to the documentation included with your purchase or contact the retailer directly. Warranty terms and conditions may vary.
For additional support, product inquiries, or to explore other Outsunny products, please visit the official Outsunny store:
Related documents01-0151

Ask a question about this manual
Ask about setup, troubleshooting, compatibility, parts, safety, or missing instructions. Manuals+ will review the question and use this page’s manual context to help answer it.